Releases: PPUC/ZeDMD
v3.2.2
- fixed 128x16 ROMs
- less artifacts in ZeDMD HD
- debug mode now displays the original ROM dimensions and the current mode (press/hold the RGB button after a starting a table to turn on the debug mode)
v3.2.1
- Upgraded to miniz 3.0.2
- increased bit depth to 7 on ZeDMD HD
- increased rendering speed
v3.2.0
- Improved rendering (speed and smoothness of animations)
- Supports all modes https://github.com/freezy/dmd-extensions provides
v3.0.0
- faster data transmission
- debug mode
- compression
ZeDMD flash ESP32 v2.1
Here are the files to flash your ESP32 as a ZeDMD.
-
Uncompress the zip file into any directory
-
In the Device Manager (Winkey+R, type "devmgmt.msc"+Enter), look inside "Ports (COM and LPT)" and find the line starting with "Silicon Labs CP210x USB to UART Bridge (COMx)" or "USB-SERIAL CH340 (COMx)" (according the chip on your board). Keep in memory the value replacing the "x" in "COMx.
-
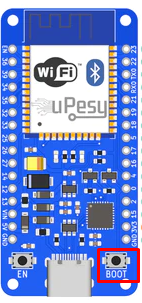
According to your DMD panel click on "flash ZeDMD 128x32.bat", "flash ZeDMD 256x64 (2x128x64 matrices).bat" or "flash ZeDMD 256x64 (4x64x64 matrices).bat" file. When prompted enter the number you find in the previous step (the "x") then press Enter. Caution: this is a common problem with the ESP32 that the upload never starts and this display shows that the connection is never done: https://i.servimg.com/u/f88/17/72/22/03/scree275.png
In this case, you just need to press and hold the "BOOT" button until the upload starts. When it is started, you may release it: https://i.servimg.com/u/f88/17/72/22/03/scree276.png -
Wait for the flash
v2.1
- The ESP32 is performing the calculations for up or downscaling the frames if the ROM dimensions are not the same as the panel dimensions. Huge speed improvement for ZeDMD HD with 128x32 ROM or less (most of the ROMs). You should now update your ZeDMD HD!
v2.0
- Huge improvements have been done by Markus Kalkbrenner for the serial transfers.
- Colour rotations have been added for the cRom file format
If you have a ZeDMD HD, stick to the previous release, we have still some changes to make.
v1.2
- No need to edit the .bat file anymore, just enter the value when prompted (Thanks MikePinball #4)
v1.1
ZeDMD flash ESP32 v2.0
Here are the files to flash your ESP32 as a ZeDMD.
- Uncompress the zip file into any directory
- In the Device Manager (Winkey+R, type "devmgmt.msc"+Enter), look inside "Ports (COM and LPT)" and find the line starting with "Silicon Labs CP210x USB to UART Bridge (COMx)" or "USB-SERIAL CH340 (COMx)" (according the chip on your board). Keep in memory the value replacing the "x" in "COMx.
- According to your DMD panel click on "flash ZeDMD 128x32.bat", "flash ZeDMD 256x64 (2x128x64 matrices).bat" or "flash ZeDMD 256x64 (4x64x64 matrices).bat" file. When prompted enter the number you find in the previous step (the "x") then press Enter.
- Wait for the flash
v2.0
- Huge improvements have been done by Markus Kalkbrenner for the serial transfers.
- Colour rotations have been added for the cRom file format
If you have a ZeDMD HD, stick to the previous release, we have still some changes to make.
v1.2
- No need to edit the .bat file anymore, just enter the value when prompted (Thanks MikePinball #4)
v1.1
ZeDMD flash ESP32 v1.2
Here are the files to flash your ESP32 as a ZeDMD.
- Uncompress the zip file into any directory
- In the Device Manager (Winkey+R, type "devmgmt.msc"+Enter), look inside "Ports (COM and LPT)" and find the line starting with "Silicon Labs CP210x USB to UART Bridge (COMx)" or "USB-SERIAL CH340 (COMx)" (according the chip on your board). Keep in memory the value replacing the "x" in "COMx.
- According to your DMD panel click on "flash ZeDMD 128x32.bat", "flash ZeDMD 256x64 (2x128x64 matrices).bat" or "flash ZeDMD 256x64 (4x64x64 matrices).bat" file. When prompted enter the number you find in the previous step (the "x") then press Enter.
- Wait for the flash
v1.2
- No need to edit the .bat file anymore, just enter the value when prompted (Thanks MikePinball #4)
v1.1
ZeDMD flash ESP32 v1.1
Here are the files to flash your ESP32 as a ZeDMD.
- Uncompress the zip file into any directory
- In the Device Manager (Winkey+R, type "devmgmt.msc"+Enter), look inside "Ports (COM and LPT)" and find the line starting with "Silicon Labs CP210x USB to UART Bridge (COMx)" or "USB-SERIAL CH340 (COMx)" (according the chip on your board). Keep in memory the value replacing the "x" in "COMx.
- According to your DMD panel modify (=right click then "modify") "flash ZeDMD 128x32.bat", "flash ZeDMD 256x64 (2x128x64 matrices).bat" or "flash ZeDMD 256x64 (4x64x64 matrices).bat" file. Find "COM3" and replace the "3" with the COM number you found in the device manager. Type Ctrl+S to save then exit
- (Left)Click on this bat file and wait for the flash