C2Bridges allow developers to create new custom communication protocols and quickly utilize them within Covenant.
C2Bridges are used to develop an outbound command and control protocol without editing any Covenant code. For developers that feel comfortable integrating new listeners, a new C2 protocol should be added as a first-class new listener type that is fully integrated into the interface. However, it may be faster in some situations to create a C2Bridge outside of Covenant and connect it with a BridgeListener for proof-of-concepts or testing out new protocols.
Developers can use the C2Bridge project as a template for creating new C2Bridges. Within the C2Bridge project, there is an abstract C2Bridge class. A developer can inherit from this class and implement the needed functions to read and write from implants to the BridgeListener using the new chosen C2 protocol.
using System.Threading;
using System.Threading.Tasks;

namespace C2Bridge
{
    /// <summary>
    /// IC2Bridge is an interface implemented by the C2Bridge class.
    /// </summary>
    public interface IC2Bridge
    {
        Task RunAsync(CancellationToken token);
    }

    /// <summary>
    /// C2Bridge is an abstract class that new C2Bridges should inherit from.
    /// </summary>
    public abstract class C2Bridge : IC2Bridge
    {
        // The BridgeConnector handles communication between the Covenant server and the C2Bridge
        protected BridgeConnector BridgeConnector { get; set; }
        // The BridgeProfile handles parsing and formatting data passed between the implant and Covenant
        protected BridgeProfile BridgeProfile { get; set; }

        /// <summary>
        /// The constructor for the C2Bridge. New C2Bridges should use their own constructor that accepts
        /// any command line arguments needed for the C2Bridge to function.
        /// </summary>
        /// <param name="Connector">The BridgeConnector that handles communication with the Covenant server.</param>
        /// <param name="Profile">The BridgeProfile that handles the parsing and formatting of data.</param>
        protected C2Bridge(BridgeConnector Connector, BridgeProfile Profile)
        {
            this.BridgeConnector = Connector;
            this.BridgeProfile = Profile;
            BridgeConnector.OnReadBridge += OnReadBridge;
        }

        /// <summary>
        /// The RunAsync function is the main function that should start the C2Bridge and continue to run until you
        /// are done with your operation. C2Bridge developers should implement the logic to start and run the listener
        /// within this function.
        /// </summary>
        /// <param name="Token">The CancellationToken that will cancel the C2Bridge if the source of the token is cancelled.</param>
        /// <returns></returns>
        public abstract Task RunAsync(CancellationToken Token);

        /// <summary>
        /// The OnReadBridge function is called each time data is read from the Covenant server meant for an implant.
        /// C2Bridge developers should implement the logic to determine which implant this data is meant for and write
        /// this data to the implant.
        /// </summary>
        /// <param name="sender">
        /// Sender is the object that called the OnReadBridge function. C2Bridge developers can safely ignore this parameter.
        /// </param>
        /// <param name="args">Args contains the data that should be written from the Covenant server to the implant.</param>
        protected abstract void OnReadBridge(object sender, BridgeConnector.ReadBridgeArgs args);

        /// <summary>
        /// The WriteToConnector function handles writing data from an implant to the Covenant server. This logic should be the
        /// same for all C2Bridge types, but can be overloaded by the C2Bridge developer if custom logic is needed.
        ///
        /// When calling this function, the returned GUID string should be used to track implant GUID values by the C2Bridge.
        /// </summary>
        /// <param name="Data">The data read from the implant that should be written to the Covenant server.</param>
        /// <returns>
        /// Returns the GUID value parsed out of the Data. This value should be used to track implant GUID values by the C2Bridge.
        /// </returns>
        protected virtual string WriteToConnector(string Data)
        {
            var parsed = this.BridgeProfile.ParseWrite(Data);
            if (parsed != null)
            {
                _ = this.BridgeConnector.Write(this.BridgeProfile.FormatRead(parsed));
                return parsed.Guid;
            }
            return null;
        }

        /// <summary>
        /// The GetBridgeMessengerCode function should contain the code to be embedded in the implant for communication with
        /// the C2Bridge. This function is not actually used anywhere within the project, but is here so that the necessary
        /// implant code can be found along with the C2Bridge. C2Bridge developers should place the code here for use within
        /// a BridgeProfile's BridgeMessengerCode property.
        /// </summary>
        /// <returns></returns>
        protected abstract string GetBridgeMessengerCode();
    }
}
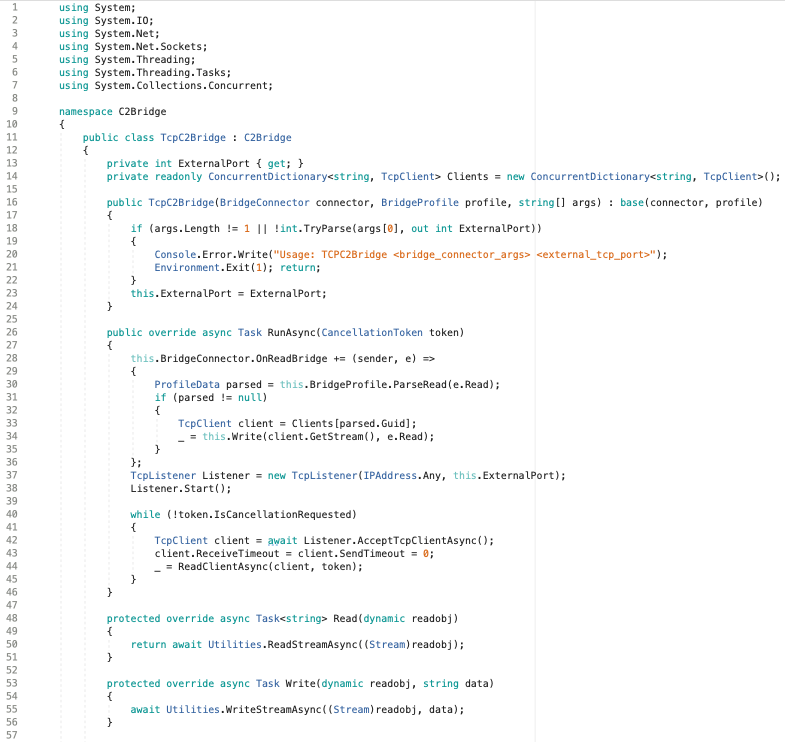
The C2Bridge project contains an example TCPC2Bridge class that inherits from this interface and provides an example of how to implement one.
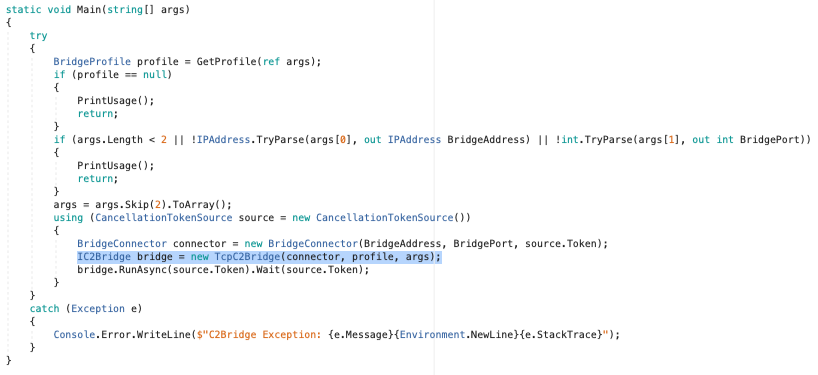
Once you have written your new C2Bridge, the constructor call for TCPC2Bridge within the Main() function can be replaced with the new constructor:
The abstract GetBridgeMessengerCode() method is not actually used anywhere within the C2Bridge project but is used to tie together a C2Bridge with an implant. An implant needs code that is able to read and write to the outbound C2Bridge. This code is specific to a given C2Bridge, and should be placed within the inherited GetBridgeMessengerCode() method. A Covenant user that utilizes a C2Bridge will take the BridgeMessengerCode from this method and use it within a BridgeProfile.
Covenant users that utilize a C2Bridge will need to configure a BridgeProfile that is specific to the C2Bridge. The Grunt implants need to know how to read and write to the outbound C2Bridge. The BridgeProfile.BridgeMessengerCode property represents the code that will be placed in the implant and is responsible for reading and writing to the outbound C2Bridge. This code should be found in a C2Bridge's GetBridgeMessengerCode() method.
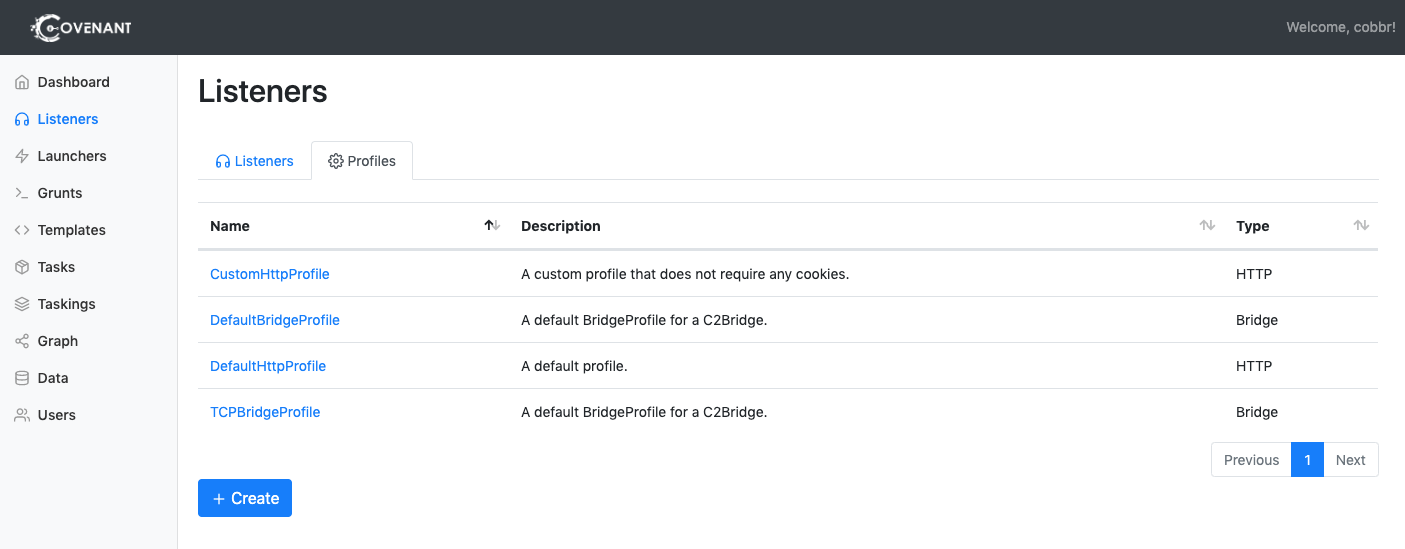
Users can create an entirely new BridgeProfile or edit the DefaultBridgeProfile with the correct BridgeMessengerCode. To do so, you'll navigate to the listeners navigation page and select the "Profiles" tab:
To create a new profile, click on the "Create" button. To edit a particular profile, click on the name of the profile. Keep in mind, that you cannot edit profiles that are associated with active listeners.
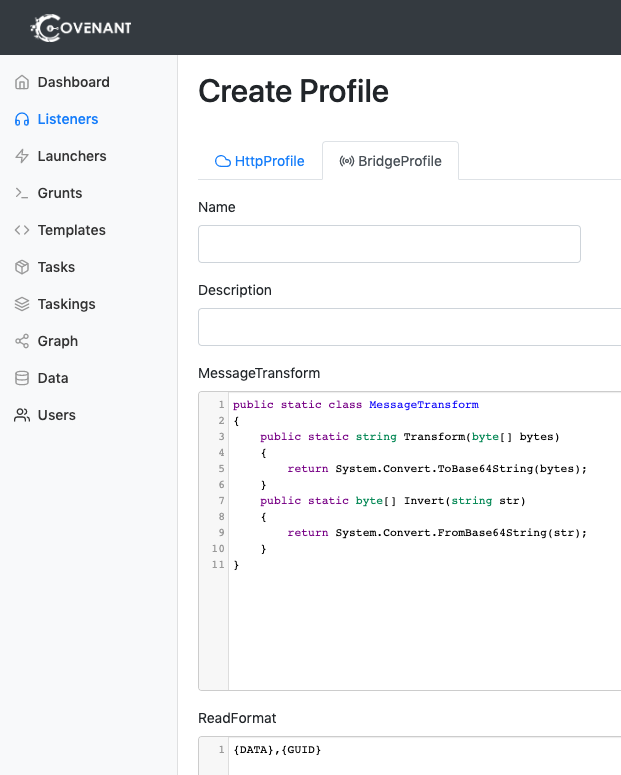
After clicking "Create", select the "BridgeProfile" tab:
The following options will need to be configured when editing or creating a profile:
- Name - The
Nameof the profile that will be used throughout the interface. Pick something recognizable! - Description - The
Descriptionof the profile. This should be a thorough description of the profile that operators can read and easily understand how the profile works, and the use cases for which it would be appropriate to use the profile. - MessageTransform - The
MessageTransformis a unique way to specify how the communication data will be transformed before being placed into the formats specified in theReadFormatandWriteFormat. AnMessageTransformshould be a static C# class namedMessageTransformthat includes a publicTransformand a publicInvertfunction. The class can transform the data in any way that you desire, as long as the Transform and Invert functions mirror each other (i.e.data == MessageTransform.Invert(MessageTransform.Transform(data))). TheMessageTransformclass must be cross-platform compatible and compile underNet40,Net35, andNetCore21. - ReadFormat - The
ReadFormatis the format of a message when a Grunt reads data from a C2Bridge. The format must include a location for the data and Grunt GUID to be placed. Include the string "{DATA}" to indicate the location that the data should be placed and the string "{GUID}" to indicate the location that the GUID should be placed. - WriteFormat - The
WriteFormatis the format of a message when a Grunt writes data to a C2Bridge. The format must include a location for the data and Grunt GUID to be placed. Include the string "{DATA}" to indicate the location that the data should be placed and the string "{GUID}" to indicate the location that the GUID should be placed. - BridgeMessengerCode - The
BridgeMessengerCodeis the code that will be placed in the implant and is responsible for reading and writing to the outbound C2Bridge. This code should be found in a C2Bridge'sGetBridgeMessengerCode()method.
When configuring these options, the Covenant user has total freedom to configure any of these values any way they would like, except for the BridgeMessengerCode property. The BridgeMessengerCode propery must be taken from the C2Bridge.
If a Covenant user does edit the ReadFormat and/or WriteFormat properties, the C2Bridge must be informed of this change when starting the C2Bridge. The C2Bridge project accepts a --profile <profile.yaml> parameter that accepts a profile YAML file, which can optionally be used when these properties are customized.
The overall process for developing and utilizing a C2Bridge is as follows:
- Write the "listener" code for reading and writing on a custom command and control protocol to an implant.
- Write the implant code for reading and writing on a custom command and control protocol to a "listener".
- Implement a C2Bridge using the "listener" and implant code that inherits from the abstract
C2Bridgeclass from the C2Bridge project. Reference theTCPC2Bridgeclass as an example. - Within Covenant, create a
BridgeProfilethat uses theBridgeMessengerCodefound in the C2Bridge'sGetBridgeMessengerCode()method. - Start a BridgeListener that uses the created
BridgeProfile. - Start the C2Bridge that connects to the BridgeListener. If you customized the BridgeProfile's
ReadFormatand/orWriteFormatproperties, use the optional--profile <profile.yaml>CLI parameter to inform the C2Bridge of these customizations. - Generate launchers that utilize the
GruntBridgeImplantTemplate and the BridgeListener you started. - Test out your new launcher that utilizes a custom command and control protocol!


