{% hint style="info" %} A CLA Group defines:
- What CLA types your project requires for pull requests or push submissions — corporate CLA (CCLA), individual CLA (ICLA), or both, What CLA templates are used for the CCLA and/or ICLA, What GitHub repositories, Gerrit instances, or GitLab groups are enforced for CLA mechanism {% endhint %}
A single CLA Group includes a pair of CCLA and ICLA templates, if both types are enabled for that CLA Group.
1. Sign in to the Project Control Center.
2. Under My Projects, click a project or search the project from the search bar for which you want to create a CLA group.
3. From left-side navigation, Navigate to Tools > EasyCLA.
4. Click +Add New CLA Group.
Note: For the current v2 release, a single project can have only one CLA Group. If you have already created a CLA Group for that project, or for a parent of that project, the +Add New CLA Group button will be disabled and you will not be able to create another CLA group for that project.
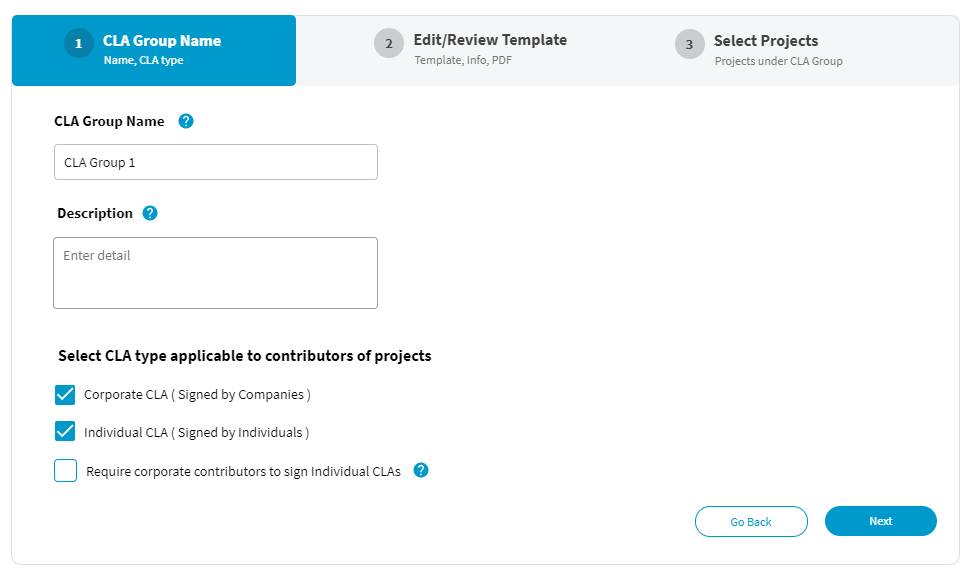
5. Under CLA Group Name tab, provide a CLA group name and a brief description in the respective fields.
Note: Click the help icons (?) to know more about a field or check box.
6. Select the check boxes as applicable to the contributors of a project, and click Next.
{% hint style="info" %}
- A warning message appears if you select only one. Most projects will enable contributions under a CCLA as well as an ICLA.
- If you only select Corporate CLA, then only corporate employees can sign and contribute to your project.
- If you only select Individual CLA, then only individuals can sign and contribute to your project. {% endhint %}
7. Under Edit/Review Template tab, review the project name, project full entity name. If these are not correct, stop and do not proceed. Check the Project object database settings and contact the LF legal team at legal@linuxfoundation.org if you have questions.
8. Then, select a template from Template drop-down. and provide appropriate point of contact in the Email Address of Person Managing Project field. This will be filled into the CLA templates as the email address for contributors to submit signed CLAs if they want to sign them manually, rather than via DocuSign.
{% hint style="info" %} Note:
- If you want to use a different template than the ones listed, create a support ticket with the correct CCLA and ICLA templates that your project will use.
- Both the available templates are standard CCLA / ICLA pairs that are used by several projects on EasyCLA. These templates are derived from the Apache Software Foundation's CLAs and Academy Software Foundation's CLAs, but are not identical to either of them. {% endhint %}
9. Review the generated CCLA and ICLA templates. If the filled-in values or other contents of the template do not look correct, stop and do not proceed. Contact the EasyCLA support team by filing a support ticket if you need assistance.
10. If the Project for which you are creating the CLA Group has no subprojects, then click Finish and skip the next step.
11. If the Project for which you are creating the CLA Group does have subprojects, then click Next. Under the Select Projects tab, select the projects that you want to enroll under the CLA group, and click Finish.
{% hint style="info" %} Note: As mentioned above, for the initial v2 release, a single project can only have one CLA Group. If you have already created a CLA Group for that project, or for a parent of that project, the +Add New CLA Group button will be disabled and you will not be able to create another CLA group for that project. {% endhint %}
.png)


