| id | title | layout | category | permalink | next |
|---|---|---|---|---|---|
tutorial |
Tutorial |
docs |
Quick Start |
docs/tutorial.html |
videos |
This tutorial aims to get you up to speed with writing iOS apps using React Native. If you're wondering what React Native is and why Facebook built it, this blog post explains that.
We assume you have experience writing websites with React. If not, you can learn about it on the React website.
React Native requires OSX, Xcode, Homebrew, node, npm, and watchman. Flow is optional.
After installing these dependencies there are two simple commands to get a React Native project all set up for development.
-
npm install -g react-native-clireact-native-cli is a command line interface that does the rest of the set up. It’s installable via npm. This will install
react-nativeas a command in your terminal. You only ever need to do this once. -
react-native init AwesomeProjectThis command fetches the React Native source code and dependencies and then creates a new Xcode project in
AwesomeProject/AwesomeProject.xcodeproj.
You can now open this new project (AwesomeProject/AwesomeProject.xcodeproj) in Xcode and simply build and run it with cmd+R. Doing so will also start a node server which enables live code reloading. With this you can see your changes by pressing cmd+R in the simulator rather than recompiling in Xcode.
For this tutorial we'll be building a simple version of the Movies app that fetches 25 movies that are in theaters and displays them in a ListView.
react-native init will copy Examples/SampleProject to whatever you named your project, in this case AwesomeProject. This is a simple hello world app. You can edit index.ios.js to make changes to the app and then press cmd+R in the simulator to see the changes.
Before we write the code to fetch actual Rotten Tomatoes data let's mock some data so we can get our hands dirty with React Native. At Facebook we typically declare constants at the top of JS files, just below the requires, but feel free to add the following constant wherever you like. In index.ios.js:
var MOCKED_MOVIES_DATA = [
  {title: 'Title', year: '2015', posters: {thumbnail: 'http://i.imgur.com/UePbdph.jpg'}},
];We're going to render the title, year, and thumbnail for the movie. Since thumbnail is an Image component in React Native, add Image to the list of React requires below.
var {
  AppRegistry,
  Image,
  StyleSheet,
  Text,
  View,
} = React;
Now change the render function so that we're rendering the data mentioned above rather than hello world.
  render: function() {
    var movie = MOCKED_MOVIES_DATA[0];
    return (
      <View style={styles.container}>
        <Text>{movie.title}</Text>
        <Text>{movie.year}</Text>
        <Image source={{uri: movie.posters.thumbnail}} />
      </View>
    );
  }
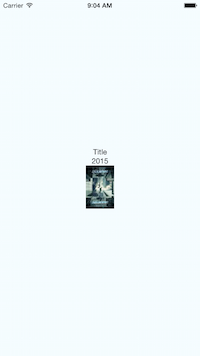
Press cmd+R and you should see "Title" above "2015". Notice that the Image doesn't render anything. This is because we haven't specified the width and height of the image we want to render. This is done via styles. While we're changing the styles let's also clean up the styles we're no longer using.
var styles = StyleSheet.create({
  container: {
    flex: 1,
    justifyContent: 'center',
    alignItems: 'center',
    backgroundColor: '#F5FCFF',
  },
  thumbnail: {
    width: 53,
    height: 81,
  },
});
And lastly we need to apply this style to the Image component:
        <Image
          source={{uri: movie.posters.thumbnail}}
          style={styles.thumbnail}
        />
Press cmd+R and the image should now render.
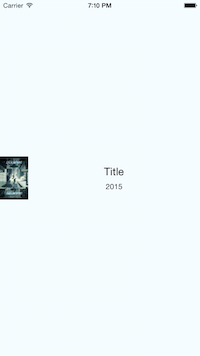
Great, we've rendered our data. Now let's make it look better. I'd like to put the text to the right of the image and make the title larger and centered within that area:
+---------------------------------+
|+-------++----------------------+|
||       ||        Title         ||
|| Image ||                      ||
||       ||        Year          ||
|+-------++----------------------+|
+---------------------------------+
We'll need to add another container in order to vertically lay out components within horizontally layed out components.
      return (
        <View style={styles.container}>
          <Image
            source={{uri: movie.posters.thumbnail}}
            style={styles.thumbnail}
          />
          <View style={styles.rightContainer}>
            <Text style={styles.title}>{movie.title}</Text>
            <Text style={styles.year}>{movie.year}</Text>
          </View>
        </View>
      );
Not too much has changed, we added a container around the Texts and then moved them after the Image (because they're to the right of the Image). Let's see what the style changes look like:
  container: {
    flex: 1,
    flexDirection: 'row',
    justifyContent: 'center',
    alignItems: 'center',
    backgroundColor: '#F5FCFF',
  },
We use FlexBox for layout - see this great guide to learn more about it.
In the above code snippet, we simply added flexDirection: 'row' that will make children of our main container to be layed out horizontally instead of vertically.
Now add another style to the JS style object:
  rightContainer: {
    flex: 1,
  },
This means that the rightContainer takes up the remaining space in the parent container that isn't taken up by the Image. If this doesn't make sense, add a backgroundColor to rightContainer and then try removing the flex: 1. You'll see that this causes the container's size to be the minimum size that fits its children.
Styling the text is pretty straightforward:
  title: {
    fontSize: 20,
    marginBottom: 8,
    textAlign: 'center',
  },
  year: {
    textAlign: 'center',
  },
Go ahead and press cmd+R and you'll see the updated view.
Fetching data from Rotten Tomatoes's API isn't really relevant to learning React Native so feel free to breeze through this section.
Add the following constants to the top of the file (typically below the requires) to create the REQUEST_URL used to request data with.
var API_KEY = '7waqfqbprs7pajbz28mqf6vz';
var API_URL = 'http://api.rottentomatoes.com/api/public/v1.0/lists/movies/in_theaters.json';
var PAGE_SIZE = 25;
var PARAMS = '?apikey=' + API_KEY + '&page_limit=' + PAGE_SIZE;
var REQUEST_URL = API_URL + PARAMS;
Add some initial state to our application so that we can check this.state.movies === null to determine whether the movies data has been loaded or not. We can set this data when the response comes back with this.setState({movies: moviesData}). Add this code just above the render function inside our React class.
  getInitialState: function() {
    return {
      movies: null,
    };
  },
We want to send off the request after the component has finished loading. componentDidMount is a function of React components that React will call exactly once, just after the component has been loaded.
  componentDidMount: function() {
    this.fetchData();
  },
Now add fetchData function used above to our main component. This method will be respondible for handling data fetching. All you need to do is call this.setState({movies: data}) after resolving the promise chain because the way React works is that setState actually triggers a re-render and then the render function will notice that this.state.movies is no longer null. Note that we call done() at the end of the promise chain - always make sure to call done() or any errors thrown will get swallowed.
  fetchData: function() {
    fetch(REQUEST_URL)
      .then((response) => response.json())
      .then((responseData) => {
        this.setState({
          movies: responseData.movies,
        });
      })
      .done();
  },
Now modify the render function to render a loading view if we don't have any movies data, and to render the first movie otherwise.
  render: function() {
    if (!this.state.movies) {
      return this.renderLoadingView();
    }

    var movie = this.state.movies[0];
    return this.renderMovie(movie);
  },

  renderLoadingView: function() {
    return (
      <View style={styles.container}>
        <Text>
          Loading movies...
        </Text>
      </View>
    );
  },

  renderMovie: function(movie) {
    return (
      <View style={styles.container}>
        <Image
          source={{uri: movie.posters.thumbnail}}
          style={styles.thumbnail}
        />
        <View style={styles.rightContainer}>
          <Text style={styles.title}>{movie.title}</Text>
          <Text style={styles.year}>{movie.year}</Text>
        </View>
      </View>
    );
  },
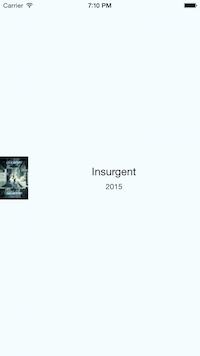
Now press cmd+R and you should see "Loading movies..." until the response comes back, then it will render the first movie it fetched from Rotten Tomatoes.
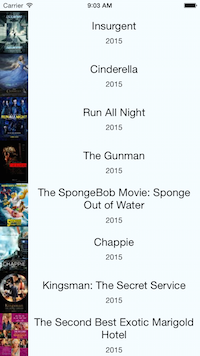
Let's now modify this application to render all of this data in a ListView component, rather than just rendering the first movie.
Why is a ListView better than just rendering all of these elements or putting them in a ScrollView? Despite React being fast, rendering a possibly infinite list of elements could be slow. ListView schedules rendering of views so that you only display the ones on screen and those already rendered but off screen are removed from the native view hierarchy.
First thing's first: add the ListView require to the top of the file.
var {
  AppRegistry,
  Image,
  ListView,
  StyleSheet,
  Text,
  View,
} = React;
Now modify the render function so that once we have our data it renders a ListView of movies instead of a single movie.
  render: function() {
    if (!this.state.loaded) {
      return this.renderLoadingView();
    }

    return (
      <ListView
        dataSource={this.state.dataSource}
        renderRow={this.renderMovie}
        style={styles.listView}
      />
    );
  },
The DataSource is an interface that ListView is using to determine which rows have changed over the course of updates.
You'll notice we used dataSource from this.state. The next step is to add an empty dataSource to the object returned by getInitialState. Also, now that we're storing the data in dataSource, we should no longer use this.state.movies to avoid storing data twice. We can use boolean property of the state (this.state.loaded) to tell whether data fetching has finished.
  getInitialState: function() {
    return {
      dataSource: new ListView.DataSource({
        rowHasChanged: (row1, row2) => row1 !== row2,
      }),
      loaded: false,
    };
  },
And here is the modified fetchData method that updates the state accordingly:
  fetchData: function() {
    fetch(REQUEST_URL)
      .then((response) => response.json())
      .then((responseData) => {
        this.setState({
          dataSource: this.state.dataSource.cloneWithRows(responseData.movies),
          loaded: true,
        });
      })
      .done();
  },
Finally, we add styles for the ListView component to the styles JS object:
  listView: {
    paddingTop: 20,
    backgroundColor: '#F5FCFF',
  },
And here's the final result:
There's still some work to be done to make it a fully functional app such as: adding navigation, search, infinite scroll loading, etc. Check the Movies Example to see it all working.
/**
 * Sample React Native App
 * https://github.com/facebook/react-native
 */
'use strict';

var React = require('react-native');
var {
  AppRegistry,
  Image,
  ListView,
  StyleSheet,
  Text,
  View,
} = React;

var API_KEY = '7waqfqbprs7pajbz28mqf6vz';
var API_URL = 'http://api.rottentomatoes.com/api/public/v1.0/lists/movies/in_theaters.json';
var PAGE_SIZE = 25;
var PARAMS = '?apikey=' + API_KEY + '&page_limit=' + PAGE_SIZE;
var REQUEST_URL = API_URL + PARAMS;

var AwesomeProject = React.createClass({
  getInitialState: function() {
    return {
      dataSource: new ListView.DataSource({
        rowHasChanged: (row1, row2) => row1 !== row2,
      }),
      loaded: false,
    };
  },

  componentDidMount: function() {
    this.fetchData();
  },

  fetchData: function() {
    fetch(REQUEST_URL)
      .then((response) => response.json())
      .then((responseData) => {
        this.setState({
          dataSource: this.state.dataSource.cloneWithRows(responseData.movies),
          loaded: true,
        });
      })
      .done();
  },

  render: function() {
    if (!this.state.loaded) {
      return this.renderLoadingView();
    }

    return (
      <ListView
        dataSource={this.state.dataSource}
        renderRow={this.renderMovie}
        style={styles.listView}
      />
    );
  },

  renderLoadingView: function() {
    return (
      <View style={styles.container}>
        <Text>
          Loading movies...
        </Text>
      </View>
    );
  },

  renderMovie: function(movie) {
    return (
      <View style={styles.container}>
        <Image
          source={{uri: movie.posters.thumbnail}}
          style={styles.thumbnail}
        />
        <View style={styles.rightContainer}>
          <Text style={styles.title}>{movie.title}</Text>
          <Text style={styles.year}>{movie.year}</Text>
        </View>
      </View>
    );
  },
});

var styles = StyleSheet.create({
  container: {
    flex: 1,
    flexDirection: 'row',
    justifyContent: 'center',
    alignItems: 'center',
    backgroundColor: '#F5FCFF',
  },
  rightContainer: {
    flex: 1,
  },
  title: {
    fontSize: 20,
    marginBottom: 8,
    textAlign: 'center',
  },
  year: {
    textAlign: 'center',
  },
  thumbnail: {
    width: 53,
    height: 81,
  },
  listView: {
    paddingTop: 20,
    backgroundColor: '#F5FCFF',
  },
});

AppRegistry.registerComponent('AwesomeProject', () => AwesomeProject);这个教程旨在让您更快的用React Native来编写iOS应用,如果您想知道React Native是什么,Facebook为什么创造它,这篇博客中有您想要的答案。
我们假设你有用React来编写网站的经验。如果没有,可以在React网站学习。
React Native要求安装OSX、Xcode、Homebrew、node、npm和watchman,Flow是可选的。
在安装完成这些依赖之后,可以通过两条简单的命令来创建一个完整的React Native开发环境。
-
npm install -g react-native-clireact-native-cli是一个命令行接口,创建过程中的剩下的工作都由它来完成,可以用npm安装。这条命令将安装react-native在您的终端中,您只需安装一次。 -
react-native init AwesomeProject这条命令会取回React Native的源码和一些依赖,然后创建一个Xcode项目
AwesomeProject/AwesomeProject.xcodeproj。
用Xcode打开新创建的项目(AwesomeProject/AwesomeProject.xcodeproj),然后用快捷键Cmd + R来编译运行,这也会启动一个node的服务,它将可以让代码热加载,这样您只需在模拟器中按cmd + R来刷新,就能看到您的改动,而不需要在Xcode中重新编译。
在这个教程中,我们将会编写一个简单的应用:Movies,这个应用会获取25个电影数据,然后显示在一个ListView中。
react-native init会拷贝Examples/SampleProject到您命名的项目中,在这个例子中,我们会创建一个叫AwesomeProject的项目,这是一个简单的hello world应用,你可以编辑index.ios.js来改变这个app,然后通过在模拟器中按cmd + R来观察您的改动。
在我们编写代码来获取真实的Rotten Tomatoes的数据之前,让我们先构造一些假数据来熟悉React Native。在Facebook,我们一般会在JS文件最开始(requires下面)声明一些常量,但是您可以随意将下面的常量放在您喜欢的地方,在inex.ios.js中:
var MOCKED_MOVIES_DATA = [
  {title: 'Title', year: '2015', posters: {thumbnail: 'http://i.imgur.com/UePbdph.jpg'}},
];这里我们会渲染标题、年份和电影的缩略图,因为在React Native里,缩略图是一个图片组件,所以,在需要添加Image到React的依赖中,如下:
var {
  AppRegistry,
  Image,
  StyleSheet,
  Text,
  View,
} = React;
现在,编辑渲染函数,现在我们可以渲染上面提到的数据,而不是hello world。
render: function() {
    var movie = MOCKED_MOVIES_DATA[0];
    return (
      <View style={styles.container}>
        <Text>{movie.title}</Text>
        <Text>{movie.year}</Text>
        <Image source={{uri: movie.posters.thumbnail}} />
      </View>
    );
  }
按cmd + R,然后您可以看到在"2015"上面有行文字"Title",请注意,Image没有渲染出来,这是因为我们没有指定图片的宽度和高度,这个可以通过样式来指定,在编辑样式的时候,我们也需要将不再使用的样式删掉。
var styles = StyleSheet.create({
  container: {
    flex: 1,
    justifyContent: 'center',
    alignItems: 'center',
    backgroundColor: '#F5FCFF',
  },
  thumbnail: {
    width: 53,
    height: 81,
  },
});
最后我们需要把这个样式应用到Image组件上:
        <Image
          source={{uri: movie.posters.thumbnail}}
          style={styles.thumbnail}
        />
按cmd + R,现在图片可以渲染出来了
很好,我们已经渲染了数据,现在我们让它看起来好看点。我倾向于把文字放在图片的右边,让标题更大一点,并且居中。就像下面这样:
+---------------------------------+
|+-------++----------------------+|
||       ||        Title         ||
|| Image ||                      ||
||       ||        Year          ||
|+-------++----------------------+|
+---------------------------------+
为了在水平组件中插入一个垂直布局的组件,我们需要另外一个容器。
      return (
        <View style={styles.container}>
          <Image
            source={{uri: movie.posters.thumbnail}}
            style={styles.thumbnail}
          />
          <View style={styles.rightContainer}>
            <Text style={styles.title}>{movie.title}</Text>
            <Text style={styles.year}>{movie.year}</Text>
          </View>
        </View>
      );
没有太多的改变,我们在Text组件外层增加了一个容器,然后将它们移到图片后面(因为它们在图片的右侧),让我们来看看样式的变化:
 container: {
    flex: 1,
    flexDirection: 'row',
    justifyContent: 'center',
    alignItems: 'center',
    backgroundColor: '#F5FCFF',
  },
我们使用FlexBox来布局 - 阅读完整的Flexbox指南来学习它。
在上面的代码片段中,我们简单的添加了flexDirection: 'row',这会让住容器的子节点呈水平布局。
现在添加额外的样式到JS样式对象:
  rightContainer: {
    flex: 1,
},这表示rightContainer将会占据父容器中还没有被Image占据的剩余空间,如果您没有理解,在rightContainer中添加backgroundColor,然后去掉flex: 1,您将看到这会导致容器变成最小能适应子容器的大小。
更改文字样式是很简单的:
  title: {
    fontSize: 20,
    marginBottom: 8,
    textAlign: 'center',
  },
  year: {
    textAlign: 'center',
  },
在模拟器中按cmd + R,您将看到新的渲染结果
通过Rotten Tomatoes的API获取数据实际上和学习React Native并无关系,所以自由阅读该章节。
添加下面的常量到文件的最开始(通常在requies下面),常量REQUEST_URL会用来请求数据。
/**
 * For quota reasons we replaced the Rotten Tomatoes' API with a sample data of
 * their very own API that lives in React Native's Gihub repo.
 */
var REQUEST_URL = 'https://raw.githubusercontent.com/facebook/react-native/master/docs/MoviesExample.json';在应用中添加初始状态,以便我们可以通过this.state.movies === null检查数据是否已经请求到了。我么可以在请求返回后设置这个数据,this.setState({movies: moviesData}),添加下面的代码到render函数的上面:
  getInitialState: function() {
    return {
      movies: null,
    };
},如果我们想在组件都加载完成之后发送请求,可以通过componentDidMount可以帮我们做到,这是一个函数,React只会在组件都加载完成之后调用它一次。
  componentDidMount: function() {
    this.fetchData();
},现在,添加fetchData函数。这个函数会负责发送请求,您所做的只是在Promise链中运行this.setState({movies: data}),因为,在React中,setState会触发重新渲染,然后,render函数会注意到this.state.movies不再是null。请注意,在Promise链的最后面我们调用了done(),要确保调用了done(),否则任何抛出的错误都会被吞噬。
  fetchData: function() {
    fetch(REQUEST_URL)
      .then((response) => response.json())
      .then((responseData) => {
        this.setState({
          movies: responseData.movies,
        });
      })
      .done();
  },
现在更改render函数,在还未加载到数据的时候,渲染加载中的视图,否则渲染第一部电影。
  render: function() {
    if (!this.state.movies) {
      return this.renderLoadingView();
    }

    var movie = this.state.movies[0];
    return this.renderMovie(movie);
  },

  renderLoadingView: function() {
    return (
      <View style={styles.container}>
        <Text>
          Loading movies...
        </Text>
      </View>
    );
  },

  renderMovie: function(movie) {
    return (
      <View style={styles.container}>
        <Image
          source={{uri: movie.posters.thumbnail}}
          style={styles.thumbnail}
        />
        <View style={styles.rightContainer}>
          <Text style={styles.title}>{movie.title}</Text>
          <Text style={styles.year}>{movie.year}</Text>
        </View>
      </View>
    );
  },
按cmd + R刷新,您将看到“Loading movies...”,直到请求返回,然后会渲染从Rotten Tomatoes获取的数据中的第一步影片。
现在,让我们来进一步改进,在应用中使用ListView组建来渲染所有的数据,而不是只有一部影片。
为什么ListView比只是渲染所有元素或者把他们渲染在一个ScrollView中要好?尽管React很快,但是渲染一个很长的元素列表页会很慢。ListView会安排试图的渲染顺序,这样能可以渲染只在当前屏幕上的元素,并且那些已经渲染的但是并不在当前屏幕的元素,也会从本地视图中删除。
第一件事情就是先添加对ListView的依赖到文件最开始。
var {
  AppRegistry,
  Image,
  ListView,
  StyleSheet,
  Text,
  View,
} = React;
现在,更改render函数,在取得数据之后,渲染一个ListView ,而不是第一部影片。
  render: function() {
    if (!this.state.loaded) {
      return this.renderLoadingView();
    }

    return (
      <ListView
        dataSource={this.state.dataSource}
        renderRow={this.renderMovie}
        style={styles.listView}
      />
    );
},DataSource是ListView用来确定哪些行发生了改变的一个接口。
您会注意到我们在this.state中使用了dataSource,下一步,添加一个空的dataSource到getInitialState返回的对象中,我们不应该继续使用this.state.movies,避免重复存储数据,可以通过state的boolean属性this.state.loaded来判断是否已经获取到数据。
  getInitialState: function() {
    return {
      dataSource: new ListView.DataSource({
        rowHasChanged: (row1, row2) => row1 !== row2,
      }),
      loaded: false,
    };
},下面是更新之后的fetchData方法,会相应的更新state:
  fetchData: function() {
    fetch(REQUEST_URL)
      .then((response) => response.json())
      .then((responseData) => {
        this.setState({
          dataSource: this.state.dataSource.cloneWithRows(responseData.movies),
          loaded: true,
        });
      })
      .done();
},最后,我们添加一些样式到ListView组件:
  listView: {
    paddingTop: 20,
    backgroundColor: '#F5FCFF',
  },
然后,这是最终结果:
到这里,它离一个拥有完整功能的app还有一段距离,例如:导航栏、搜索、滚动加载等等,完整功能的例子看这里:Movies Example。
/**
 * Sample React Native App
 * https://github.com/facebook/react-native
 */
'use strict';

var React = require('react-native');
var {
  AppRegistry,
  Image,
  ListView,
  StyleSheet,
  Text,
  View,
} = React;

var API_KEY = '7waqfqbprs7pajbz28mqf6vz';
var API_URL = 'http://api.rottentomatoes.com/api/public/v1.0/lists/movies/in_theaters.json';
var PAGE_SIZE = 25;
var PARAMS = '?apikey=' + API_KEY + '&page_limit=' + PAGE_SIZE;
var REQUEST_URL = API_URL + PARAMS;

var AwesomeProject = React.createClass({
  getInitialState: function() {
    return {
      dataSource: new ListView.DataSource({
        rowHasChanged: (row1, row2) => row1 !== row2,
      }),
      loaded: false,
    };
  },

  componentDidMount: function() {
    this.fetchData();
  },

  fetchData: function() {
    fetch(REQUEST_URL)
      .then((response) => response.json())
      .then((responseData) => {
        this.setState({
          dataSource: this.state.dataSource.cloneWithRows(responseData.movies),
          loaded: true,
        });
      })
      .done();
  },

  render: function() {
    if (!this.state.loaded) {
      return this.renderLoadingView();
    }

    return (
      <ListView
        dataSource={this.state.dataSource}
        renderRow={this.renderMovie}
        style={styles.listView}
      />
    );
  },

  renderLoadingView: function() {
    return (
      <View style={styles.container}>
        <Text>
          Loading movies...
        </Text>
      </View>
    );
  },

  renderMovie: function(movie) {
    return (
      <View style={styles.container}>
        <Image
          source={{uri: movie.posters.thumbnail}}
          style={styles.thumbnail}
        />
        <View style={styles.rightContainer}>
          <Text style={styles.title}>{movie.title}</Text>
          <Text style={styles.year}>{movie.year}</Text>
        </View>
      </View>
    );
  },
});

var styles = StyleSheet.create({
  container: {
    flex: 1,
    flexDirection: 'row',
    justifyContent: 'center',
    alignItems: 'center',
    backgroundColor: '#F5FCFF',
  },
  rightContainer: {
    flex: 1,
  },
  title: {
    fontSize: 20,
    marginBottom: 8,
    textAlign: 'center',
  },
  year: {
    textAlign: 'center',
  },
  thumbnail: {
    width: 53,
    height: 81,
  },
  listView: {
    paddingTop: 20,
    backgroundColor: '#F5FCFF',
  },
});

AppRegistry.registerComponent('AwesomeProject', () => AwesomeProject);


