My meteorological station is a Web app to manage homemade weather stations built with Raspberry Pi.
This is a project for Google Summer of Code 2017 - Physical Web organization.
- Raspberry pi (model 2B or 3B)
- Sensor Adafruit DHT22 (3 pins)
- Sensor Adafruit BMP 180 (4 pins)
- Micro SD card (minimum 8GB)
- Micro usb power adapter
- 7 GPIO cable (female both ends)
This image shows how RPi GPIO pins are labeled.
DHT22 sensor:
- + to 3.3v pin
- out to pin 17
- - to Ground pin
BMP180 sensor:
- VIN to 3.3v pin
- GND to Ground pin
- SLC to pin 3
- SDA to pin 2
The final result can be like this:
-
Follow the official steps to install Raspbian OS using NOOBS (the easiest way).
-
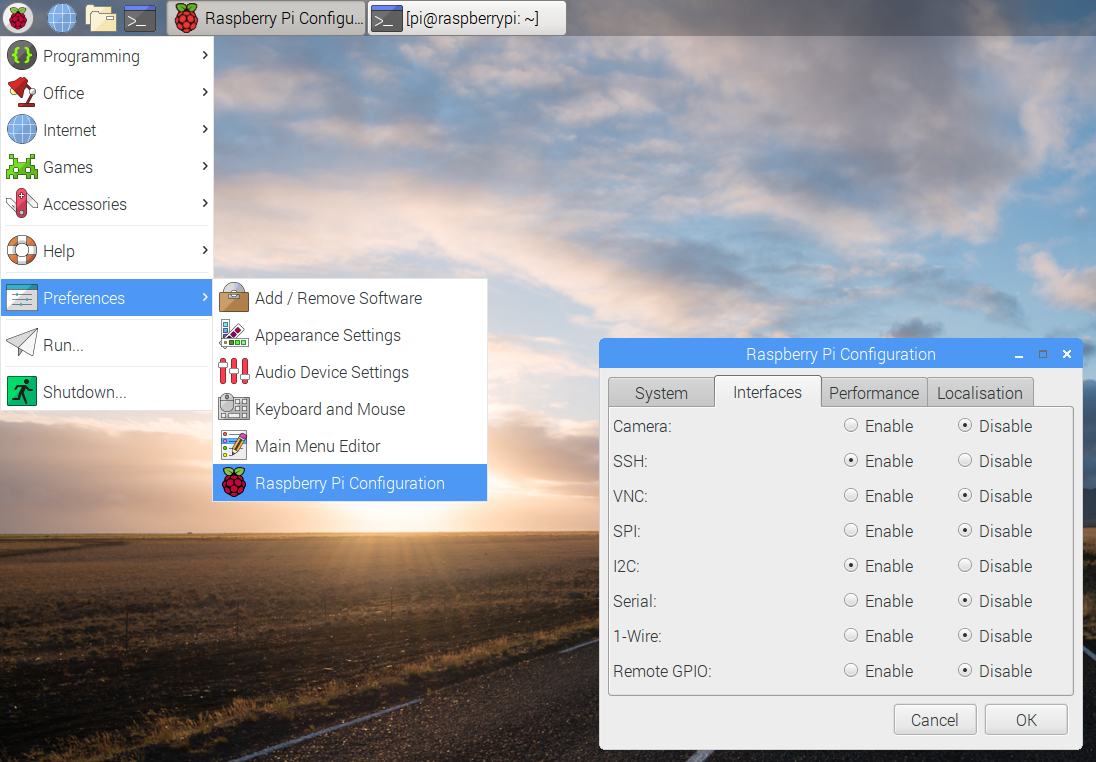
Enable SSH and I2C port.
Go to Preferences > Raspberry Pi Configuration > Interfaces tab > Enable SSH and I2C like the next image.
- Get and annotate RPi ip typing
ifconfigin the terminal.
When the server installation is completed and the application is running, you can add a new station and the station is automatically configured by the server (copying all scripts and enabling services using ssh).
curl -sL https://deb.nodesource.com/setup_8.x | sudo -E bash -
sudo apt-get install -y nodejs
-
Enable Google sign in
Go to Authentication > Sign-in merthod > Google > Enable
-
Add database rules
Go to database > Rules and copy this rules.
{ "rules": { "beacons": { "$uid": { ".read": "$uid === auth.uid", ".write": "$uid === auth.uid" } }, "stations": { ".read": true, ".write": false, "$uid": { ".read": true, ".write": "$uid === auth.uid" } }, "users": { "$uid": { ".read": "$uid === auth.uid", ".write": "$uid === auth.uid" } } } } -
Get client data
Create a file named firebase-config.json with this structure:
 {
 	"apiKey": "",
 	"authDomain": "",
 	"databaseURL": "",
 	"projectId": "",
 	"storageBucket": "",
 	"messagingSenderId": ""
 }
Go to Project Settings > Add Firebase to your web app button and fill all fields with the data from your project.
-
Get admin data
Go to Project Settings > Service accounts > Generate new private key
Download and rename key to firebase-admin.json.
Create a Google Cloud project, go to APIs & services, enable Maps Javascript API and Maps Geocoding API and create a key.
Create a file named maps-key.json with this structure and paste your key.
{
	"apikey": ""
}
Create a file called twitter-config.json with this structure:
{
	"consumer_key": "",
	"consumer_secret": "",
	"access_token": "",
	"access_token_secret": ""
}
Create a new twitter app, go to Keys and Access Tokens and fill all fields with the values from your project.
-
Clone this repository
git clone https://github.com/gerard87/my-meteorological-station.git -
Copy config files
Copy to the root of the project the four config files:
- firebase-config.json
- firebase-admin.json
- maps-key.json
- twitter-config.json
-
Install dependencies
npm install -
Start server
npm start
-
Go to https://api.ai/ and create a new agent.
-
Click settings > Export and import > Restore from zip.
-
Select the mmsagent.zip inside /assistant/agent folder.
-
Go to Fullfitment and enter the URL: https://<your_server_URL>/assistant
MIT © Gerard Farré Gomez


