Amazon EKS is a Kubernetes service provided by AWS that makes it easier to setup Kubernetes on AWS without the need to maintain our own Kubernetes control planes.
Joomla is a free and open-source content management system for publishing web content, developed by Open Source Matters, Inc. It is built on a model–view–controller web application framework that can be used independently of the CMS.
MySQL is a relational database management system based on SQL — Structured Query Language. The application is used for a wide range of purposes, including data warehousing, e-commerce, and logging applications. The most common use for MySQL however, is for the purpose of a web database.
Amazon Elastic File System is a cloud storage service provided by Amazon Web Services designed to provide scalable, elastic, concurrent with some restrictions, and encrypted file storage for use with both AWS cloud services and on-premises resources.
This blog tells how to launch CMS like Joomla with MySQL database as a backend with AWS EFS as a Persistent Volume and on a worker node launched using Amazon EKS.
First, we need to create a YAML file for setting up EKS including specification of Node Groups (group of Worker Nodes in a Cluster).
apiVersion: eksctl.io/v1alpha5
kind: ClusterConfig

metadata:
  name: task-cluster
  region: ap-south-1

nodeGroups:
  - name: nodeGroup1
    desiredCapacity: 2
    instanceType: t2.micro
    ssh:
      publicKeyName: task
  - name: nodeGroup2
    desiredCapacity: 1
    instanceType: t2.small
    ssh:
      publicKeyName: task
  - name: nodeGroup-mixed
    minSize: 2
    maxSize: 5
    instancesDistribution:
      maxPrice: 0.017
      instanceTypes: ["t3.small", "t3.medium"]
      onDemandBaseCapacity: 0
      onDemandPercentageAboveBaseCapacity: 50
      spotInstancePools: 2
    ssh:
      publicKeyName: task
But, before creating our cluster , let’s setup CLI tool required for the same i.e., eksctl, basically eksctl is a CLI tool for creating clusters in EKS and it is developed by weaveworks.
For setting up eksctl in respective OS , check out the below link.
https://github.com/weaveworks/eksctlAfter setting up our eksctl CLI tool, let’s set up the cluster.
eksctl create cluster -f <filename>.yml
After the cluster has been setup , we need to configure kubectl so as to setup connection with Amazon EKS , the command for the same are as follows:
aws eks update-kubeconfig --name <name of the cluster specified in YAML file>
It is usually a good practice to create a namespace as it avoids the interference into setup of other works, also it makes it easier to manage multiple work. It can be created using the below command.
kubectl create namespace <namespace>
After creating a new namespace , we need to set up context in kubeconfig (it provides access to cluster) to the new namespace created and it could be done using the below command.
kubectl config set-context --current --namespace=<namespace>
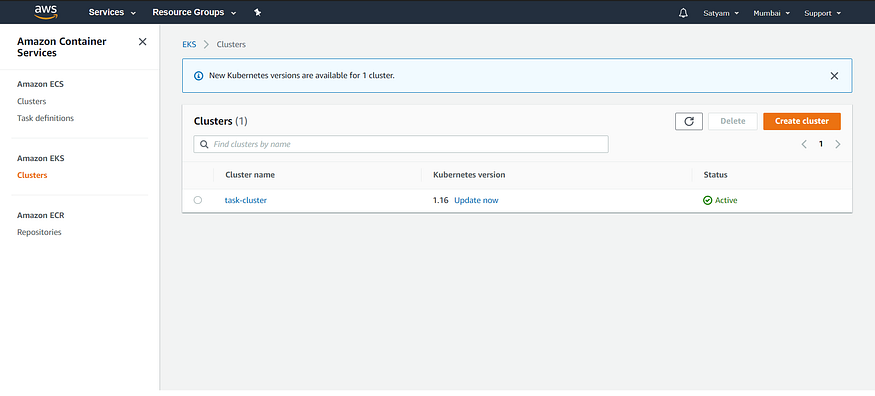
In AWS console, the EKS cluster setup would look like as follows:
After executing eksctl command,
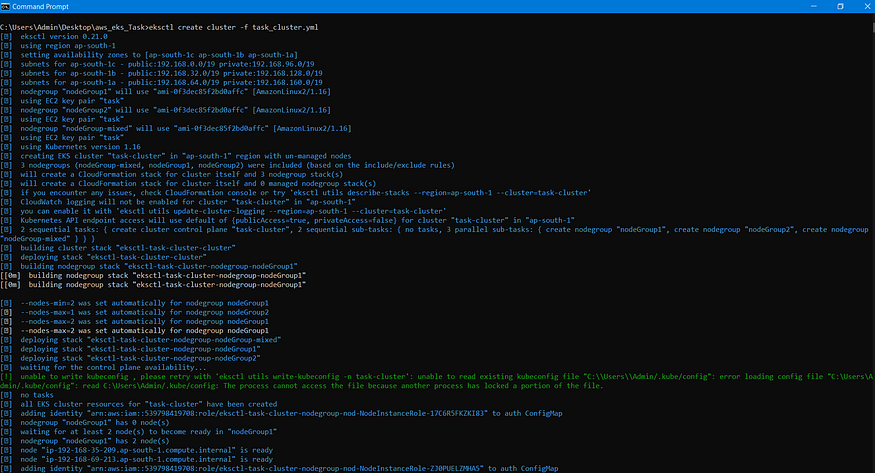
Cluster Launch
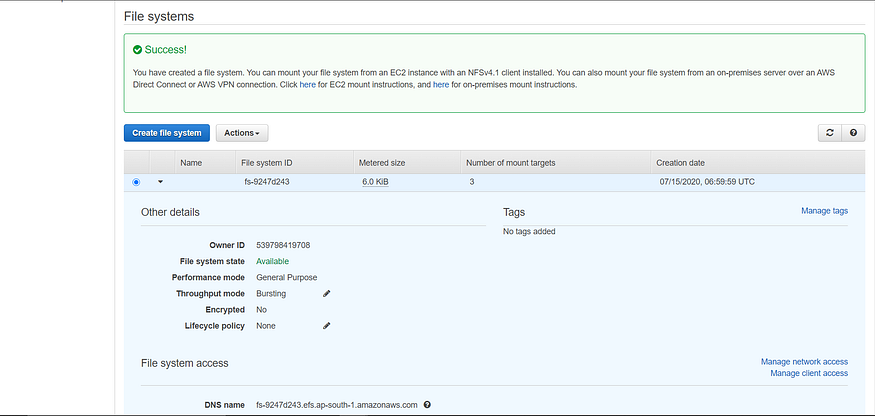
First, access the EFS console in AWS, create a File System using VPC and Security Group ID specified in the EKS cluster created before.
First, access the EKS console and then access the cluster created , click on Networking, it would specify the VPC ID and the Security Group ID , place the same while creating File System in EFS.
After creating the same , it would look like this :
EFS Provisioner could be used to setup EFS as a Persistent Volume in Kubernetes by using efs-provisioner as image. The YAML code for the same is as follows:
apiVersion: apps/v1
kind: Deployment
metadata:
  name: efs-provisioner
spec:
  selector:
    matchLabels:
      app: efs-provisioner
  replicas: 1
  strategy:
    type: Recreate
  template:
    metadata:
      labels:
        app: efs-provisioner
    spec:
      containers:
        - name: efs-provisioner
          image: quay.io/external_storage/efs-provisioner:v0.1.0
          env:
            - name: FILE_SYSTEM_ID
              value: fs-9247d243
            - name: AWS_REGION
              value: ap-south-1
            - name: PROVISIONER_NAME
              value: satyam/aws-efs
          volumeMounts:
            - name: pv-volume
              mountPath: /persistentvolumes
      volumes:
        - name: pv-volume
          nfs:
            server: fs-9247d243.efs.ap-south-1.amazonaws.com
            path: /
Note : Use the same File System ID as the one that gets generated after creating EFS and use the DNS Name specified in the EFS in the server field in the YAML file above.
Role-based access control, is an authorization mechanism for managing permissions around Kubernetes resources.It could be setup using YAML file shown as below:
apiVersion: rbac.authorization.k8s.io/v1beta1
kind: ClusterRoleBinding
metadata:
  name: nfs-provisioner-role-binding
subjects:
  - kind: ServiceAccount
    name: default
    namespace: task
roleRef:
  kind: ClusterRole
  name: cluster-admin
apiGroup: rbac.authorization.k8s.ioA Storage Classes provides a way for administrators to describe the “classes” of storage they offer and use provisioners that are specific to the storage platform or cloud provider to give Kubernetes access to the physical media being used. In our case, the provisioner is Amazon EFS and the YAML file for Storage Class is as shown below:
apiVersion: storage.k8s.io/v1
kind: StorageClass
metadata:
  name: aws-efs
provisioner: satyam/aws-efs
---
apiVersion: v1
kind: PersistentVolumeClaim
metadata:
  name: efs-joomla
  annotations:
    volume.beta.kubernetes.io/storage-class: "aws-efs"
spec:
  accessModes:
    - ReadWriteMany
  resources:
    requests:
      storage: 10Gi
---
apiVersion: v1
kind: PersistentVolumeClaim
metadata:
  name: efs-mysql
  annotations:
    volume.beta.kubernetes.io/storage-class: "aws-efs"
spec:
  accessModes:
    - ReadWriteMany
  resources:
    requests:
      storage: 10Gi
Here, along with specifying Storage Classes , PVC has also been specified for both Joomla as well as MySQL, alternatively,each PVC could also be specified in their respective deployment as well.
Note :Here, the accessModes used is “ReadWriteMany” for both as this setup includes multiple nodes.
Let’s now take a look on Deployment file for Joomla and MySQL.
apiVersion: v1
kind: Service
metadata:
  name: joomla
  labels:
    app: joomla
spec:
  ports:
    - port: 80
  selector:
    app: joomla
    tier: frontend
  type: LoadBalancer
---
apiVersion: apps/v1
kind: Deployment
metadata:
  name: joomla
  labels:
    app: joomla
spec:
  selector:
    matchLabels:
      app: joomla
      tier: frontend
  strategy:
    type: Recreate
  template:
    metadata:
      labels:
        app: joomla
        tier: frontend
    spec:
      containers:
      - image: joomla:3.9.18-apache
        name: joomla
        env:
        - name: JOOMLA_DB_HOST
          value: joomla-mysql
        - name: JOOMLA_DB_PASSWORD
          valueFrom:
            secretKeyRef:
              name: mysql-pass
              key: password
        ports:
        - containerPort: 80
          name: joomla
        volumeMounts:
        - name: joomla-persistent-storage
          mountPath: /var/www/html
      volumes:
      - name: joomla-persistent-storage
        persistentVolumeClaim:
claimName: efs-joomlaapiVersion: v1
kind: Service
metadata:
name: joomla-mysql
labels:
app: joomla
spec:
ports:
- port: 3306
selector:
app: joomla
tier: mysql
clusterIP: None
---
apiVersion: apps/v1
kind: Deployment
metadata:
name: joomla-mysql
labels:
app: joomla
spec:
selector:
matchLabels:
app: joomla
tier: mysql
strategy:
type: Recreate
template:
metadata:
labels:
app: joomla
tier: mysql
spec:
containers:
- image: mysql:5.6
name: mysql
env:
- name: MYSQL_ROOT_PASSWORD
valueFrom:
secretKeyRef:
name: mysql-pass
key: password
ports:
- containerPort: 3306
name: mysql
volumeMounts:
- name: mysql-persistent-storage
mountPath: /var/lib/mysql
volumes:
- name: mysql-persistent-storage
persistentVolumeClaim:
claimName: efs-mysqlNote: In case of Joomla, Service type has been setup to LoadBalancer for provisioning Load Balancer for the Service.
Secrets in Kubernetes is used for storing and managing sensitive information, such as passwords, OAuth tokens, and ssh keys.
Kustomize is used for setting up management for Kubernetes Objects like Volume, Pods and many more, also secret could be generated as well by using secretGenerator field in the file, in this case, MySQL password is generated. Under resources, the order in which file should be executed has been specified .The file is as follows:
apiVersion: kustomize.config.k8s.io/v1beta1
kind: Kustomization
secretGenerator:
- name: mysql-pass
  literals:
  - password=*******
resources:
  - efs-provisioner.yaml
  - rbac.yaml
  - storage-class.yaml
  - mysql-deployment.yaml
  - joomla-deployment.yaml
Note: The file name should be kustomization.yaml only and the command to execute the same is given below.
kubectl apply -k <kustomization_directory> -n <namespace>
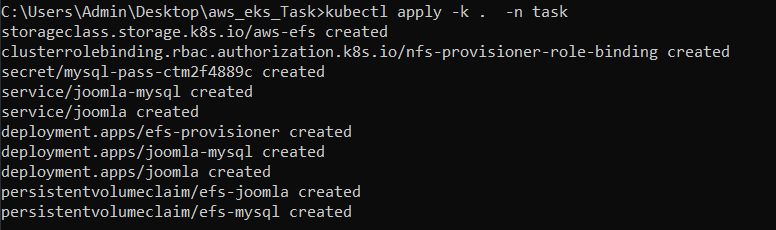
Setup using kustomization.yaml file

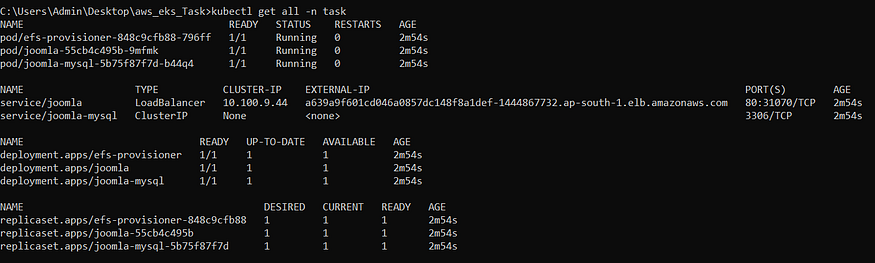
Pods launched
Address for accessing Joomla could be obtained from External-IP for service/joomla
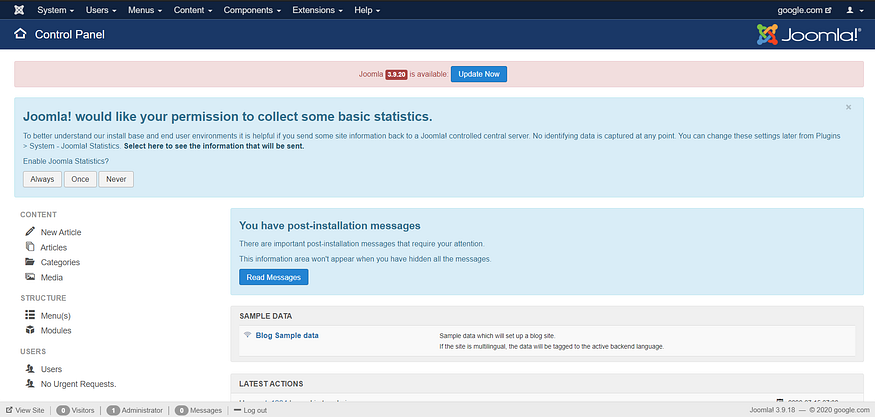
After accessing that address and after doing some initial setup , the screen would look like this

Article created in Joomla

After accessing MySQL in joomla-mysql deployment, the database created while setting up Joomla(i.e., mysql) is visible inside the database indicating that MySQL as a backend has been properly set up
https://www.linkedin.com/in/satyam-singh-95a266182