-
Notifications
You must be signed in to change notification settings - Fork 100
Storage Miners
Please refer to the most updated version!
| Hardware | Minimum | Recommended |
|---|---|---|
| CPU | 4 Cores | 8 Cores |
| Memory (RAM) | 4 GB | 8GB |
| Storage | 500 GB | 1TB |
| Software (OS) |
|---|
| Ubuntu_x64 18.04 or higher |
| CentOS 8.2 or higher |
Note: In addition, the server must also have a static public IP. And the disk space is calculated as: 1kb = 1024byte
- Ubuntu system Enter the command below, and open port range 15001~15010.
sudo ufw allow 15001:15010/tcp-
CentOS system
-
Execute the command sudo firewall-cmd --state in the terminal to check the firewall status.
-
The firewall is closed if it shows “not running”, which means the soft firewall of the server itself will not block any ports. You can go directly to the next step.
-
The firewall is enabled If it shows “running”, enter the following command to open ports 15001-15010.
sudo firewall-cmd --permanent --add-port=15001-15010/tcp
- Restart the firewall:
sudo firewall-cmd --reload
- View the firewall rules:
sudo firewall-cmd --list-all
-
-
Note:
Make sure to open ports from 15001~15010 in the server firewall or security group policy: Since different service providers have different security group policy settings, please consult the server provider and request to open ports in the range from 15001 to 15010.
Check the hard disk status using the df -h command:
df -h- The disk is not mounted If the hard drive for storage mining cannot be found. Use the fdisk -l command to view unmounted hard disks:
fdisk -lDisk /dev/vdb: 30 GiB, 32212254720 bytes, 62914560 sectors Units: sectors of 1 * 512 = 512 bytes Sector size (logical/physical): 512 bytes / 512 bytes I/O size (minimum/optimal): 512 bytes / 512 bytes
The unmounted disk is /dev/vdb in the demonstration above. If the disk cannot be found, which means that the disk has not been installed successfully. Please restart the computer and install it. We will be using /dev/vdb to demonstrate the mounting operation.
- Allocate the /dev/vdb disk
fdisk /dev/vdb
Enter and press Enter:
n
p
1
2048
the value after default
w- Format the newly divided disk into ext4 format
mkfs.ext4 /dev/vdbEnter y to continue If the system asks to proceed Proceed anyway? (y,N) y
- Create /test directory to mount the disk. Using /test as an example
mkdir /test- Type it fstable
echo "/dev/vdb /test ext4 defaults 0 0" >> /etc/fstabNote: replace /dev/vdb with your own disk name. /test‟ has to be the same as created in the previous step.
- Reload fstable
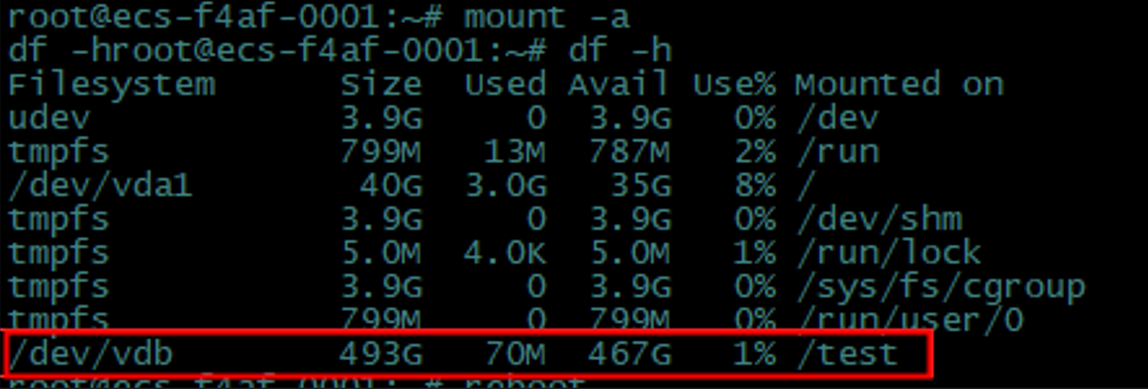
mount -a- Check the disk mounting status
df -h
As shown in the figure above, the disk is mounted successfully!
wget https://github.com/CESSProject/cess-nodeadm/archive/v0.1.2.tar.gz
tar -xvf v0.1.2.tar.gz
cd cess-nodeadm-0.1.2
sudo ./install.sh
Execute the 'sudo ./install.sh' command. The installation is successful when 'Install success' shows up after executing the 'sudo ./install.sh' command.
If the following exception occurs, please execute the following commands, and all future CESS program commands must have sudo privileges.

sudo systemctl start docker-
Please refer to the CESS Wallet section above for creating a CESS wallet. Please join CESS Discord miner support sub-channel to receive TCESS tokens for staking.
-
Miners need to create two wallet accounts.
-
Account 1: For staking, punishment, and identity verification. This wallet address must have TCESS tokens for staking, and the staking rule is 2500TCESS/T. (The raw seed or mnemonic seed will be used in modifying the configuration file).
-
Account 2: For income (miners save their personal raw seed and mnemonic seed securely)
-
cess config set-------------------Install success-----------------------
root@s197281:/home/customer/cess-nodeadm-0.1.1# cess config set
Enter cess node mode from 'authority/storage/watcher' (current: authority, press enter to skip): storage
Which way to use to give the outsider access to the machine?
[0] use external IP; [1] use domain name (default 0): 0
Enter external ip for the machine: 173.....213.58
Enter cess bucket income account: cXiHsw32kT3Fzw6YeXDTECCfFNKjDVg85eg......
Enter cess bucket signature phrase: shoe ...... creek metal avoid
Enter cess bucket disk path (default: /opt/cess/storage/disk): /cess
Enter cess bucket space, by GB unit (current: 300, press enter to skip): 1000
----------Set configurations successfully------------If the error message below occurs, try the 'cess config set' command several times.
'[ERROR] download image cesslab/cess-bucket:latest failed, try again later'
cess startcess bucket state
Fail:
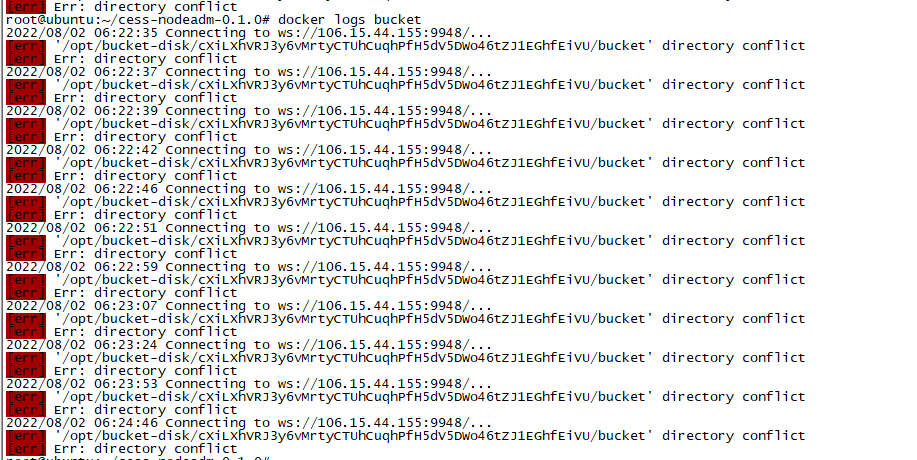
cess logs bucketPlease clean up the mount directory if the errors shown below occur.

for example :
rm -rf /cess (/cess is the mount path)
cess reloadcess bucket increase <deposit amount>cess bucket exit- Note: Do NOT press click the EXIT Command (your miner account will be deleted permanently!)
cess bucket update_income [account]cess bucket update_address [ip:port]cess stopExecute the 'sudo ./install.sh' command. The installation is successful when 'Install success' shows up after executing the 'sudo ./install.sh' command.
If the following exception occurs, please execute the following commands, and all future CESS program commands must have sudo privileges.

sudo systemctl start dockercess config set-------------------Install success-----------------------
root@s197281:/home/customer/cess-nodeadm-0.1.1# cess config set
Enter cess node mode from 'authority/storage/watcher' (current: authority, press enter to skip): storage
Which way to use to give the outsider access to the machine?
[0] use external IP; [1] use domain name (default 0): 0
Enter external ip for the machine: 173.....213.58
Enter cess bucket income account: cXiHsw32kT3Fzw6YeXDTECCfFNKjDVg85eg......
Enter cess bucket signature phrase: shoe ...... creek metal avoid
Enter cess bucket disk path (default: /opt/cess/storage/disk): /cess
Enter cess bucket space, by GB unit (current: 300, press enter to skip): 1000
----------Set configurations successfully------------If the error message below occurs, try the 'cess config set' command several times.
'[ERROR] download image cesslab/cess-bucket:latest failed, try again later'
cess tools upgrade-image chain
cess tools upgrade-image config-gen
cess tools upgrade-image bucket
cess purge
cess config generatecess start