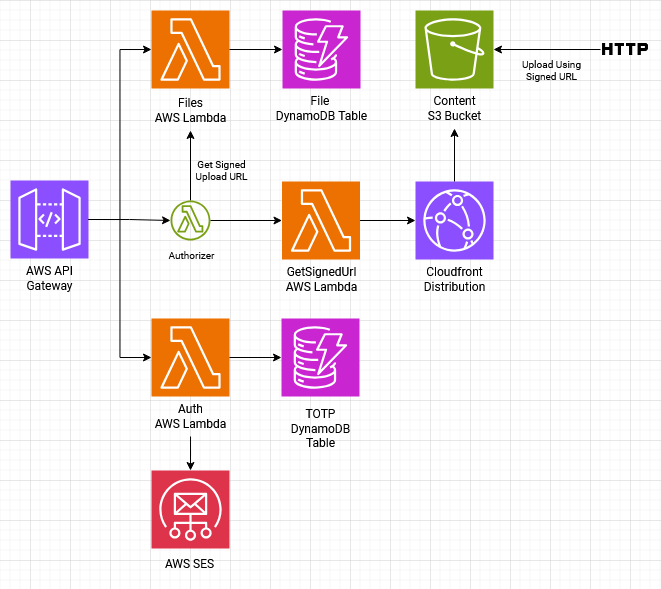
It allows users to authenticate using email address and an OTP code sent through email message and once authenticated you can download files content and upload new files. It also has a trigger for new uploaded files that adds the file to AWS DynamoDB and make it is listed in the endpoints. CloudFront was used to caching files.
- Node.js ^20.16.0
- Serveless Framework
- AWS Account
npm install
Or:
yarn
Rename the .env.example in the root directory to .env then update it with your settings.
| key | description |
|---|---|
| TOTP_KEY | An alphanumeric random string. Seed used to generate OTP codes. |
| JWT_SECRET | An alphanumeric random string. Used to create signed tokens. |
| NOREPLY_EMAIL_ADDRESS | Email address used to send the OTP code email message. |
| REGION | AWS Region. |
First we need to spin up localstack container and create the needed resources using localstack.sh script:
docker-compose up -d
docker-compose exec -it localstack sh -c "/var/lib/localstack/scripts/localstack.sh"
Or you can access the container and run
sh /var/lib/localstack/scripts/localstack.sh
Now start the server:
yarn dev:serverOr:
npm run dev:server| route | HTTP Method | params | description | authentication |
|---|---|---|---|---|
/files |
GET | cursorId query parameter. |
List files. | - |
/file/:id/signed-url |
GET | id of a file. |
Generate a signed URL to download file content. | Required |
/files |
POST | Body with title and filename. |
Generate presigned URL to upload file. | Required |
/auth |
POST | Body with email. |
Send OTP code to the provided email address. | - |
/auth |
POST | Body with email and otp. |
Authenticate user and generate JWT token. | - |
POST /files
Request body:
{
    "title": "Lorem Ipsum",
    "filename": "sample.mp4"
}
POST /auth
Request body:
{
    "email": "johndoe@example.com"
}
{
"email": "johndoe@example.com",
"otp": "111065"
}First you will need to generate public and private keys for CloudFront Distribution:
openssl genpkey -algorithm RSA -out private_key.pem -aes256
openssl rsa -pubout -in private_key.pem -out public_key.pem
Once the files exist they will be included into the package by
serverless.tsconfiguration file.
Now you are ready to deploy:
sls deployJest was the choice to test the app, to run:
$ yarn test
Or:
$ npm run test
Run the command in the root folder
You can see the coverage report inside tests/coverage. They are automatically created after the tests run.


