Quick links: Motivation | Feature guide | *Demos* | How does it work? | *Install* | Try it out & Setup | Glossary | FAQ | Support | Troubleshooting guide | Developer’s guide
Promnesia is a browser extension for Chrome/Firefox (including Firefox for Android!) which serves as a web surfing copilot, enhancing your browsing history and web exploration experience.
TLDR: it lets you explore your browsing history in context: where you encountered it, in chat, on Twitter, on Reddit, or just in one of the text files on your computer. This is unlike most modern browsers, where you can only see when you visited the link.
It allows you to answer different questions about the current web page:
- have I been here before? When? demo (30 s) demo (40s)
- how did I get on it? Which page has led to it? demo (40s)
- why have I bookmarked it? who sent me this link? Can I just jump to the message? demo (30s)
- or, can I jump straight into the file where the link occurred? demo (20s)
- which links on this page have I already explored? demo (30s),
- which posts from this blog page have I already read? demo (20s)
- have I annotated it? demo (1m)
- how much time have I spent on it? screenshot
- and it also works on your phone! screenshot
See feature guide for more information.
You can jump straight to the Demos and Install sections if you’re already overexcited.
See a writeup on history and the problems Promnesia is solving. Here’s a short summary.
- Has it ever occurred to you that you were reading an old bookmark or some lengthy blog post and suddenly realized you had read it already before? It would be fairly easy to search in the browser history, however, it is only stored locally for three months.
- Or perhaps you even have a habit of annotating and making notes elsewhere? And you wanna know quickly if you have the current page annotated and display the annotations. However, most services want you to use their web apps even for viewing highlights. You don’t know if you have highlights, unless you waste time checking every page.
- Or you have this feeling that someone sent you this link ages ago, but you don’t remember who and where.
- Or you finally got to watch that thing in your ‘Watch later’ youtube playlist, that’s been there for three years, and now you want to know why did you add it in the first place.
Then this tool is for you.
See feature guide if you’re wondering how something specific here works.
- a green eye means that the link was visited before and has some contexts, associated with it. When you click on it, the sidebar opens with more information about the visits.
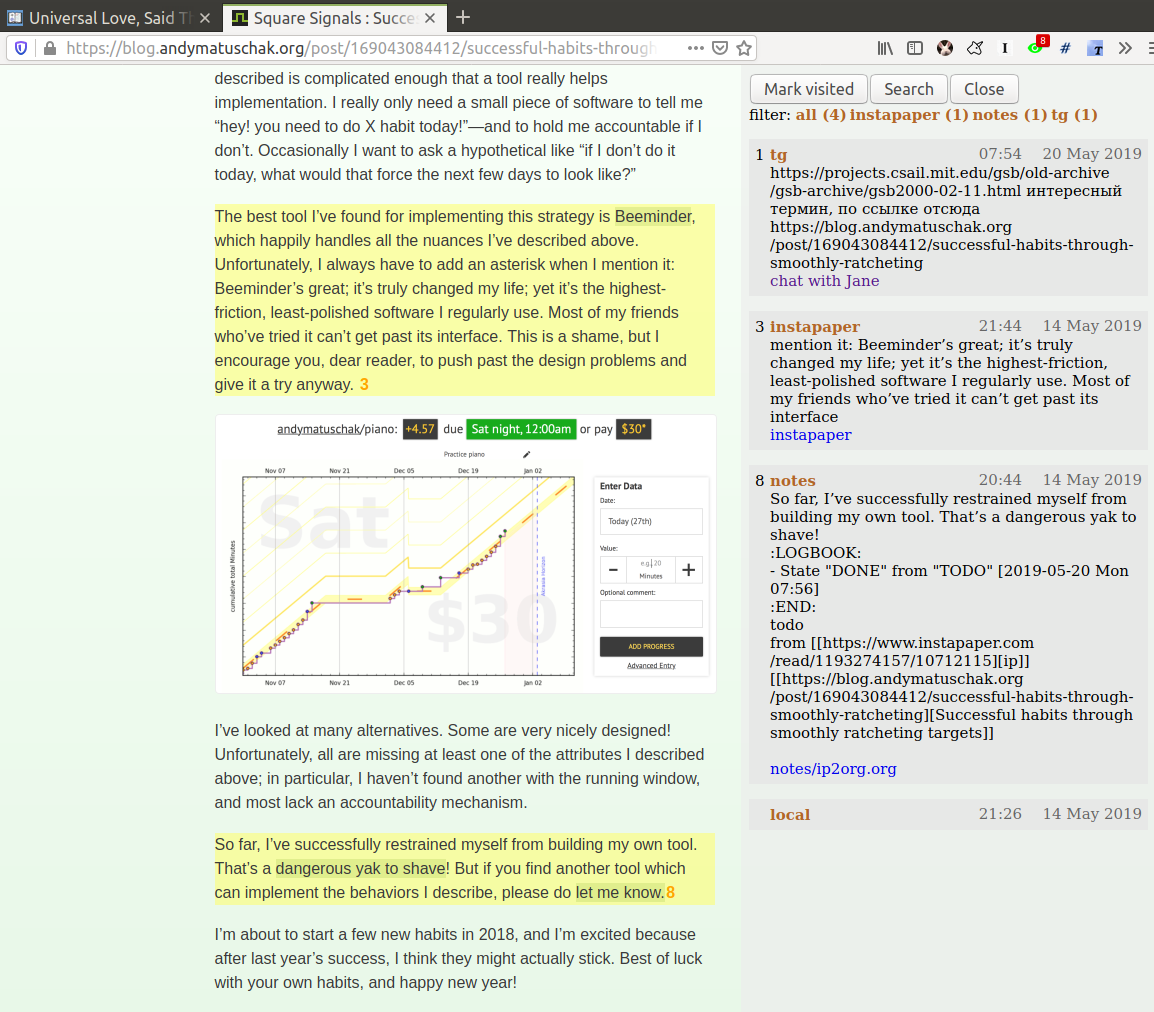
- You can see that I’ve sent the link to Jane on Telegram (#1)
- I’ve annotated the link on Instapaper and highlights (#3) is marked with yellow right within the page
Normally in order to see see your Instapaper highligths you have to go to the web app first!
- I’ve clipped some content to my personal notes at some point (#8), the selected text was matched and highlighted as well
If I click
notes/ip2org.org, it will cause my Emacs to open and jump to the file, containing this note.
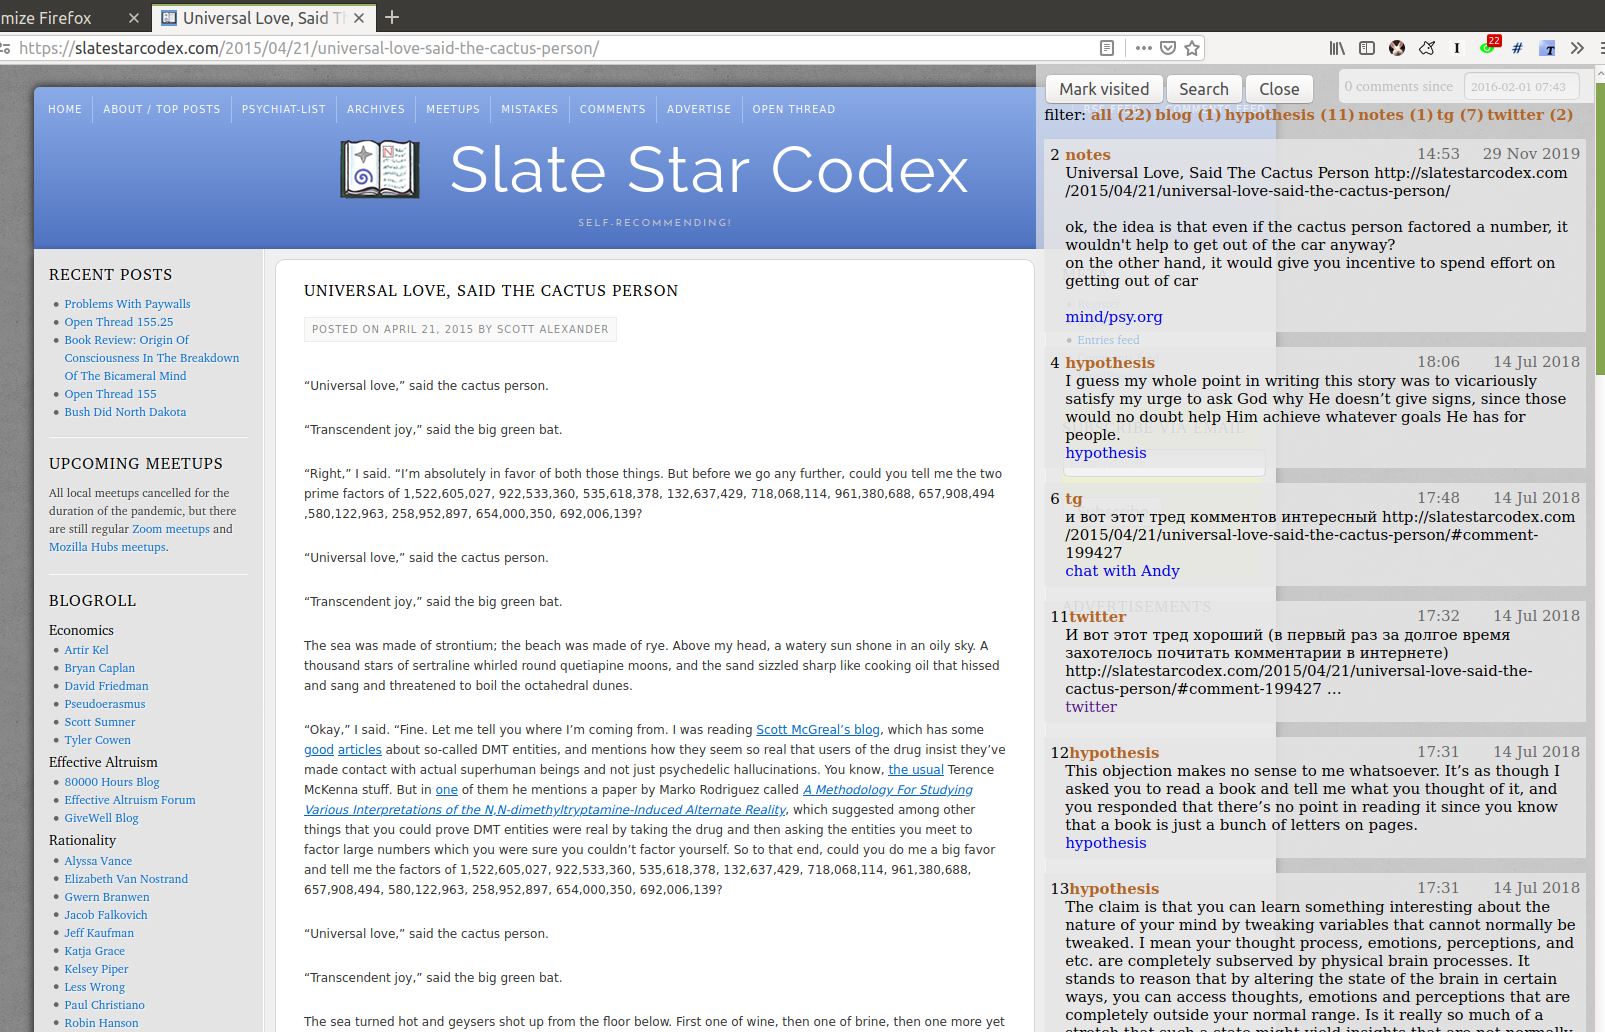
- I have a note about the page in my personal notes on my filesystem (#2)
- I chatted with a friend and sent them the link at some point (#6)
Clicking on the link will open Telegram and jump straight to the message where the link was mentioned. So you can reply to it without having to search or scroll over the whole chat history.
- I’ve tweeted about this link before (#11)
Similarly, clicking would jump straight to my tweet.
- I also have this link annotated via Hypothesis (#4, #12, #13)
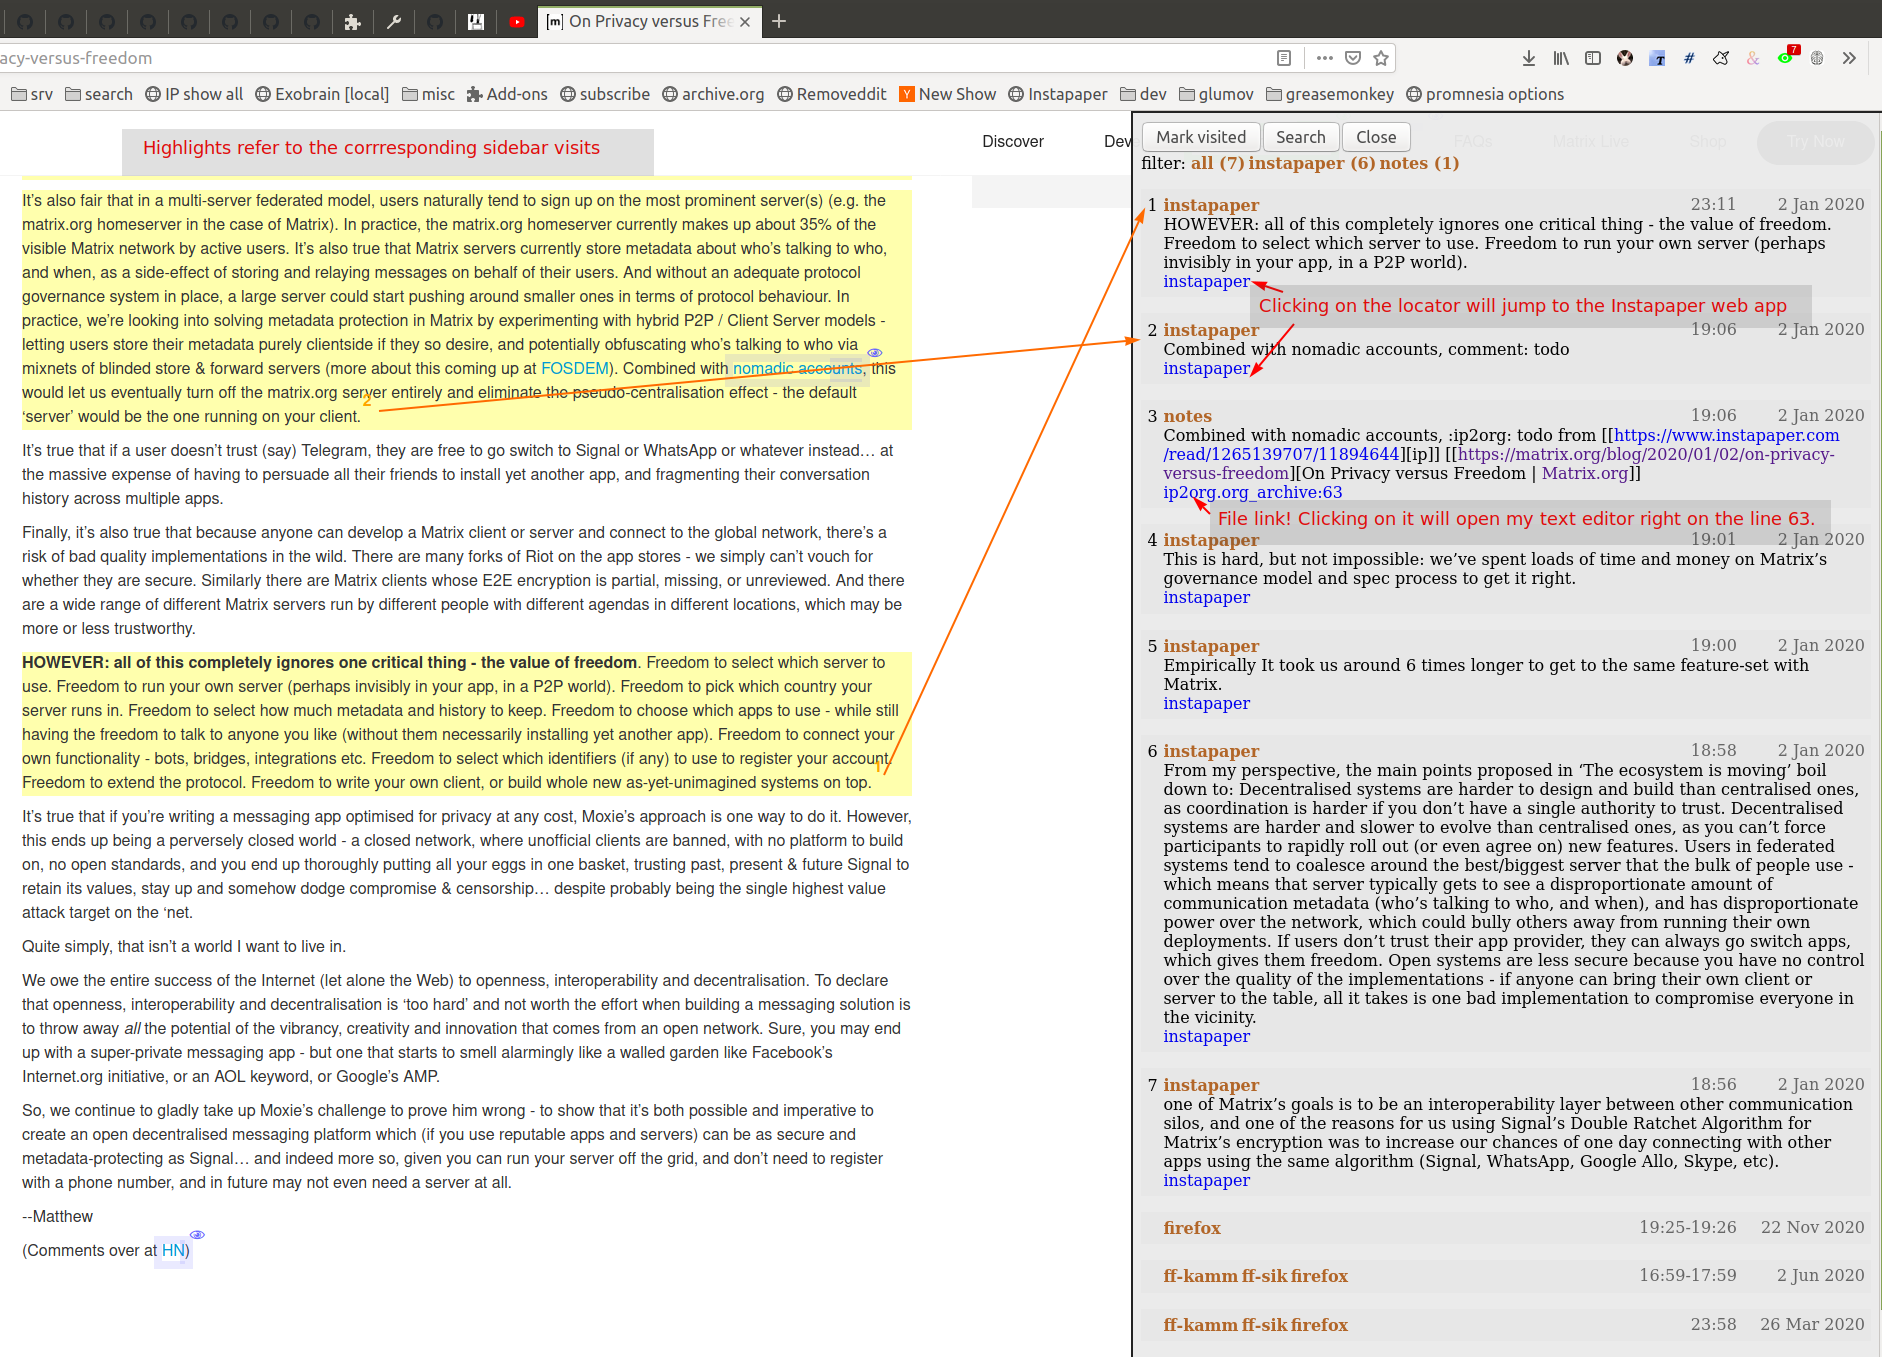
- Annotated demo of sidebar with direct & child visits, and ‘visited’ marks (click to zoom)

- Annotated demo of highlight and locator features (click to zoom)

- More:
- A video, demonstrating
- ‘mark visited’ feature
- highlights
- jumping to the originating tweet; jumping straight to the org-mode heading where links occurred
- You can find more short screencasts, demonstrating various features here
- There are more screenshots here
- This post features a video demo of using Promnesia with a Roam Research database
- Video demos for the mobile extension:
- showing all references to pages on W3C website in my org-mode notes
- marking already visited links on the page, to make easier to process Reddit posts
- A video, demonstrating
- browser extension
- neatly displays the history and other information in a sidebar
- handles highlights
- provides search interface
However, browser addons can’t read access your filesystem, so to load the data we need a helper component:
- server/backend:
promnesia servecommandIt’s called ‘server’, but really it’s just a regular program with the only purpose to serve the data to the browser. It runs locally and you don’t have to expose it to the outside.
- indexer:
promnesia indexcommandIndexer goes through the sources (specified in the config), processes raw data and extracts URLs along with other useful information.
Another important thing it’s doing is normalising URLs to establish equivalence and stip off garbage. I write about the motivation for it in “URLs are broken”.
You might also want to skim through the glossary if you want to understand deeper what information Promnesia is extracting.
Promnesia ships with some builtin sources. It supports:
- data exports from online services: Reddit/Twitter/Hackernews/Telegram/Messenger/Hypothesis/Pocket/Instapaper, etc.
It heavily benefits from HPI package to access the data.
- Google Takeout/Activity backups
- Markdown/org-mode/HTML or any other plaintext on your disk
- in general, anything that can be parsed in some way
- you can also add your own custom sources, Promnesia is extensible
See SOURCES for more information.
Here’s a diagram, which would hopefully help to understand how data flows through Promnesia.
See HPI section on data flow for more information on HPI modules and data flow.
Also check out my infrastructure map, which is more detailed!
┌─────────────────────────────────┐ ┌────────────────────────────┐ ┌─────────────────┐
│ 💾       HPI sources            │ │  💾    plaintext files      │ │  other sources  │
│ (twitter, reddit, pocket, etc.) │ │ (org-mode, markdown, etc.) │ │ (user-defined)  │
└─────────────────────────────────┘ └────────────────────────────┘ └─────────────────┘
                                ⇘⇘              ⇓⇓               ⇙⇙
                                 ⇘⇘             ⇓⇓              ⇙⇙
                                 ┌──────────────────────────────┐
                                 │ 🔄    promnesia indexer      │
                                 |        (runs regularly)      │
                                 └──────────────────────────────┘
                                                ⇓⇓
                                 ┌──────────────────────────────┐
                                 │ 💾    visits database        │
                                 │       (promnesia.sqlite)     │
                                 └──────────────────────────────┘
                                                ⇓⇓
                                 ┌──────────────────────────────┐
                                 │ 🔗    promnesia server       │
                                 |       (always running)       |
                                 └──────────────────────────────┘
                                                ⇣⇣
                                 ┌─────────────────────────────────┐
         ┌───────────────────────┤  🌐      web browser            ├────────────────────┐
         │  💾 browser bookmarks ⇒      (promnesia extension)      ⇐  💾 browser history |
         └───────────────────────┴─────────────────────────────────┴────────────────────┘
- extension:
- Chrome: desktop version. Unfortunately mobile Chrome doesn’t support web extensions.
- Firefox: desktop and Android
- note: web extensions on Android are mostly broken at the moment, see here (unless you’re using Firefox Nightly)
- unfortunately, iOS Firefox doesn’t support web extensions.
- you can also find ‘unpacked’ versions in Releases
It can be useful because Chrome Web Store releases might take days to approve, but in general the store version if preferrable.
- backend
Note that Promnesia can work without the backend, so technically this step is optional. But then it will only be able to use browser visits and browser bookmarks, so the benefits of the extension will be limited.
- simplest: install from PyPi:
pip3 install --user promnesia- install optional dependencies with:
pip3 install --user bs4 lxml mistletoe logzero
- install optional dependencies with:
- alternatively: you can clone this repository and run it as
scripts/promnesiaThis is mainly useful for tinkering with the code and writing new modules.
You might also need some extra dependencies. See “Extra dependencies” for more info.
As for supported operating systems:
- Linux: everything is expected to work as it’s what I’m using!
- OSX: expected to work, but there might be issues at times (I don’t have any macs so working blind here). Appreciate help!
You might want to run
brew install libmagicfor proper MIME type detection. - Windows: at the moment doesn’t work straightaway (I don’t have any Windows to test against), there is an open issue describing some workarounds.
- Android: allegedly, possible to run with Termux! But I haven’t got to try personally.
- simplest: install from PyPi:
You can try out Promnesia with the extension only, it uses browser history and bookmarks as data sources. However, Promnesia’s main power is using data from external sources, and for that you’ll need to run the indexer and backend (more on it in the next section).
The easiest way to try this mode is to run promnesia demo command, it can give you a sense of what Promnesia is doing with zero configuration.
- Install the extension and the server (PIP package), in case you haven’t already
- Run
promnesia demo https://github.com/karlicoss/exobrainThis clones the repository, (my personal wiki in this case), extracts the URLs, and runs on the port
13131(default, can be specified via--port)You can also use a path on your local filesystem (e.g. directory with text files), or a website URL.
- After that, visit https://www.reddit.com
If you press the extension icon, you will see the pages from my blog where I link to posts on Reddit.
To get the most benefit from Promnesia, it’s best to properly setup your own config, describing the sources you want it to use. If something is unclear, please feel free to open issues or reach me, I’m working on improving the documentation. Also check out troubleshooting guide or open discussions on documentation.
- create the config:
promnesia config createThe command will put a stub promnesia config in your user config directory, e.g.
~/.config/promnesia/config.pyon Linux. (it’s possibly different on OSX and Windows, see this if you’re not sure). If you wish to specify a custom location, you can set thePROMNESIA_CONFIGenvironment variable or pass the--configflag. - edit the config and add some sources
You can look at an example config, or borrow bits from an annotated configuration example here: doc/config.py.
The only required setting is:
SOURCESSOURCES specifies the list of data sources, that will be processed and indexed by Promnesia.
You can find the list of available sources with more documentation on each of them here: SOURCES.
- reading example config: doc/config.py
- browsing the code: promnesia/sources.
If you want to learn about other settings, the best way at the moment (apart from reading the source) is, once again, example config.
- [optional] check the config
First, you can run
promnesia doctor config, it can be used to quickly troubleshoot typos and similar errors. Note that you may need to install [mypy](https://github.com/python/mypy) for some config checks.Next, you can use the demo mode:
promnesia demo --config /path/to/config.py.This will index the data and launch the server immediately, so you can check that everything works as expected in your browser.
- run the indexer:
promnesia indexAt the moment, indexing is periodic, not realtime. The best is to run it via cron/systemd once or several times a day:
# run every hour in cron
0 * * * *      promnesia index    >/tmp/promnesia-index.log 2>/tmp/promnesisa-index.err
Note: you can also pass
--config /path/to/config.pyexplicitly if you prefer or want to experiment.- [optional] check the database
Run
promnesia doctor databaseto quickly inspect the database and check that stuff that you wanted got indexed. You might need to installsqlitebrowserfirst.
- [optional] check the database
- run the server:
promnesia serveYou only have to start it once, it will automatically detect further changes done by
promnesia index.- [optional] autostart the server with
promnesia install-serverThis sets it up to autostart and run in the background:
- via Systemd for Linux
- via Launchd for OSX. I don’t have a Mac nearby, so if you have any issues with it, please report them!
I think you can also use cron with
@rebootattribute:# sleep is just in case cron starts up too early. Prefer systemd script if possible! @reboot sleep 60 && promnesia serve >/tmp/promnesia-serve.log 2>/tmp/promnesia-serve.errAlternatively, you can just create a manual autostart entry in your desktop environment.
- [optional] check that the server is responding
promnesia doctor server
- [optional] autostart the server with
- [optional] setup MIME handler to jump to files straight from the extension
See a short 20s demo, and if this is something you’d like, follow the instructions in open-in-editor.
Visit represents an ‘occurence’ of a link in your digital trace. Obviously, visiting pages in your browser results in visits, but in Promnesia this notion also captures links that you interacted with in other applications and services.
In code (python, JS), visits are reprented as class Visit (and class DbVisit).
Visits have the following fields:
- url: hopefully, no explanation needed!
The only required field.
- timestamp: when the page was visited
Required, but in the future might be optional (sometimes you don’t have a meaningful timestamp).
- locator: what’s the origin of the visit?
Usually it’s a permalink back to the original source of the visit.
For example:
- locators for a link extracted from Reddit data point straight into
reddit.cominterface, for the corresponding post or comment - locators for a link extracted a local file point straight into these files on your disk. Clicking on the locator will open your text editor via MIME integration
Required, but in the future might be optional. (TODO also rename to ‘origin’??)
- locators for a link extracted from Reddit data point straight into
- context: what was the context, in which the visit occurred?
For example:
- context for Telegram visits is the message body along with its sender
- context for a link from org-mode file is the whole paragraph (outline), in which it occurred
I usually call a visit without a context ‘boring’ – it doesn’t contain much information except for the mere fact of visiting the page before. However they are still useful to have, since they fill in the gaps and provide means of tracing through your history.
Optional.
- duration: how much we have spent on the page
Somewhat experimental field, at the moment it’s only set for Chrome (and often not very precise).
Optional.
Digression: now that you have an idea what is a Visit, you can understand few more things about Promnesia:
- source (or indexer) is any function that extract visits from raw files and generates a stream of visits (i.e.
Iterable[Visit]). - promnesia indexer goes through the sources, specified in config, collects the visits and puts in the database
- promnesia server reads visits form the database, and sends them to the extension
Now let’s consider some concrete examples of different kinds of Visits:
- Google Takeout indexer
Results in visits with:
- url
- timestamp
- locator
There isn’t any context for visits from takeout, because it’s basically a fancy database export.
- Instapaper indexer
Generates a visit for each highlight on the page:
- url: original URL of the annotated page
- timestamp: time when you created the highlight
- locator: permalink to the highlight, bringing you into the Instapaper web app
- context: highlight body
- Markdown indexer
Extracts any links it finds in Markdown files:
- url: extracted link
- timestamp: Markdown doesn’t have a well defined datetime format, so it’s just set to the file modification time.
However, if you do have your own format, it’s possible to write your own indexer to properly take them into the account.
- locator: links straight into the markdown file on your disk!
- context: the markdown paragraph, containing the url
Note: this terminology is not set is stone, so if someone feels there are words that describe these concepts better, I’m open to suggestions!
The best support for me would be if you contribute to this or my other projects. Code, ideas of feedback – everything is appreciated.
I don’t need money, but I understand it’s often easier to give away than time, so here are some of projects that I donate to:

