Also, available in other languages: Русский
multifactor-radius-adapter is a RADIUS server for Linux. It allows you to quickly add multifactor authentication through RADIUS protocol to your VPN, VDI, RDP, and other resources.
The component is a part of MultiFactor 2FA hybrid solution.
See documentation at https://multifactor.pro/docs/radius-adapter/linux/ for additional guidance on integrating 2FA through RADIUS into your infrastructure.
Windows version of the component is available in our MultiFactor.Radius.Adapter repository.
- Background
- Prerequisites
- Installation
- Configuration
- Start-Up
- Logs
- Limitations of Active Directory Integration
- Use Cases
- License
Remote Authentication Dial-In User Service (RADIUS) — is a networking protocol primarily used for remote user authentication.
The protocol has been around for a long time and is supported by major network devices and services vendors.
Key features:
- Receive authentication requests through the RADIUS protocol;
- Verify the first authentication factor — user login and password in Active Directory (AD) or Network Policy Server (NPS);
- Verify the second authentication factor on the user's secondary device (usually, mobile phone).
Additional features:
- Inline enrollment within VPN/VDI client;
- Conditional access based on the user's group membership in Active Directory;
- Activate second factor selectively based on the user's group membership in Active Directory;
- Use user's phone number from Active Directory profile for one-time SMS passcodes;
- Configure RADIUS response attributes based on user's Active Directory group membership;
- Proxy Network Policy Server requests and responses.
- Component is installed on a Linux server, tested on CentOS, Ubuntu, Debian;
- Minimum server requirements: 1 CPU, 2 GB RAM, 8 GB HDD (to run the OS and adapter for 100 simultaneous connections — approximately 1500 users);
- Port 1812 (UDP) must be open on the server to receive requests from Radius clients;
- The server with the component installed needs access to
api.multifactor.ruvia TCP port 443 (TLS) directly or via HTTP proxy; - To interact with Active Directory, the component needs access to the domain server via TCP port 389 (LDAP scheme) or 636 (LDAPS scheme);
- To interact with the Network Policy Server, the component needs access to NPS via UDP port 1812.
The component uses the .NET 6 runtime environment, which is free, open-source, developed by Microsoft and the open-source community. The runtime environment does not impose any restrictions on its use.
To install, run the commands:
sudo rpm -Uvh https://packages.microsoft.com/config/centos/7/packages-microsoft-prod.rpm
sudo yum install aspnetcore-runtime-6.0
https://docs.microsoft.com/ru-ru/dotnet/core/install/linux-centos
⚠️ Warning
CentOS Linux 8 reached an early End Of Life (EOL) on December 31st, 2021.
For more information, see the official CentOS Linux EOL page. Because of this, .NET isn't supported on CentOS Linux 8.
For more information see this page.
See also: install the .NET on CentOS Stream.
$ wget https://packages.microsoft.com/config/ubuntu/18.04/packages-microsoft-prod.deb -O packages-microsoft-prod.deb
$ sudo dpkg -i packages-microsoft-prod.deb

$ sudo apt-get update; \
  sudo apt-get install -y apt-transport-https && \
  sudo apt-get update && \
  sudo apt-get install -y aspnetcore-runtime-6.0
https://docs.microsoft.com/ru-ru/dotnet/core/install/linux-ubuntu
$ wget https://packages.microsoft.com/config/debian/10/packages-microsoft-prod.deb -O packages-microsoft-prod.deb
$ sudo dpkg -i packages-microsoft-prod.deb

$ sudo apt-get update; \
  sudo apt-get install -y apt-transport-https && \
  sudo apt-get update && \
  sudo apt-get install -y aspnetcore-runtime-6.0
https://docs.microsoft.com/ru-ru/dotnet/core/install/linux-debian
Create a folder, download and unzip the current version of the component from GitHub:
sudo mkdir /opt/multifactor /opt/multifactor/radius /opt/multifactor/radius/logs
sudo wget https://github.com/MultifactorLab/multifactor-radius-adapter/releases/latest/download/release_linux_x64.zip
sudo unzip release_linux_x64.zip -d /opt/multifactor/radius
Create a system user mfa and give it rights to the application:
sudo useradd -r mfa
sudo chown -R mfa: /opt/multifactor/radius/
sudo chmod -R 700 /opt/multifactor/radius/
Create a service
sudo vi /etc/systemd/system/multifactor-radius.service[Unit]
Description=Multifactor Radius Adapter
[Service]
WorkingDirectory=/opt/multifactor/radius/
ExecStart=/usr/bin/dotnet /opt/multifactor/radius/multifactor-radius-adapter.dll
Restart=always
# Restart service after 10 seconds if the service crashes:
RestartSec=10
KillSignal=SIGINT
SyslogIdentifier=multifactor-radius
User=mfa
Environment=ASPNETCORE_ENVIRONMENT=Production
Environment=DOTNET_PRINT_TELEMETRY_MESSAGE=false
# How many seconds to wait for the app to shut down after it receives the initial interrupt signal.
# If the app doesn't shut down in this period, SIGKILL is issued to terminate the app.
# The default timeout for most distributions is 90 seconds.
TimeoutStopSec=30
[Install]
WantedBy=multi-user.targetEnable autorun:
sudo systemctl enable multifactor-radiusThe component's parameters are stored in /opt/multifactor/radius/multifactor-radius-adapter.dll.config in XML format.
<appSettings>
  <!-- The address and port (UDP) on which the adapter will receive authentication requests from clients -->
  <!-- If you specify 0.0.0.0, then the adapter will listen on all network interfaces -->
  <add key="adapter-server-endpoint" value="0.0.0.0:1812"/>

  <!-- Shared secret to authenticate RADIUS clients -->
  <add key="radius-shared-secret" value=""/>

  <!-- How to check the first factor: Active Directory, RADIUS or None (do not check) -->
  <add key="first-factor-authentication-source" value="ActiveDirectory"/>

  <!-- Multifactor API address -->
  <add key="multifactor-api-url" value="https://api.multifactor.ru"/>
  <!--Timeout for requests in the Multifactor API, the minimum value is 65 seconds-->
  <add key="multifactor-api-timeout" value="00:01:05"/>
  <!-- NAS-Identifier parameter to connect to the Multifactor API (found in user profile) -->
  <add key="multifactor-nas-identifier" value=""/>
  <!-- Shared Secret parameter to connect to the Multifactor API (found in user profile) -->
  <add key="multifactor-shared-secret" value=""/>

  <!-- Use this option to access the Multifactor API via HTTP proxy (optional)-->
  <!--add key="multifactor-api-proxy" value="http://proxy:3128"/-->

  <!-- Logging level: 'Debug', 'Info', 'Warn', 'Error' -->
  <add key="logging-level" value="Debug"/>

  <!-- [Optional] Enable/disable nested group checking in active directory -->
  <add key="load-active-directory-nested-groups" value="false"/>

  <!-- [Optional] Base dn(s) separated by ';' for user nested groups checking.
  Specify the containers in which to search for nested groups. -->
  <add key="nested-groups-base-dn" value="CN=Users,DC=domain,DC=your;OU=Admins,DC=domain,DC=your"/>
</appSettings>To check the first factor in the Active Directory domain, the following parameters apply:
<appSettings>
<!--ActiveDirectory authentication settings: for example domain.local on host 10.0.0.4 -->
<add key="active-directory-domain" value="ldaps://10.0.0.4/DC=domain,DC=local"/>
<!--Give access to users from specified group only (not checked if setting is removed)-->
<add key="active-directory-group" value="VPN Users"/>
<!--Require the second factor for users from a specified group only (second factor is required for users if the setting is removed)-->
<add key="active-directory-2fa-group" value="2FA Users"/>
<!--Use your users' phone numbers listed in Active Directory to send one-time SMS codes (not used if settings are removed)-->
<!--add key="use-active-directory-user-phone" value="true"/-->
<!--add key="use-active-directory-mobile-user-phone" value="true"/-->
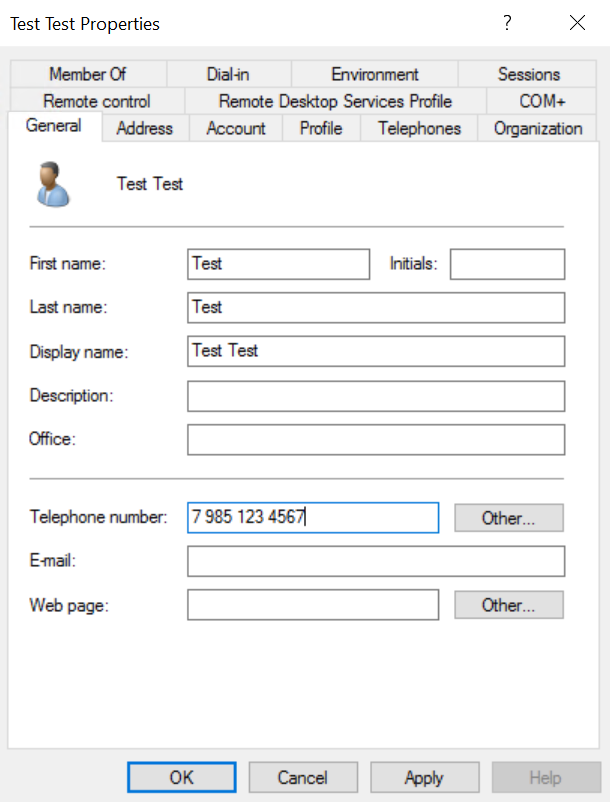
</appSettings>When the use-active-directory-user-phone option is enabled, the component will use the phone recorded in the General tab. The format of the phone can be anything.
When the use-active-directory-mobile-user-phone option is enabled, the component will use the phone recorded in the Telephones tab in the Mobile field. The format of the phone can also be any format.

To check the first factor in RADIUS, for example in Network Policy Server, the following parameters are applicable:
<appSettings>
  <!--Address (UDP) from which the adapter will connect to the server -->
  <add key="adapter-client-endpoint" value="192.168.0.1"/>
  <!--Server address and port (UDP) -->
  <add key="nps-server-endpoint" value="192.168.0.10:1812"/>
</appSettings>You can specify attributes the component will pass further upon successful authentication, including verification that the user is a member of a security group.
<RadiusReply>
    <Attributes>
        <!--This is an example, any attributes can be used-->
        <add name="Class" value="Super" />
        <add name="Fortinet-Group-Name" value="Users" when="UserGroup=VPN Users"/>
        <add name="Fortinet-Group-Name" value="Admins" when="UserGroup=VPN Admins"/>
    </Attributes>
</RadiusReply>The following parameters will help you set up access to the MULTIFACTOR API when checking the second factor:
<appSettings>
  <!-- Use the specified attribute as the user identity when checking the second factor-->
  <add key="use-attribute-as-identity" value="mail"/>
  <!-- Skip repeated authentications without requesting the second factor for 1 hour, 20 minutes, 10 seconds (caching is disabled if you remove the setting) -->
  <add key="authentication-cache-lifetime" value="01:20:10" />
  <!-- If the API is unavailable, skip the MULTIFACTOR without checking (by default), or deny access (false) -->
  <add key="bypass-second-factor-when-api-unreachable" value="true"/>
  <!-- Automatically assign MULTIFACTOR group membership to registering users -->
  <add key="sign-up-groups" value="group1;Group name 2"/>
</appSettings>The Adapter now supports new mode: Second Factor Authentication before First Factor Authentication. If this mode is enabled, the user will have to confirm the second factor before he can proceed to confirm the first (login/password). All current features such as BYPASS and INLINE ENROLLMENT are available in the new mode as well.
Note: The Second Factor Authentication before First Factor Authentication mode is not available for Winlogon and RDGW resources.
All available methods - push, telegram, otp - specifies the preferred method for the current user during the authentication session on the Multifactor Cloud side. This means that the specified method will be preferred. But if this method is not available, the next one will be used according to priority.
In otp mode, the user must enter the OTP code in the User-Password attribute along with the password. If no password is required, the user only needs to enter the OTP code.
Examples of User-Password attribute content:
- password + otp: mypassword123456
- otp only: 123456
You can activate this mode by adding the following option to the client config:
<add key="pre-authentication-method" value="METHOD"/>
Allowed METHOD values: none (by default), push, telegram, otp.
If the mode is enabled (push, telegram, otp) it is necessary to add invalid credential delay settings in root or client level config:
<add key="invalid-credential-delay" value="DELAY"/>
The minimal value of DELAY must be 2.
<appSettings>
  <!-- feature disabled -->
  <add key="pre-authentication-method" value="none"/>
  <add key="invalid-credential-delay" value="0"/>

  <!-- push -->
  <add key="pre-authentication-method" value="push"/>
  <add key="invalid-credential-delay" value="2"/>

  <!-- telegram -->
  <add key="pre-authentication-method" value="telegram"/>
  <add key="invalid-credential-delay" value="3-5"/>

  <!-- otp -->
  <add key="pre-authentication-method" value="otp"/>
  <add key="invalid-credential-delay" value="4"/>
</appSettings>There are such options to customize logging:
<appSettings>
  <!--Allows you to customize the template of logs which get into the system log -->
  <add key="console-log-output-template" value="outputTemplate"/>
  <!--Allows you to customize the logs’ template which get into the file -->
  <add key="file-log-output-template" value="outputTemplate"/>
</appSettings>
As outputTemplate also acts text template which shows the logging system how the message should be formatted. For example
[{Timestamp:HH:mm:ss} {Level:u3}] {Message:lj}{NewLine}{Exception}
[{Timestamp:HH:mm:ss} {Level:u3}] {CorrelationId} {Message:lj}{NewLine}{Exception}
For more information see this page.
Moreover, logging can be provided in json:
<appSettings>
  <add key="logging-format" value="format"/>
</appSettings>
Keep in mind that console-log-output-template and file-log-output-template settings are not applicable for the JSON log format, but it's possible to choose from predefined formats. Here are possible values of the format parametr (register is not case-sensitive).
-
JsonorJsonUtc. Compact logging, times in UTC.{"@t":"2016-06-07T03:44:57.8532799Z","@m":"Hello, \"nblumhardt\"","@i":"7a8b9c0d","User":"nblumhardt"} -
JsonTz. Compact logging, differs fromJsonUtcby the time format. In this kind of format the local time with time zone is indicated.{"@t":"2023-11-23 17:16:29.919 +03:00","@m":"Hello, \"nblumhardt\"","@i":"7a8b9c0d","User":"nblumhardt"} -
Ecs. Ecs formats logs according to elastic common schema.{ "@timestamp": "2019-11-22T14:59:02.5903135+11:00", "log.level": "Information", "message": "Log message", "ecs": { "version": "1.4.0" }, "event": { "severity": 0, "timezone": "AUS Eastern Standard Time", "created": "2019-11-22T14:59:02.5903135+11:00" }, "log": { "logger": "Elastic.CommonSchema.Serilog" }, "process": { "thread": { "id": 1 }, "executable": "System.Threading.ExecutionContext" } }
There is another way to configure the Adapter - by setting environment variables.
This approach has a number of advantages:
- independence from configuration files: solves the problem of possible overwriting of files;
- easier containerization: just set a set of environment variables inside the container;
- increased security: sensitive data can be transferred via variables without using the file system.
When launched, the Adapter reads the configuration from the multifactor-radius-adapter.dll.config file, as well as from the *.config files located in the /clients folder.
After this, the adapter receives values from the environment and "overlays" them on top of the settings read from the settings files.
Thus, it turns out that values from environment variables overload values from settings files.
By the way, you don’t have to use settings files at all (leave them with default values): any settings can be described through environment variables.
To allow the adapter to read settings for multi-client mode from environment variables, you should place client configuration files into the clients folder, but you can keep them empty.
Here is an example of an empty file:
<?xml version="1.0" encoding="utf-8"?>
<configuration>
</configuration>Syntax:
# Linux
export VAR=VALUE

# Windows (PowerShell)
$Env:VAR = VALUE
VAR - environment variable name, VALUE - variable value.
The export directive is needed to set the specified variable not only for the current shell, but also for all processes launched from this shell.
To pass settings to the adapter via environment variables, you must specify the name correctly.
To transfer the setting to the main config (multifactor-radius-adapter.dll.config), the variable name should look like this:
export RAD_APPSETTINGS__FirstFactorAuthenticationSource=ActiveDirectoryRAD_ - prefix.
APPSETTINGS - section inside the configuration file.
FirstFactorAuthenticationSource - name of a setting.
__ - nesting separator.
Case of variable name is not important.
Note: if the name of the configuration file contains whitespace characters, when forming the name for the environment variable, these spaces must be ignored:
my rad->myrad.
Alternative way:
<appsettings>
  <add key="first-factor-authentication-source" value="ActiveDirectory" />
</appsettings>
More complex example:
export RAD_RADIUSREPLY__ATTRIBUTES__ADD__0__NAME=Class
export RAD_RADIUSREPLY__ATTRIBUTES__ADD__0__VALUE=users1
0 - an index (number) of element.
Alternative way:
<RadiusReply>
  <Attributes>
    <add name="Class" value="users1" />
  </Attributes>
</RadiusReply>
If you need to pass setting to the client configuration, you must just insert configuration name after RAD_ prefix. For example, for the configuration that is in the my-rad.config file, the variable name would look like this:
export RAD_my-rad_APPSETTINGS__FirstFactorAuthenticationSource=ActiveDirectoryAfter configuring the configuration, run the component:
sudo systemctl start multifactor-radiusYou can check the status with the command:
sudo systemctl status multifactor-radiusThe logs of the component are located in the /opt/multifactor/radius/logs folder as well as in the system log.
- The Linux version of the Adapter can't yet handle multiple domains with trust established between them;
- A simple user's password authentication is used with Active Directory. We strongly recommend using the LDAPS scheme to encrypt traffic between the adapter and the domain (AD server must have a certificate installed, including a self-signed one).
Use Radius Adapter Component to implement 2FA in one of the following scenarios:
- Two-factor authentication for VPN devices Cisco, Fortigate, CheckPoint, Mikrotik, Huawei and others;
- Two-factor authentication for Windows VPN with Routing and Remote Access Service (RRAS);
- Two-factor authentication for Microsoft Remote Desktop Gateway ;
- Two-factor authentication for VMware Horizon;
- Citrix Gateway two-factor authentication;
- Apache Guacamole two-factor authentication;
- Two-factor authentication for Wi-Fi hotspots;
and many more...
Please note, the license does not entitle you to modify the source code of the Component or create derivative products based on it. The source code is provided as-is for evaluation purposes.