-
Notifications
You must be signed in to change notification settings - Fork 18
Materials

(Note that this page assumes you're using Blender as your 3D modeler.)
Materials in Tetra3D have a few properties and options available to them, both within Blender in the Material panel, as well as in-engine.
Each Material slot in Blender becomes an individual MeshPart and draw call in Tetra3D - in general, you want to limit these draw calls as it slows down rendering. However, Tetra3D has visual intersection only between draw calls, so a balance must be struck between efficiency and getting the visual look you want.
Transparency is specified by using an opaque or transparent texture and toggling between three different transparency modes on a Material. The three options are opaque (which is default), fully transparent, and alpha clip. Note that the differences between these materials primarily influence how they write to the depth buffer, and so if they obscure other objects. If the depth buffer isn't enabled, material transparency modes wouldn't influence how objects are rendered to the screen. To achieve actual transparency, you would use these settings, as well as either changing the object's color to be partially transparent, or using a partially transparent texture.
- Opaque materials write to the depth buffer and obscure objects behind them. Simple.
- Transparent materials don't write to the depth buffer - they do not obscure objects behind them. They are rendered in a second render pass after all non-transparent materials, and in back-to-front sorting order.
- Alpha clip materials write their textures' alpha values to the depth buffer, but not the transparent portions - this would be useful for certain textures or materials that are wholly transparent or opaque - for example, for a 2D character sprite, or a cloak with frayed edges. Alpha clip requires rendering the object and then compositing the result into the finished scene, so it is more CPU and GPU intensive than rendering a fully opaque or transparent object.
Transparency modes are loaded in from exported GLTF files, which comes from the Material's Blend Mode settings, either adjustable in the Tetra3D Material panel, or the Material's Settings panel.

- Tetra3D's Opaque is Blender's Opaque
- Tetra3D's Transparent is Blender's Alpha Blend or Alpha Hash (they are the same in Tetra3D)
- Tetra3D's Alpha Clip is Blender's Alpha Clip
Lastly, by default, opaque materials are set to be TransparencyModeAuto in Tetra3D - this means that if an ordinarily opaque object turns transparent (i.e. its color's alpha component is less than 1), it will be pushed into the transparent sorting bin and render after all other objects, as though it were manually set to be transparent. This is done so that, for example, fading an object out actually makes it appear over other objects, rather than continuing to obscure things underneath it even though you should be able to see through it.
By default, Blender does not enable backface culling (as can be seen in the screenshot above). To fix this, simply set the backface culling option in the material to true. However, if this becomes a hassle, you can simply set all materials' backface culling property programmatically after loading the objects through GLTF.
(Also note that flipping sprites in-game by using negative scale is supported, but requires that Backface Culling be set to false on the sprite's materials as the face normals aren't altered.)
Materials can have custom composition modes, enabling you to change how they render to the scene. By default, materials will render to the scene and overwrite anything underneath with their own color and alpha values. With additive composition, materials will add their color on top of what was previously there. With clear composition, objects will "cut out" whatever was previously there, enabling you to see through the scene onto whatever is rendered underneath, before the camera was cleared and began rendering.
For a visual example, see the compositing example.
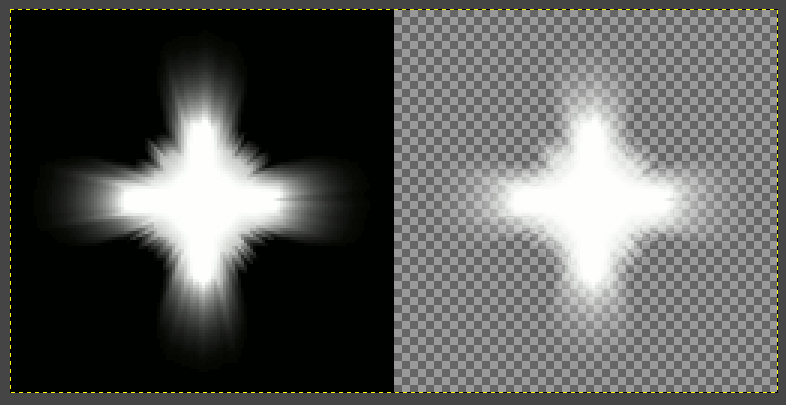
NOTE: Objects will render using their texture (assuming they have one), which means that textures rendered with additive or multiplicative blending can render oddly against the screen background if they're completely opaque black and white rather than partially transparent. (This is probably because while blending works fine against other objects within the same texture, when the texture is drawn to the screen, it blends against a transparent background, so it appears to render "normally".) To resolve this, render something behind these objects, or convert the texture from ranging from black to white, to ranging from transparent to white. You can do this in GIMP in the Layer > Transparency > Color to Alpha option.

In the above picture, the flare particle on the left is black and white, while the right has had the black color converted to alpha transparency.

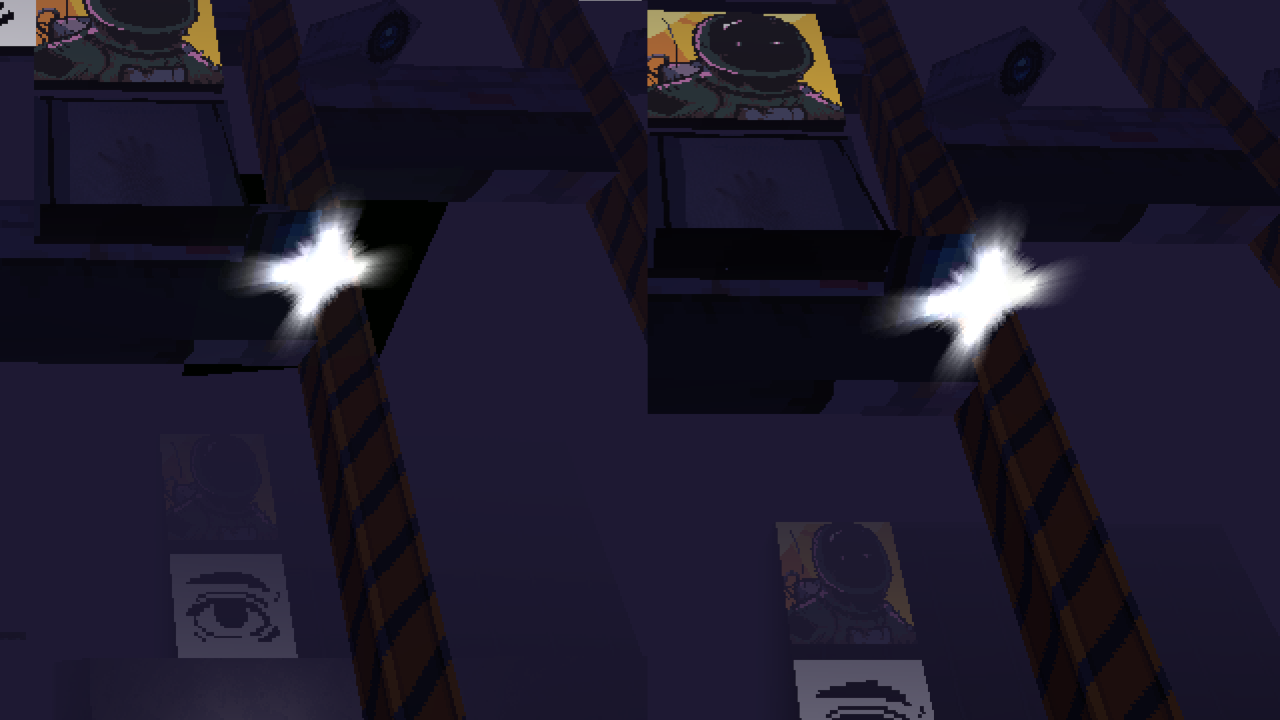
In the above picture, the flare on the left is rendering with additive blending, but no transparency on the particle. While this works fine when rendering against other objects, it shows up as black against the background (which is just a transparent world color). This is resolved by using the texture on the right above and converting the black color to transparent.
Billboarding is when an object constantly faces the camera. This technique was used frequently in retro games to reduce poly counts, or give the effect of a perfect sphere by using a flat circle for a texture, for example. Billboarding is implemented in Tetra3D as a setting on the material, indicating how the object should face the Camera. Tetra3D's built-in billboarding does not currently work with armature-animated objects.
The three modes are Off, X/Z, and Full. Below are examples taken from the AnimatedTextures example:

- Without Billboarding (left), the character doesn't face the camera at all.
- In X/Z Billboarding (center), the character faces the camera horizontally, but doesn't tilt vertically.
- In Full Billboarding (right), the character faces the camera on all axes.
Note that for billboarding, the object is rotated assuming -Y in Blender (and +Z in Tetra3D) is forward, toward the camera.
Vertex colors can be used to bring a space to life, particularly for indoor areas. Retro games made extensive use of vertex coloring for faking shading and visual effects, and the results can be the same here. The usual way you'd make use of vertex coloring for affecting shadowing and ambient occlusion is to make use of Blender's built-in Dirty Vertex Colors operator. This option is found underneath the Paint menu in Vertex Paint mode. When used, Dirty Vertex Colors generates darker vertex colors based on the cavity, recesses, and corners of the mesh.
When texturing your object in Blender, you should leave the material set to Principled BSDF and then modulate the base color using an image to assign a texture to the Material. You can do this by clicking the yellow circle next to the Base Color color picker. By using the Principled shader, textures are properly exported while the preview shows what the material should look like.
Color management should be set to sRGB in the file's Render Properties (which is the default) for colors to be visually accurate both in Blender and Tetra3D (as Tetra3D automatically converts colors specified in Blender from sRGB on import).
If you're not using the add-on, but rather export the scene as vanilla GLTF files, textures will be combined into the GLTF / GLB file, and so will be loaded automatically into Tetra3d when loading a mesh.