-
Notifications
You must be signed in to change notification settings - Fork 127
User_ChronoZoom Authoring Guide
This guide shows you how to create and share your own unique historical explorations on ChronoZoom. Content in ChronoZoom is organized as follows:
- Collections are the top level container for content in ChronoZoom. Each collection contains one root timeline, within which all other timelines are nested.
- Timelines are a visual representation of a period of time, such as the Paleozoic era, or the Industrial Revolution. Timelines can contain other timelines, as well as exhibits.
- Exhibits are collections of multimedia content tied to a specific historical event of interest.
- Artifacts are media files, including: images, video or audio files, OneDrive Images, and OneDrive Documents.
- Tours are sequenced presentations that advance automatically through elements within a timeline and/or collection.
See also: ChronoZoom User Guide
- Sign In
- Research and Planning
- Work with Collections
- Work with Timelines
- Work with Exhibits
- Work with Tours
- Copy and Paste, Favorites, and Twitter
- Import/Export Collections
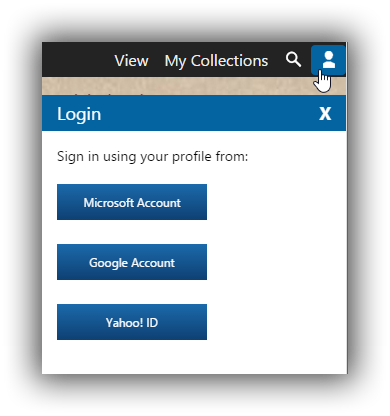
Before you start, you will need to sign in using either a Windows Live™, Google, or Yahoo! user account. If you don't already have an email account, you will need to create one. You can use any of the following account types:

Once you have signed in, you will need to create a new collection to get started.
Doing a bit of research and planning will make creating content in ChronoZoom much more efficient. You might find it helpful to create a spreadsheet to plan and track the items you want to cover. The following example spreadsheet shows a list of exhibits for a proposed timeline documenting the UFO phenomenon beginning in 1947 with the famous sighting that gave us the term "Flying Saucer". Each sheet represents the exhibits that are associated with a particular timeline or collection.
UFO_Phenomenon_Timeline_Priorities.xlsx
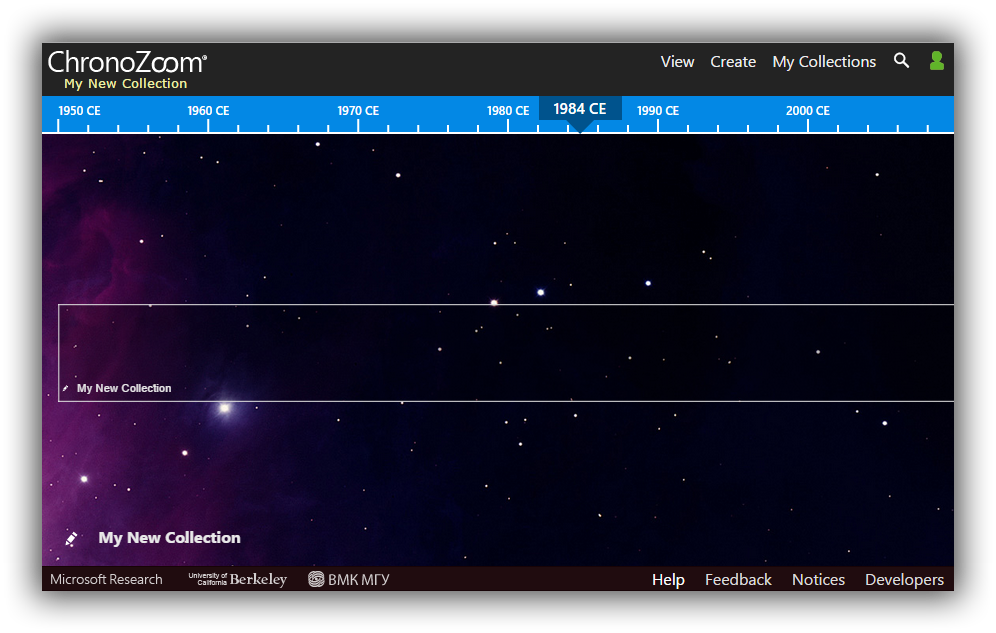
A collection contains a set of timelines, and will be the starting point for any content you create. You can create as many collections as you like. When you sign in for the first time, you should see a blank collection similar to the following image.

By default the collection contains one timeline with the same name as the collection. This is the root timeline, within which all child timelines must be nested. You can edit the properties of both the collection and the timeline by clicking the pencil icon ![]() for each.
for each.
- Sign in to ChronoZoom.
- Click Create, then Create Collection
- Enter a unique name for your collection, then click OK.
- From My Collections, open the collection you would like to edit.
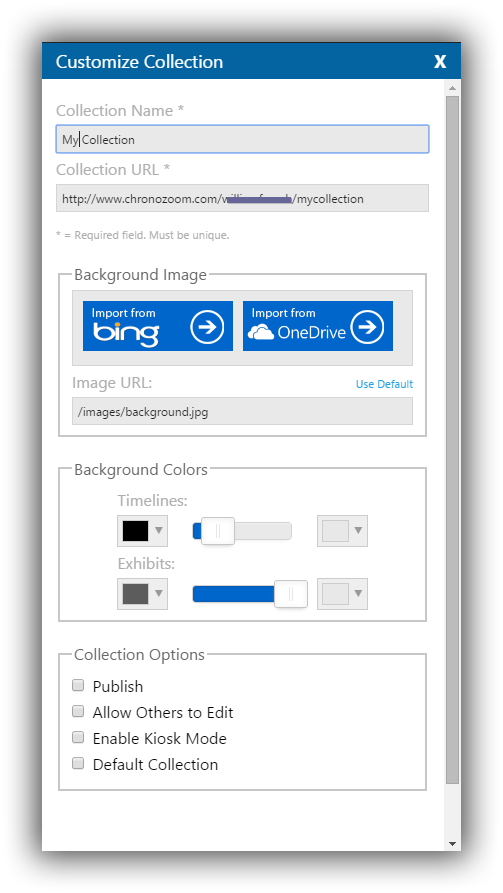
- Click the pencil icon in the lower left corner of the screen. The Customize Collection dialog will appear.

- The collection properties are as follows:
- Collection Name: The name of the collection.
- Collection URL: A shareable URL for the collection.
- Background Image: The background image for the colleciton. You can use an image from Bing, or import an image from your OneDrive. Supported image formats are: .jpg, .jpeg, .png, .gif.
- Background Colors: Set the background colors to use for timelines and exhibits.
-
Collection Options
- Publish: When checked, this setting makes the collection publicly searchable.
- Allow Others to Edit: When checked, this setting enables others to edit your collection with the same level of permissions that you have. When this option is checked the Manage Editors button will appear. Check Default Collection to prevent others from deleting the collection.
- Click Save Collection when you are finished.
When editing is enabled on a collection (set the Allow Others to Edit option), click the Manage Editors button to add other users to the list of editors for the collection.
- Click the pencil icon for the collection to manage.
- In Collection Options, check Allow Others to Edit.
- Click the Manage Editors button. The Manage Editors' List dialog appears.

- Under Find & Add Users type a username into the field.
- Check the names for users that you want to add.
- Click Add Selected to List to add the users to the Editors' List.
- To remove a user from the Editors' List, click the "X" next to the name of the user you want to remove.
- Click Keep Changes to save your changes.
- From My Collections, open the collection you would like to delete.
- Click the pencil icon in the lower left corner of the screen. The Customize Collection dialog will appear.
- Click the Delete Collection button to delete the collection.
Note: The default collection cannot be deleted. To delete a collection that has been set as the default collection, first set a different collection as the default, then repeat these steps to delete the collection.
A timeline is a visual representation of a time period. Timelines can contain other (child) timelines, and exhibits. You can use timelines to depict a range of time such as the lifespan of a historical figure or period of a civilization.
- Sign in to ChronoZoom.
- Click My Collections and open a collection.
- Click Create, then Create Timeline.
- Within a collection, position your cursor near the point you would like the timeline to begin, then click and drag to create the timeline. The Create Timeline dialog appears.
- Enter a Title.
- Enter a Start Time, and End Time. Use the dropdown menus to select Date or Year. If Year is selected, select a time unit:
- Giga-annum (Ga): one billion years
- Mega-annum (Ma): one million years
- Kilo-annum (Ka): one thousand years
- Before Common Era (BCE): The period prior to Julian Era 1
- Common Era (CE): The period after Julian Era 1
- Click the Create Timeline button to create the timeline.
- Navigate to the timeline you want to edit.
- Click the pencil icon in the lower left corner. The Edit Timeline dialog will appear.
- Make your changes.
- Click the Update Timeline button to save your changes.
- Navigate to the timeline you want to delete.
- Click the pencil icon in the lower left corner. The Edit Timeline dialog will appear.
- Click the Delete Timeline button to delete the timeline.
IMPORTANT: This cannot be undone. When you delete a timeline, all nested content (exhibits and timelines) will be deleted as well.
An exhibit consists of a set of content items (artifacts), and is contained in a timeline within a collection. Artifacts can be one of the following types:
- Image
- Audio
- Video
- OneDrive Image
- OneDrive Document
-
Sign in to ChronoZoom.
-
Click My Collections and open a collection.
-
Click Create, then Create Exhibit.
-
Zoom in to the regime that is the most appropriate for the length of the exhibit you are creating (Cosmos, Earth, Life, Prehistory, Humanity).
-
Click the timeline to which the exhibit should be added. The Create Exhibit dialog will appear.

-
Enter a title for the exhibit.
-
Specify a year or an exact date for the exhibit. Check Circa/Approximate if the exact date or year is unknown. The exhibit will have a dotted line to reflect this fact.
-
Click Create Artifact to add an artifact. You can add up to nine artifacts. See To add an artifact to an exhibit for more details. Within the exhibit's list of artifacts, you can:
- Click and drag to change the order of artifacts in the list.
- Double-click an artifact to edit it.
- Click the "X" to delete an artifact.
-
Click Create Exhibit to save the exhibit.
- Navigate to the exhibit you want to edit.
- Click the pencil icon at the top of the exhibit. The Edit Exhibit dialog will appear.

- Make your changes.
- Click Update Exhibit to save your changes.
An artifact is a media item such as an image, video, PDF, or OneDrive document. Each exhibit or timeline you create can have one or more artifacts. Each exhibit must contain at least one artifact.
- Open an exhibit for editing. If you do not have an exhibit, you can create a new exhibit to edit.
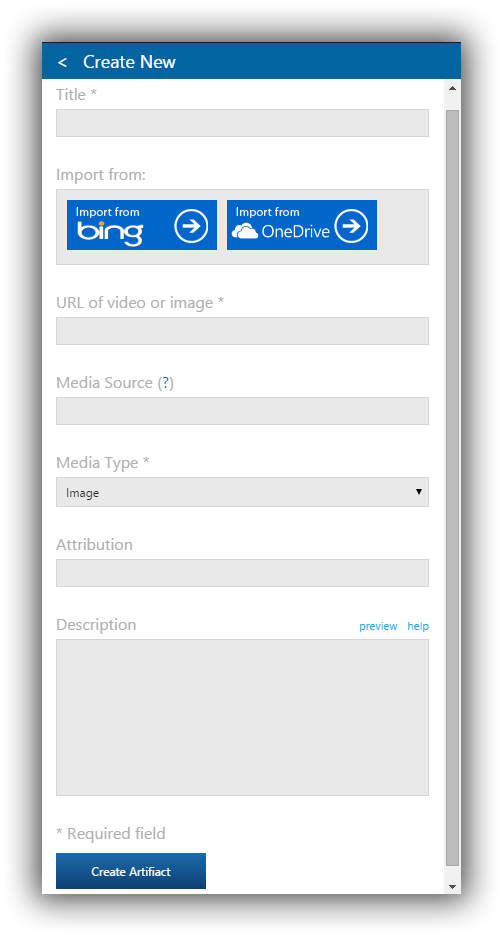
- Click Create Artifact to create a new artifact. The Create New dialog will appear.

- Enter a title for the artifact.
- You can import media from Bing, or your OneDrive account, or enter a URL.
- Fill in applicable properties for the artifact:
- URL of video or image: The URL for the image or video (this field is automatically populated when importing from Bing or OneDrive).
- Media Source: The source of the image or video (for example Wikipedia).
- Media Type: The type of media (Image, PDF, Video, OneDrive Image, OneDrive Document).
- Attribution: The name of the creator/author of the artifact. This field is automatically populated.
- Description: Text to describe the artifact. You can use Markdown to format the description text. Click preview to see how the text will appear. Click help for Markdown editing hints.
- Click Create Artifact to finish adding the artifact. The artifact will appear in the list of artifacts for the exhibit.
- Navigate to the exhibit that contains the artifact you want to edit.
- Click the pencil icon in the lower right corner of the artifact.
- Make your changes.
- Click Update Artifact to save your changes.
Note: You can also edit an artifact by double-clicking it in the list of artifacts in the Edit Exhibit dialog.
- Navigate to the exhibit that contains the artifact you want to edit.
- Click the pencil icon at the top of the exhibit.
- In the list of artifacts, click the "X" next to the artifact you want to delete.
- Click Update Exhibit to save your changes.

A tour is a sequenced presentation that advances automatically through elements within a timeline and/or collection. You can add a custom soundtrack for your tour.
- Sign in to ChronoZoom.
- Click My Collections and open a collection.
- Click Create, then Create Tour. The Create Tour dialog will appear.

- Fill in the properties for the tour:
- Title: The title for the tour.
- Summary: A descriptive paragraph or two, which you can format using Markdown.
- MP3 Audio URL: A URL referencing an MP3 audio file to use for a tour soundtrack.
- Tour Stops: The list of tour stops.
- Add tour stops (see next procedure for details).
- Click Create Tour to save the tour when you are finished.
- Open a tour to edit, or create a new tour.
- In the Create Tour dialog, click Add New Stop to add a new stop on the tour. You will be prompted to select an element (timeline or exhibit). The element will be added to the list of tour stops.
- Add a description for the tour stop. You can format the description using Markdown.
- Enter a load time, in seconds, for the tour stop. This sets the amount of time that should elapse before the stop is displayed. For example, if you set a load time of ten seconds, the previous stop will display for ten seconds before the current stop is shown.
- Arrange the order of stops by clicking and dragging the items in the Tour Stops list.
- Click Create Tour to save the tour when you are finished adding stops.
The My Tours dialog shows the tours you have created within a particular collection, and provides options for viewing, editing, and sharing tours.
-
Click View, then Guided Tours. The My Tours dialog will appear, showing a list of all the tours you have created.

-
Locate the tour you want to view, then click View.
- Click Create, then Edit Tours. The My Tours dialog will appear.
- Locate the tour you want to edit, then click Edit and make your changes.
- Click Update Tour to save your changes.
- Click View, then Guided Tours. The My Tours dialog will appear.
- Locate the tour for which you want an URL, then click Link. You will be presented with a direct link for the tour.
- Click CTRL + C to copy the URL to your clipboard.
- Click View, then Guided Tours. The My Tours dialog will appear.
- Locate the tour you want to share, then click the Twitter icon. This will open a Twitter page where you can share the tour with your Twitter followers.
- Click Create, then Edit Tours. The My Tours dialog will appear.
- Locate the tour you want to delete, then click Edit. Click Delete Tour to delete the tour.
You can copy and paste content from one collection or timeline to another, add a collection or timeline to a list of favorites, and share your collection or timeline using Twitter. In the bottom right corner of each timeline and collection there are four icons: Copy, Paste, Favorite, and Twitter.

- Navigate to the timeline you want to copy.
- Click the copy icon
 to copy all of the content from the timeline.
 - Navigate to the timeline or collection you want to paste the content into. You can create a new timeline or collection if needed. Be sure that the duration for the new timeline is at least as long as the timeline you have copied.
- Click the paste icon:

- Refresh your browser to see the newly pasted content.
- Click the favorite icon
 to add a timeline or collection to your list of favorites. To see your list of favorites, navigate to My Collections. Favorites are listed on the right side. To remove a favorite, click the favorite icon again.
- Click the Twitter icon
 to open a Twitter page where you can share your timeline with your Twitter followers.
ChronoZoom's import/export feature lets you create offline copies of collections that can be re-imported at a later time. You can use this to back up your collections, and share them with others. Collections are represented using JSON data.
- Navigate to My Collections and open the collection you want to export.
- Click Create, then click Export Collection. You may or may not be prompted to provide a filename, depending on which browser you are using. The default filename is cz.mycollection.json. Check your downloads folder for the file.
-
Click Create, then click Import Collection.
-
Select the JSON file to import, then click Open. The collection will be imported.
Notes:
- Imports are always unpublished, so that you can edit the collection before choosing to publish it.
- If the collection being imported has the same name as an existing collection, it will not overwrite the existing collection. Instead, a number will be appended to the name (for example "-2"). You can delete or rename the collection as needed.