-
Notifications
You must be signed in to change notification settings - Fork 225
讲讲清楚OpenGL坐标变换
讲讲清楚OpenGL坐标变换
在理解OpenGL的坐标变换问题的路上,有好几个难点和易错点。且OpenGL秉持着程序难以调试、难点互相纠缠的特色,更让人迷惑。本文依序整理出关于OpenGL坐标变换的各个知识点、隐藏规则、诀窍和注意事项。
OpenGL用4x4矩阵进行坐标变换。
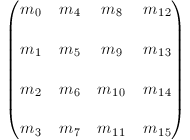
OpenGL的4x4矩阵是按列排列的。
忘记glRotatef(),glScalef(),glTranslatef()什么的吧,那都属于legacy opengl,不久会被彻底淘汰。在modern opengl中有其他方式代替他们。
为了描述3D世界,首先要设计一些三维模型出来。
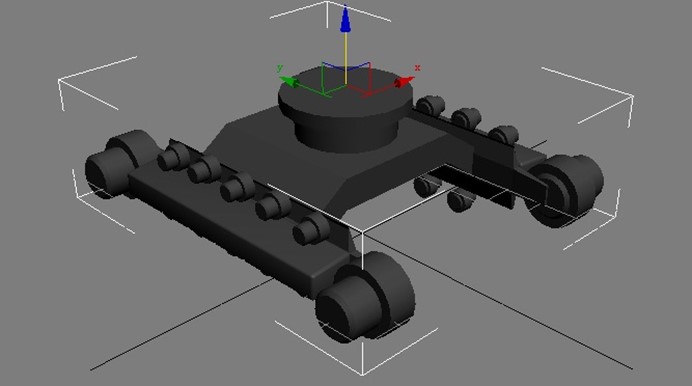
设计三维模型的时候用的坐标系就是Model Coordinate System。
此时你所见的这个空间就是Model Space。Model Space里只负责描述一个模型。
有人可能会说,此图只设计了一个茶壶,如果我设计的是一套茶具(茶壶+几个茶杯),那不就是多个模型了吗?答:还真不是,此时应该把这套茶具视作一个整体,视为一个模型。回忆一下中学学的"确定研究对象"、"将XXX视作一个整体",就是这个意思。
在Model Space设计模型的时候,要注意使模型的包围盒的中心位于原点(0, 0, 0)。
包围盒就是能够把模型包围的最小的长方体。
为什么要围绕原点?因为这样才能在下文所述的World Space里"正常地"旋转、缩放和平移模型。
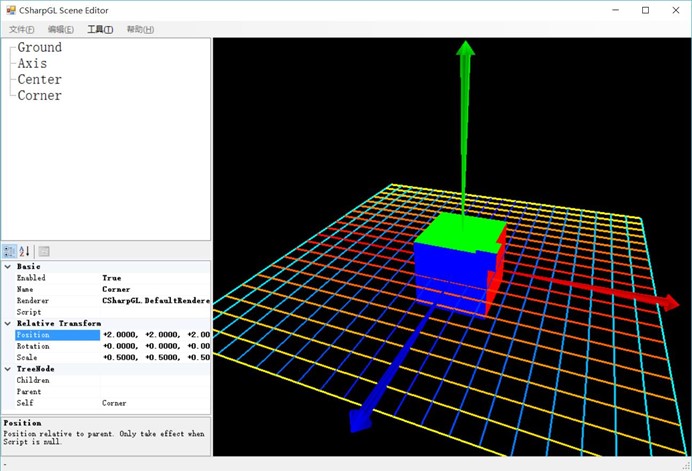
继续解释上面的问题。假设我们设计了一个立方体模型,它是关于原点(0, 0, 0)对称的。我们就这样让它降生到世界上。为了叙述方便,我们称其为Center。如下图所示。
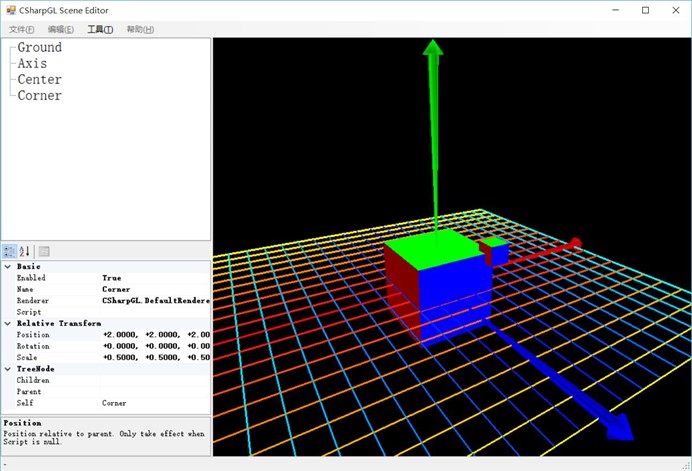
(再换个角度看)
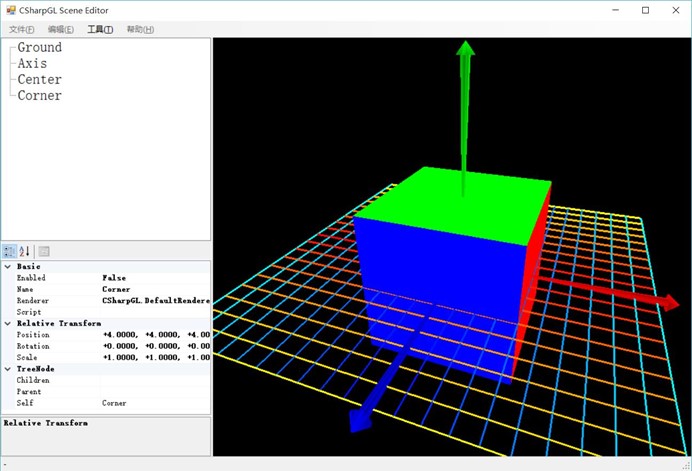
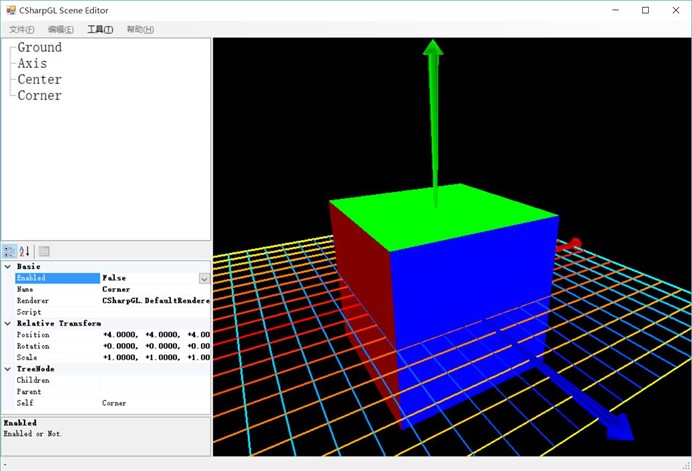
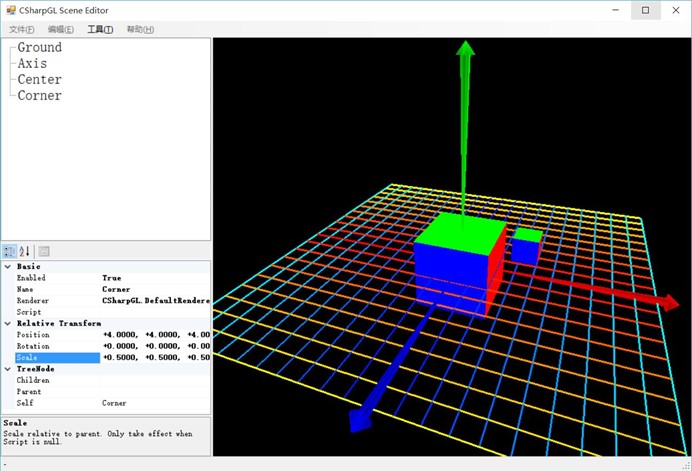
现在,我们再设计一个小一点的立方体模型,但这个立方体模型的中心不在原点(0, 0, 0)。为了叙述方便,我们称其为Corner。我们把这个Corner也放进来。
(再换个角度看)
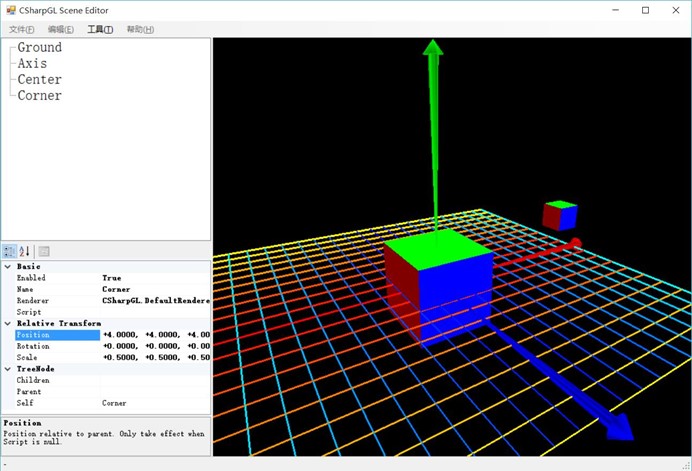
现在,我们分别把Center和Corner缩小为原来的一半。我们希望的情形是这样的:
(再换个角度看)
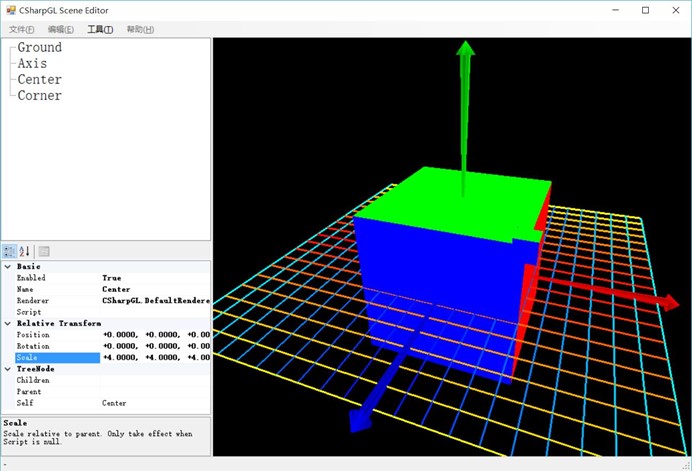
为了看得清楚,我们把Center再扩大到原来的大小:
(再换个角度看)
可以看到Corner在原来的位置上缩小了一半。这符合我们的预期。
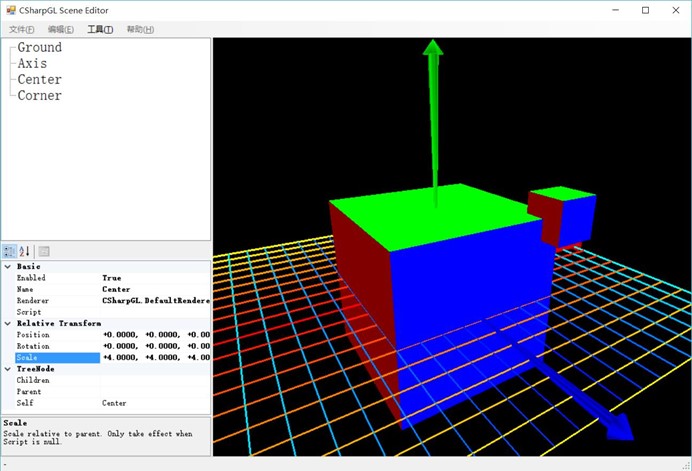
但是,残酷的现实并非如此,当你把Center和Corner同时缩小一半时,你看到的情形会是这样:
(再换个角度看)
也就是说,一个缩放操作不仅改变了Corner的大小,还改变了它的位置。如果你在缩放之前把Camera对准了Corner,那么缩放之后Corner的位置发生了巨变,Camera很可能就看不到Corner了。
如果一个模型的包围盒A在Model Space的中心不是(0, 0, 0),那么你可以想象有一个虚拟的包围盒B,B的中心是(0, 0, 0),且恰好能包围住A。然后,同时缩放A和B。由于B的中心是(0, 0, 0),缩放前后不会改变;而A的中心实际上是B内部一侧的一点,它是必然移动了的,即缩放操作改变了A的位置。
上述例子描述的是缩放操作,对于旋转操作,道理相同。
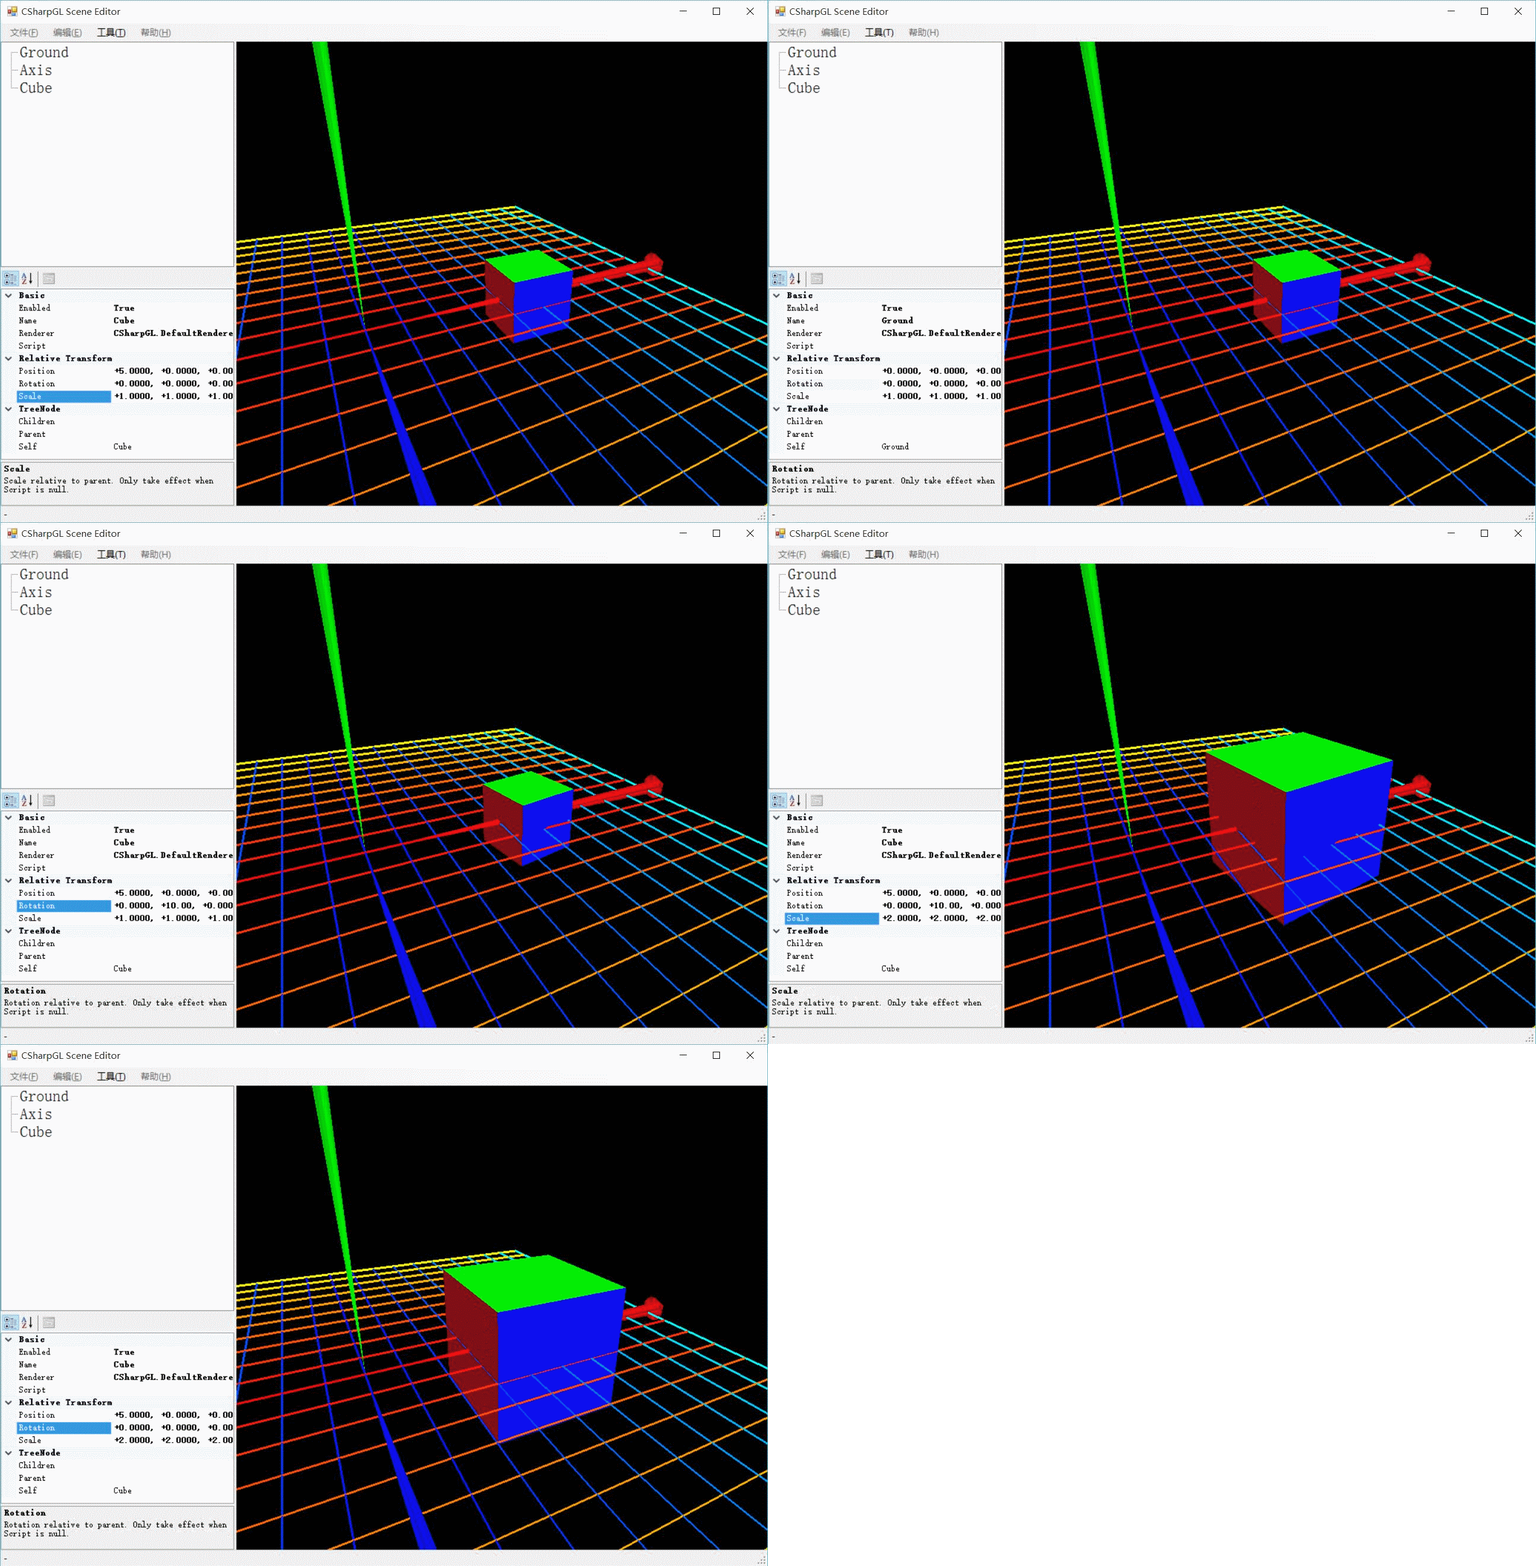
这就是保持模型的包围盒中心在原点(0, 0, 0)的好处。你可以随意旋转(rotate)、缩放(scale)模型,之后再移动(translate)到任意位置(此位置即模型在World Space里的位置)。无论你如何旋转、缩放此模型,它在移动(translate)之后的位置都是一样的。
如上图所示,一个立方体向右移动4个单位,并进行了旋转和缩放操作。无论旋转角度、缩放比例是多少,其移动距离始终是4个单位。
Model Matrix负责将模型从Model Space变换到World Space。
变换操作有三种:旋转(rotation)、缩放(scale)和平移(translate)。可以按字母表的顺序来记(Rotation, Scale, Translate)。
变换的顺序应当是:1旋转,2缩放,3平移。
设模型在Model Space里的任意一个顶点坐标为(x, y, z),我们想把模型放到World Space里的(tx, ty, tz)处,且绕y轴旋转r°,缩放为原来的s倍。那么:
平移矩阵为 mat4 translate = glm.translate(mat4.identity(), new vec3(tx, ty, tz)); ;
缩放矩阵为 mat4 scale = glm.scale(mat4.identity(), new vec3(s, s, s)); ;
旋转矩阵为 mat4 rotation = glm.rotate(mat4.identity(), (float)(r * Math.PI / 180.0), new vec3(0, 1, 0)); ;
总的Model Matrix为 mat4 modelMatrix = translate * scale * rotation; 。
为了获取(x, y, z)变换到World Space上的位置,首先将其扩充为四元向量(x, y, z, 1)。(不用管为什么不是(x, y, z, 0)),然后可得:vec4 worldPos = modelMatrix * new vec4(x, y, z, 1);
旋转、缩放操作都是关于原点(0, 0, 0)对称的。把模型的包围盒中心置于原点,会有难以言喻的好处。
(worldPos.x, worldPos,y, worldPos.z) 就是 (x, y, z) 变换到World Space之后的位置。
worldPos.w 必然是1。
对模型的操作顺序应当为rotation -> scale -> translate。
这三个名称是指同一个Space。
在World Space,各个模型都摆放好了位置和角度,之后就该从某个位置用Eye/Camera去看这个World。Camera有三个属性:eye/Position描述其位置,center/Target是朝向,Up是头顶。
Camera的Position是World Space里的一个点(Position.x, Position.y, Position.z),Target和Up是World Space里的2个向量。就是说,Camera.Position/Target/Up都是在World Space里定义的。
Camera的参数(Position, Target, Up)决定了view matrix。模型在World Space里的位置,经过view matrix的变换,就变成了在View Space里的位置。
根据camera的Position, Target, Up求view matrix的过程就是著名的lookAt()函数。
 1         /// <summary>
 2         /// Build a look at view matrix.
 3         /// transform object's coordinate from world's space to camera's space.
 4         /// </summary>
 5         /// <param name="eye">The eye.</param>
 6         /// <param name="center">The center.</param>
 7         /// <param name="up">Up.</param>
 8         /// <returns></returns>
 9         public static mat4 lookAt(vec3 eye, vec3 center, vec3 upVector)
10         {
11             // camera's back in world space coordinate system
12             vec3 back = (eye - center).normalize();
13             // camera's right in world space coordinate system
14             vec3 right = upVector.cross(back).normalize();
15             // camera's up in world space coordinate system
16             vec3 up = back.cross(right);
17
18             mat4 viewMatrix = new mat4(1);
19             viewMatrix.col0.x = right.x;
20             viewMatrix.col1.x = right.y;
21             viewMatrix.col2.x = right.z;
22             viewMatrix.col0.y = up.x;
23             viewMatrix.col1.y = up.y;
24             viewMatrix.col2.y = up.z;
25             viewMatrix.col0.z = back.x;
26             viewMatrix.col1.z = back.y;
27             viewMatrix.col2.z = back.z;
28
29             // Translation in world space coordinate system
30             viewMatrix.col3.x = -eye.dot(right);
31             viewMatrix.col3.y = -eye.dot(up);
32             viewMatrix.col3.z = -eye.dot(back);
33
34             return viewMatrix;
35         }
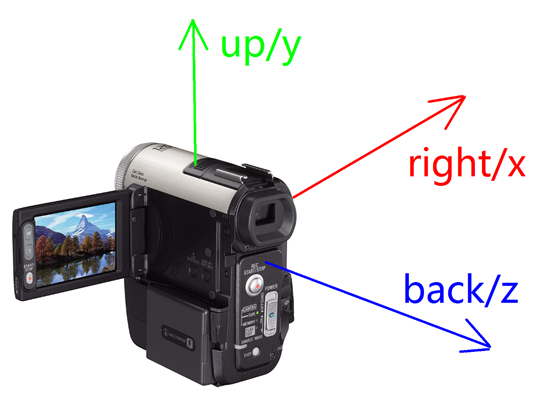
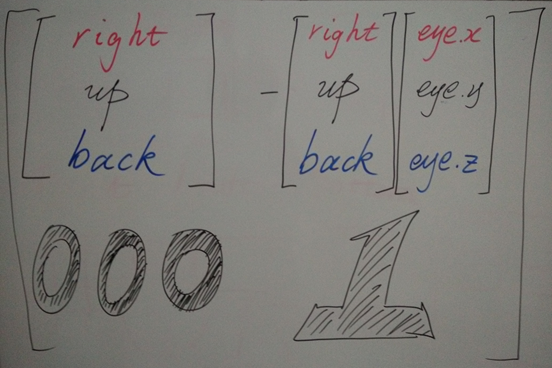
上述函数得到的结果 viewMatrix 可以用下图描述。[right/up/back]构成了旋转和缩放的部分,-[right/up/back]*eye构成了平移的部分。right/up/back分别描述了Camera坐标系的X/Y/Z轴,且在 viewMatrix 里也依次位于第0/1/2行。
Camera摆好之后,要实现透视投影或正交投影。经过投影之后的坐标就是在Clip Space里的坐标。
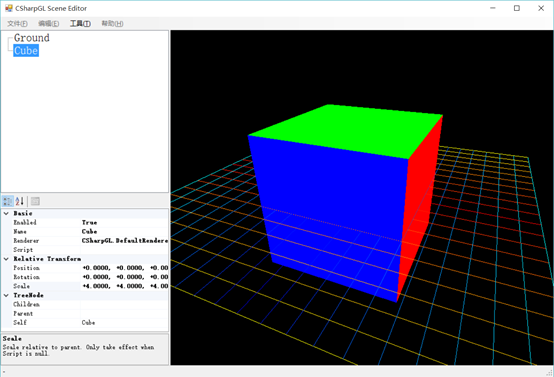
透视投影的效果就是近大远小:
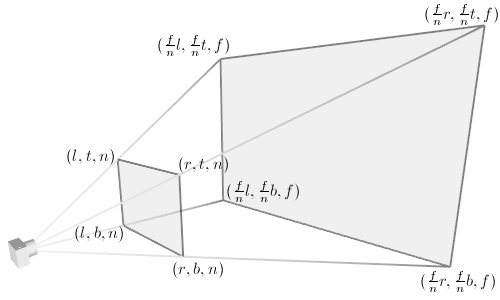
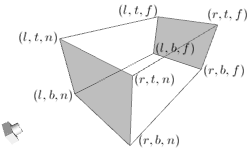
透视矩阵的作用就是设定下图所示的一个棱台范围,将Camera Space里的顶点位置变换一下。变换效果就是远处的点比变换之前更加靠近彼此,越远就靠近的越多。想象一下把这个棱台的Far面缓缓缩小到与Near面相同的大小,这一过程中,越远的顶点,被挤压的程度越大。
根据棱台参数计算透视投影矩阵的函数就是著名的perspective()函数。
 1         /// <summary>
 2         /// Creates a perspective transformation matrix.
 3         /// </summary>
 4         /// <param name="fovy">The field of view angle, in radians.</param>
 5         /// <param name="aspect">The aspect ratio.</param>
 6         /// <param name="zNear">The near depth clipping plane.</param>
 7         /// <param name="zFar">The far depth clipping plane.</param>
 8         /// <returns>A <see cref="mat4"/> that contains the projection matrix for the perspective transformation.</returns>
 9         public static mat4 perspective(float fovy, float aspect, float zNear, float zFar)
10         {
11             float tangent = (float)Math.Tan(fovy / 2.0f);
12             float height = zNear * tangent;
13             float width = height * aspect;
14
15             float left = -width, right = width, bottom = -height, top = height, near = zNear, far = zFar;
16
17             mat4 result = frustum(left, right, bottom, top, near, far);
18
19             return result;
20         }
21         /// <summary>
22         /// Creates a frustrum projection matrix.
23         /// </summary>
24         /// <param name="left">The left.</param>
25         /// <param name="right">The right.</param>
26         /// <param name="bottom">The bottom.</param>
27         /// <param name="top">The top.</param>
28         /// <param name="nearVal">The near val.</param>
29         /// <param name="farVal">The far val.</param>
30         /// <returns></returns>
31         public static mat4 frustum(float left, float right, float bottom, float top, float nearVal, float farVal)
32         {
33             var result = mat4.identity();
34
35             result[0, 0] = (2.0f * nearVal) / (right - left);
36             result[1, 1] = (2.0f * nearVal) / (top - bottom);
37             result[2, 0] = (right + left) / (right - left);
38             result[2, 1] = (top + bottom) / (top - bottom);
39             result[2, 2] = -(farVal + nearVal) / (farVal - nearVal);
40             result[2, 3] = -1.0f;
41             result[3, 2] = -(2.0f * farVal * nearVal) / (farVal - nearVal);
42             result[3, 3] = 0.0f;
43
44             return result;
45         }
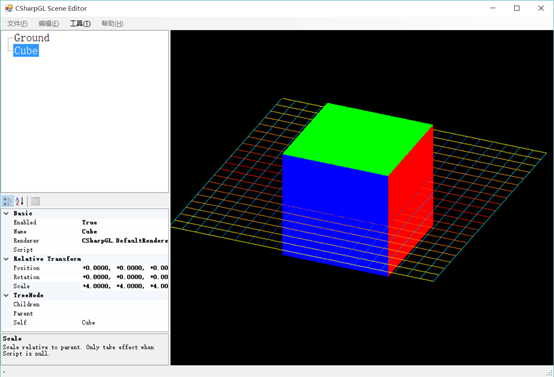
正交投影就没有近大远小的效果:
正交矩阵的作用也是设置一个范围,将Camera Space里的顶点位置变换一下。
根据参数计算正交投影矩阵的函数就是著名的ortho()函数。
 1         /// <summary>
 2         /// Creates a matrix for an orthographic parallel viewing volume.
 3         /// </summary>
 4         /// <param name="left">The left.</param>
 5         /// <param name="right">The right.</param>
 6         /// <param name="bottom">The bottom.</param>
 7         /// <param name="top">The top.</param>
 8         /// <param name="zNear">The z near.</param>
 9         /// <param name="zFar">The z far.</param>
10         /// <returns></returns>
11         public static mat4 ortho(float left, float right, float bottom, float top, float zNear, float zFar)
12         {
13             var result = mat4.identity();
14             result[0, 0] = (2f) / (right - left);
15             result[1, 1] = (2f) / (top - bottom);
16             result[2, 2] = -(2f) / (zFar - zNear);
17             result[3, 0] = -(right + left) / (right - left);
18             result[3, 1] = -(top + bottom) / (top - bottom);
19             result[3, 2] = -(zFar + zNear) / (zFar - zNear);
20             return result;
21         }
22
23         /// <summary>
24         /// Creates a matrix for projecting two-dimensional coordinates onto the screen.
25         /// <para>this equals ortho(left, right, bottom, top, -1, 1)</para>
26         /// </summary>
27         /// <param name="left">The left.</param>
28         /// <param name="right">The right.</param>
29         /// <param name="bottom">The bottom.</param>
30         /// <param name="top">The top.</param>
31         /// <returns></returns>
32         public static mat4 ortho(float left, float right, float bottom, float top)
33         {
34             var result = mat4.identity();
35             result[0, 0] = (2f) / (right - left);
36             result[1, 1] = (2f) / (top - bottom);
37             result[2, 2] = -(1f);
38             result[3, 0] = -(right + left) / (right - left);
39             result[3, 1] = -(top + bottom) / (top - bottom);
40             return result;
41         }
无论是透视投影还是正交投影,都有以下性质:
在Clip Space里的顶点位置(x, y, z, w),“x, y, z的绝对值都小于等于|w|”等价于“此顶点在可见范围之内”。
在Clip Space里的顶点位置(x, y, z, w),就是在vertex shader里赋值给 gl_Position 的值。
从Clip Space到Normalized Device Space很简单,只需将(x, y, z, w)全部除以w即可。这被称为视角除法(perspective division)。
上一节说过,在可见范围里的(x, y, z, w),x, y, z的绝对值都小于等于|w|。因此,经过视角除法后,所有可见的顶点位置都介于(-1, -1, -1)和(1, 1, 1)之间。
视角除法这一过程是由OpenGL渲染管线自动完成的,我们无需也不能参与。
最后一步,就是把(-1, -1, -1)和(1, 1, 1)之间的顶点位置转换到二维的屏幕窗口上。
假设用于OpenGL渲染的控件宽、高为Width、Height。
glViewport(int x, int y, int width, int height); 用于指定将渲染结果铺到控件的哪一块上。一般我们用 glViewport(0, 0, Width, Height); 来告诉OpenGL:我们想把结果渲染到整个控件上。当然,如果控件大小发生改变,就需要再次调用 glViewport(0, 0, Width, Height) ;。
还有一个不常见的 glDepthRange(float near, float far); 用于指定在Screen Space上的Z轴坐标范围(默认范围是 glDepthRange(0, 1) )。没错,Screen Space也是有第三个坐标轴Z的,且其方向是从你的计算机窗口指向里面。
顶点在Screen Space里的位置是按下面的公式计算的,当然也是OpenGL自动完成的,我们无需也无法参与。
这个公式很简单,通过NDC(Normalized Dived Coordinate)和Window Coordinate System的线性关系可知:
当我们用 glViewport(x, y, Width, Height); 的设定时,Screen Space的原点在 (x, y) ,X轴正方向向右,Y轴正方向向上,Z轴正方向向里。即这是一个左手系。(这个 (x, y) 是相对控件的左下角而言的,即Screen Space的X轴、Y轴是贴在WinForm控件上的)
在WinForm系统中,控件本身的 (0, 0) 位置是控件的左上角。即在mouse_down/mouse_move/mouse_up等事件中的(e.X, e.Y)是以左上角为原点,向右为X轴正方向,向下为Y轴正方向的。所以根据WinForm里的 (e.X, e.Y) 计算Screen Space里的坐标时要记得用 (e.X, Height - 1 - e.Y)转换一下。
如果你用QQ截图或者其他任何方式截图,得到的窗口图片的Width、Height很可能是不等于用glViewport()得到的Width、Height的。截图得到的图片宽高受显示器分辨率的影响,不同的显示器得到的结果不尽相同。而用glViewport()得到的宽高无论在哪个显示器上都是一致的。Screen Space里用的Width、Height就是glViewport()版本的。这里也是个小坑。
坐标变换过程很长很复杂?其实就那么回事。下面的函数就实现了从Model Space里的模型坐标到Window Space里的窗口坐标的变换过程。
 1         /// <summary>
 2         /// Map the specified object coordinates (obj.x, obj.y, obj.z) into window coordinates.
 3         /// </summary>
 4         /// <param name="modelPosition">The object’s vertex position</param>
 5         /// <param name="view">The view matrix</param>
 6         /// <param name="proj">The projection matrix.</param>
 7         /// <param name="viewport">The viewport.</param>
 8         /// <returns></returns>
 9         public static vec3 project(vec3 modelPosition, mat4 view, mat4 proj, vec4 viewport)
10         {
11             vec4 tmp = new vec4(modelPosition, (1f));
12             tmp = view * tmp;
13             tmp = proj * tmp;// this is gl_Position
14
15             tmp /= tmp.w;// after this, tmp is normalized device coordinate.
16
17             tmp = tmp * 0.5f + new vec4(0.5f, 0.5f, 0.5f, 0.5f);
18             tmp[0] = tmp[0] * viewport[2] + viewport[0];
19             tmp[1] = tmp[1] * viewport[3] + viewport[1];// after this, tmp is window coordinate.
20
21             return new vec3(tmp.x, tmp.y, tmp.z);
22         }
就这么点事。当然这个函数忽略了model matrix和 glDepthRange() 的作用。不过model matrix可以和view matrix合二为一, glDepthRange() 基本上不需要调用。所以无伤大雅。
当然也有一个从Screen Space到Model Space的函数。完全是上面的project()的逆过程。
 1         /// <summary>
 2         /// Map the specified window coordinates (win.x, win.y, win.z) into object coordinates.
 3         /// </summary>
 4         /// <param name="windowPos">The win.</param>
 5         /// <param name="view">The view.</param>
 6         /// <param name="proj">The proj.</param>
 7         /// <param name="viewport">The viewport.</param>
 8         /// <returns></returns>
 9         public static vec3 unProject(vec3 windowPos, mat4 view, mat4 proj, vec4 viewport)
10         {
11             mat4 Inverse = glm.inverse(proj * view);
12
13             vec4 tmp = new vec4(windowPos, (1f));
14             tmp.x = (tmp.x - (viewport[0])) / (viewport[2]);
15             tmp.y = (tmp.y - (viewport[1])) / (viewport[3]);
16             tmp = tmp * (2f) - new vec4(1, 1, 1, 1);// after this, tmp is normalized device coordinate.
17
18             vec4 obj = Inverse * tmp;
19             obj /= obj.w;// after this, tmp is model coordinate.
20
21             return new vec3(obj);
22         }
好好体会这2个互逆的过程,就能看透OpenGL坐标变换的全过程。
