UsingEC2
This page explains how to provision and set up an Amazon EC2 server to run the CloudCoder webapp.
First, you'll need to create an Amazon Web Services account. The good news is if you are creating a new account, you are eligible to receive an EC2 micro instance for 1 year for free. Log into the AWS console. Click on the EC2 link: this will take you to the EC2 console.
The server you use to run the CloudCoder webapp needs to have the following ports open:
- 22 (SSH)
- 443 (HTTPS)
- 47374 (connections from CloudCoder build servers)
You will need to configure a security group so that these ports are open. Click on the Security Groups link in the EC2 console. Click on the Create Security Group button. Call it "cloudcoder". Choose "No VPC". The dialog should look something like this:

Click Yes, create. Click the Inbound tab. The Create a new rule combo box allows you to choose inbound ports to open. Choose each of the following and click Add Rule to add them:
- SSH (22)
- HTTP (443)
Then, choose Custom TCP rule. Enter 47374 in the Port range box, and leave the Source unchanged ( 0.0.0.0/0 ). The tab should look something like this:

Click Add Rule. At this point, the rule list on the right-hand side of the tab should look like this:

Now, click Apply Rule Changes. (It is below the Add Rule button.)
Click on the Instances link. Then, click Launch Instance. Choose Classic Wizard and click Continue. This will bring you to a dialog in which you can choose which operating system to use. Choose Ubuntu Server 12.04.1 LTS. Make sure 64 bit is selected. The dialog should look like this:

Click Select (next to Ubuntu Server 12.04.1 LTS) to continue.
One the next wizard page, choose "T1 Micro" as the instance type. You can select an availability zone that is geographically close to you, or use the default:

Click Continue.
On the Advanced Instance Options and Storage Device Configuration pages, just keep the default options and click Continue.
On the Add tags to your instance page, just click Continue.
One the Create key pair page, you can create a new key pair,
or use an existing one. You can choose any name for the key pair:
cloudcoder is not a bad choice. The key pair file will
be end in a .pem file extension; for example, cloudcoder.pem
if you chose cloudcoder as the name of the key pair.
Important: if you create a key pair, save the downloaded key pair
file in a place where it will be safe, and where you will be able to access
it in the future. The key pair file is needed to log into the instance.
Click Continue when you have selected a key pair.
On the Configure firewall page, choose the cloudcoder security group that you created earlier:

Click Continue.
On the Review page, review your choices. If everything looks good, click Launch. You can then click Close from the last dialog. You should now see a table which shows your new instance. Check the checkbox next to the new instance: you should see some details in the panel below (note that it may take a minute or two for the instance to completely initialize):
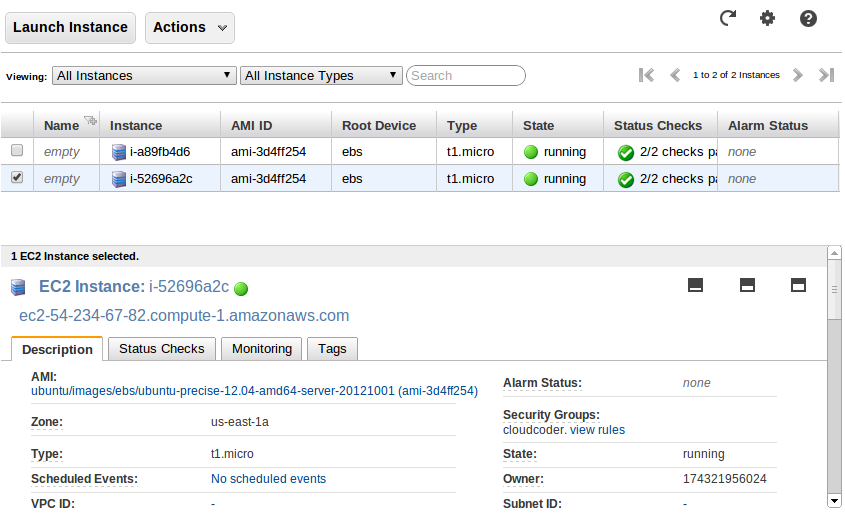
Note that in the screenshot above, the second instance is the newly-created one. One important piece of information you can see is the hostname, which in the example above is ec2-54-234-67-82.compute-1.amazonaws.com.
From a terminal window, run the following command:
ssh -i keyfile ubuntu@hostnamekeyfile should be the file containing your key pair. hostname should
be the hostname listed in the details panel. If all goes well, you should
see something like the following:
[dhovemey@nutt]$ ssh -i keys/cloudcoder.pem ubuntu@ec2-54-234-67-82.compute-1.amazonaws.com
The authenticity of host 'ec2-54-234-67-82.compute-1.amazonaws.com (54.234.67.82)' can't be established.
ECDSA key fingerprint is 46:7b:f9:f0:4c:15:9c:b0:98:5b:ca:af:80:81:da:e9.
Are you sure you want to continue connecting (yes/no)? yes
Warning: Permanently added 'ec2-54-234-67-82.compute-1.amazonaws.com,54.234.67.82' (ECDSA) to the list of known hosts.
Welcome to Ubuntu 12.04.1 LTS (GNU/Linux 3.2.0-31-virtual x86_64)

 * Documentation:  https://help.ubuntu.com/

  System information as of Tue Dec 25 19:33:36 UTC 2012

  System load:  0.08             Processes:           58
  Usage of /:   9.6% of 7.87GB   Users logged in:     0
  Memory usage: 6%               IP address for eth0: 10.195.205.250
  Swap usage:   0%

  Graph this data and manage this system at https://landscape.canonical.com/

0 packages can be updated.
0 updates are security updates.

Get cloud support with Ubuntu Advantage Cloud Guest
  http://www.ubuntu.com/business/services/cloud

The programs included with the Ubuntu system are free software;
the exact distribution terms for each program are described in the
individual files in /usr/share/doc/*/copyright.

Ubuntu comes with ABSOLUTELY NO WARRANTY, to the extent permitted by
applicable law.

To run a command as administrator (user "root"), use "sudo <command>".
See "man sudo_root" for details.

ubuntu@ip-10-195-205-250:~$
You can now proceed to Bootstrap the CloudCoder webapp.
Stopping an instance means to shut down temporarily. Stopped instances do not incur the normal hourly charge, although you will still pay for the storage required for the instance's EBS (Elastic Block Store) volume.
To stop an instance, check the instance's check box, click Actions, and then choose Stop.
Terminating an instance means to destroy it completely. Understand that if you do this, you will irrevocably lose all data stored in the instance's filesystem.
To terminate an instance, check the instance's check box, click Actions, and then choose Terminate.
