jian_ble
Jian BLE is in very early alpha stage but it works with nRFMicro and the original Jian hardware. You might need nRFMicro pinout, see nRFMicro Hardware article. Also please read Software article about building the firmware:
Wired Jian (regular QMK and Pro Micro with n-mosfet support and precompiled binaries):
Managed to run QMK on Bluemicro V2.0c as well. A separate article: jian_bm.
Jian-BLE (works with nRFMicro boards, and generally all nRF52840-based boards):
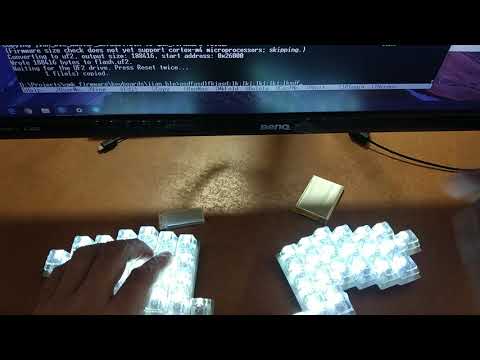
Plug in USB cable, double press the reset button, wait till USB Mass Storage drive arrives, drag and drop uf2-converted firmware file there (either master or slave, not both). The keyboard will reboot automatically after the fimware update.
Adjust layer is activated by holding Raise and Lower simultaneously. See the original Jian layout.
BLE and USB are enabled by default. You would like to restart advertising first.
- Raise + Lower + Adv. w/o w.list restart advertising without whitelist.
- Raise + Lower + UF2 open USB drive for firmware update
See Jian BLE layout for BLE shortcuts. See keymap.c for reference. All shortcuts are subject to change.
Slave half is symmetrical but unfortunately it doesn't respond to shortcuts before pairing.
The init sequence is to turn on slave keyboard, turn on master keyboard, pair master with the computer (slave is paired with the master automatically using BLEUart link). Optionally (e.g. in case of "Driver error") - delete all bonds on the master. If you're having problems with the slave keyboard, you need to erase bonds there as well. Hold 3 first keys on row 0 on the slave keyboard while powering on (it's thumb keys on Jian).
-
Raise + Lower + R delete bonds on master (R is "Delete Bonds", reboots automatically)
-
Raise + Lower + Shift delete bonds on slave (3 bottom keys, hold on power on)
Every nrf52 keyboard automatically creates two virtual interfaces on a single USB port - USB HID and USB Serial for debugging. Use terminal at 115200 baud to debug. You can debug both Master and Slave using two USB cables and two ports.
Example output:
<info> app: Erase all bonds!
<info> app: Fast advertising.
<info> app: Slave keyboard is disconnected
<info> app: Scanning slave keyboard...
<info> app: Connected to the slave keyboard
- Master and slave via BLE (all the pairing and slave bonding works just fine)
- Master via USB (slave connected with TRRS cable via i2c works fine as well)
- CapsLock and other indicator LEDs
- Backlighting (flashes on init sequence for now, 3 times - master, 2 times - slave)
- Hardware USB/BT switch support (possible with P0.26 to SW1 via 10K resistor)
- Advanced keymap features and DIP switches
- RGB underglow

More pictures: https://imgur.com/a/zUSlpPi