MIDI Controller Setup
- How MIDI2LR Works with control surfaces
- General Setup
- Controllers that send relative values or have unusual ranges
- Problems with control surfaces that have "layers"
The setup of the MIDI control surface is just as important as the setup of MIDI2LR. Because users have many different control surfaces, the advice here can't cover every situation. If you learn something new, please post a message and describe what you've learnt, so that can be added to this wiki. Right now, we're just starting. Contributions of information for this wiki are welcome!
A list of known compatible/incompatible control surfaces is at https://goo.gl/Ev6S8R. Feel free to contribute to the list.
MIDI2LR has two components: the Lightroom plugin, and the application. You see the application launched each time you start Lightroom. The plugin runs as part of LR, and is hidden, though you see parts of it when you open the Options menu. The plugin can work directly with Lightroom but can't communicate with a MIDI control surface. The application can work with a MIDI control surface but can't control Lightroom. When the application shows that it is connected to Lightroom, that means the application and the plugin have found each other, and communication is successful.
Due to the way computers work, the application cannot easily detect when the MIDI control surface is disconnected. That is why there's a Rescan MIDI Devices button. The application automatically scans for a control surface when it starts up, so normally you won't have to scan. But if you change control surfaces, or turn it off and on, you may have to rescan. If the application is ignoring the control surface, it's time to rescan.
The MIDI2LR application receives control change (CC), pitch wheel, or note messages from the control surface, and converts that to your selected action. The action and controller value (if the controller if a fader or encoder) is sent to the plugin, which then takes action based on the selected action and the value.
When Lightroom signals MIDI2LR plugin that a develop value has changed, MIDI2LR plugin checks all develop values to see if they've changed, then sends the changed values to the MIDI2LR app. The application then checks to see if the user has registered a MIDI CC for that particular develop value (e.g., exposure). If so, the application converts the value to a MIDI CC change message, using the channel that was assigned by the user. If you have a controller that is set up to receive a particular develop parameter on a different channel than it sends it, your control surface won't track LR changes.
Never use CC numbers 98 or 99. Those are reserved for NRPN messages and will completely confuse MIDI2LR. Don't use CC numbers 100 or 101 either. Those are for RPN messages, which aren't used by MIDI2LR but might some day.
Layers: most control surfaces do not track messages for hidden layers, so when you change layers, expect the controls to be out of sync with the program. MIDI2LR now will attempt to refresh the control surface if it finds the controls to be out of sync. There is also a Manual Update command that can be assigned to a button that will refresh the control surface when pressed.
Profiles: MIDI2LR understands the profiles you have assigned in the program. When you change profiles, MIDI2LR will automatically refresh your control surface, so that all the controllers are in sync.
Non-motorized faders cannot be sync'd. They will not respond to changes, such as opening up a different picture. That is a limitation of the MIDI control surface and there's no fix for that.
All buttons should be toggle off.
All CC numbers must be in the range 0-127.
All continuous controllers (faders and encoders) need to be set to absolute mode, range 0-127 unless you set up the application otherwise. (See Controllers that send relative values or have unusual ranges).
All buttons should send 127 when pressed and 0 when released.
Normal MIDI CC controllers can only send 128 different values, which doesn't allow for fine control of wide-range settings like Temperature. Some MIDI control surfaces can set individual CC controllers to NRPN mode. In NRPN mode, the number of bits per controller is doubled, from 7 to 14, so the range increases from 0-127 to 0-16383. The range of controller numbers also increases by the same amount.
MIDI2LR will assume that any CC controller numbered 0-127 is using normal MIDI, and any 128-16383 is using NRPN. Set up any CC controllers numbered 0-127 as shown above in the not using NRPN section.
NRPN CC numbers must be in the range 128-16383.
All NRPN CC controllers need to be set to absolute 14-bit mode, range 0-16383 unless you set up the application otherwise. (See Controllers that send relative values or have unusual ranges).
Caution: in the BCF2000/BCR2000 (and I suspect other control surfaces), faders in the NRPN mode only send 7-bit resolution data. This is even worse then you might suspect, because they send it without using all four messages needed for a full NRPN signal. MIDI2LR isn't clairvoyant, and can't guess that it shouldn't wait for the fourth message, so that if you set a fader to send NRPN, nothing will happen. The lesson here is, check your documentation carefully before setting a fader to NRPN mode, and if you do and the MIDI2LR application ignores the fader, that's a sign that the fader is only sending a partial set of NRPN messages.
NRPN buttons should send 16383 when pressed and 0 when released.
For CC controllers, you'll want to change the controller resolution or it will take lots of knob turning to navigate the entire controller range. Ideally, the controller resolution should vary with the speed at which you turn the knob. For the BCR2000/BCF2000, you can set four resolutions, so that the amount of change will increase as the speed of rotation increases. Thus, when you turn knob quickly, you make large changes in the value, and when you turn the knob slowly, you make small changes.
On the BCR2000/BCF2000, the resolution represents how much the value changes for each 360-degree rotation of the knob. Setting the resolution to 50 500 5000 65535, for example, will cause the value to change by 50 with each slow revolution, 500 with each faster revolution, 5000 by each even faster revolution, and 65535 by each fastest revolution.
- Press and HOLD the Edit button, while
- Press the button, you want to set to toggle OFF
- Release the Edit button
- Turn left the Mode potmeter in the unit (Top row, 3rd pot from the right), while the LCD show ToFF
- Hit the Edit button
- That's it :-)
- Repeat this with every button, you want to toggle OFF
Before version 2.0, MIDI2LR only supported controllers that sent values between 0 and 127 for CC messages (0 and 16383 for NRPN controllers). With version 2.0, the program now supports CC relative value messages, pitchwheels, and controls (either pitchwheel or CC) that have limited ranges.
Note to Mac users. The application automatically saves the control configuration when it shuts down normally. Currently, the application does not shut down properly when you close Lightroom so changes wouldn't be saved. Always close the application before closing Lightroom. This saves the changes and avoids memory leaks.
MIDI2LR assumes that any CC control sends absolute values and is full range and any pitchwheel sends full range, unless you configure the program otherwise. Setting limited ranges for controls is simple: just follow the configuration instructions below, adjusting the minimum and maximum values appropriately. Before customizing for relative value controls however, read the following so that you understand the type of relative value control you are working with.
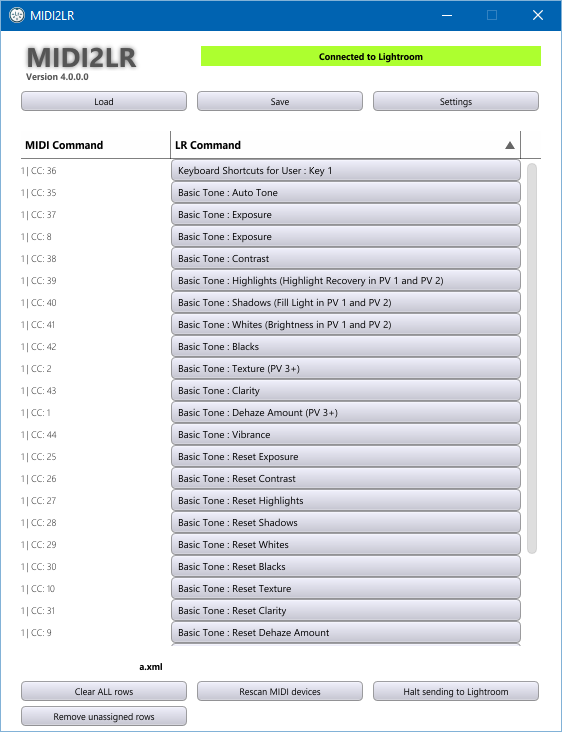
There are three types of relative value controls supported, two's complement, sign and magnitude, and binary offset. These differ in how they calculate relative values. Your controller's documentation may identify the type you are dealing with. If not, slowly rotate the control to the right and to the left, watching the values displayed on the application just above the Clear ALL rows button.
You will see a readout showing the channel, control type, control number and control value. For example, if you see 1: CC87 [1], that means channel 1, CC control, control number 87, value 1. Two's complement controls send numbers mostly near 1 and 127. Sign and magnitude controls send numbers near 1 and 65. Binary offset controls send numbers near 63 and 65. Use that to identify the type of control you have, and follow the configuration instructions below.
If you have NRPN relative value controls, two's complement controls send numbers mostly near 1 and 16383, sign and magnitude controls send numbers near 1 and 8193 and binary offset controls send numbers near 8191 and 8193.
To configure the program for any given control, right-click on the LR Command button on the application for that control. This will pop up a dialog. For example, in the illustration below, if you wanted to customize the application for channel 1, CC 87, you'd right-click on the button labeled Clarity.
A popup would appear over the application like the one below.
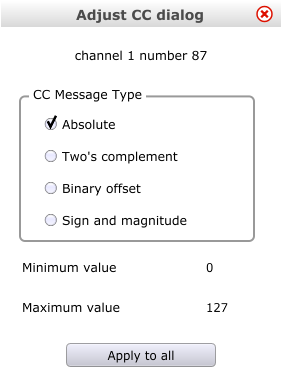
For setting up limited ranges, edit the minimum and maximum values, then click the red X in the upper right corner to close the dialog, and you are finished.
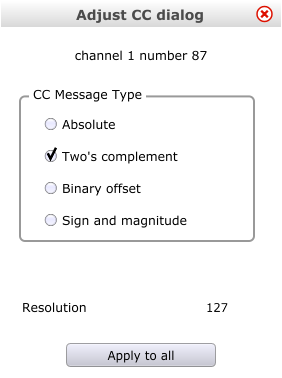
For relative value controls, select the correct type of control. When you select a relative value type, the dialog changes slightly (see below), showing resolution instead of minimum and maximum values. This is because you have more flexibility with relative value controls, and can set the resolution to any value you wish, rather than the 127 fixed steps you would have with a normal CC control. Finer resolutions (higher numbers) are more useful with develop parameters with wide ranges (e.g., temperature), but don't overdo it, as then it can become difficult to make large changes without lots of knob twirling.
Once you have the values set to your liking, close the dialog by clicking the red X in the upper right corner.
Currently, MIDI2LR and control surfaces with layers can get out of sync with each other. The discussion below shows what happens and why.
So I use an x-touch mini. It has a Layer A and Layer B button to so you can have multiple functions for each button and knob. One set on A and another on B. I have all of my exposure, temp, highlights, blacks and what not on layer A, then I have the Tone curve on layer B, along with some luminance, vibrance, and saturation. So I'll adjust the exposure and temp and what not, then switch to layer b to adjust different contrast and color adjustments. When I switch from A to B the knobs become unresponsive until I rescan MIDI or i twist the knob back and forth a ton then it registers.
When I switch from A to B for binding commands MIDI2LR show a different number for layer A and Layer B for each button and knob. So Knob 1 on Layer A is CC:1 and on Layer B it 's CC:11. So it seems like it recognizes I'm on a different layer but doesn't resync with lightroom on it's own for each layer.
Thanks for the clear description. Here's what's happening:
MIDI2LR knows of all the knob and button assignments you have, but doesn't know which ones are active in a particular layer.
It also assumes that your control surface remembers the last setting it was at. For example, if knob for exposure is on layer A, it assumes that the control surface will remember knob A's value.
And it assumes that, when it sends an updated value to the MIDI control surface, the control surface responds appropriately.
When you switch layers, the MIDI control surface does not remember the values from a prior layer. So, when you switch from A to B then B to A, the prior settings for the A knobs are lost by the control surface. This means that the knob is out of sync with MIDI2LR, and won't work until you turn it past the current photo's settings ("pickup mode")--this is so that you won't have massive unexpected changes caused by the knob being out of sync.
Also, when you are in layer B, MIDI2LR is sending back information on what has changed on layer A, but your control surface is ignoring it. MIDI2LR doesn't know that.
Finally, a layer switch could trigger MIDI2LR to do a full update, but I don't know if the x-touch mini could be programmed to send a notification when layers change. If it doesn't send a notification, MIDI2LR has no idea that it needs to do an update.
If the x-touch mini can send a notification when changing layers, this problem can be easily solved, by mapping the notification to a "full update". Does the x-touch mini have this capability?
If not, we'll have to add a "full update" command to MIDI2LR, and you'll have to click the button associated with that command to cause an update.