-
Notifications
You must be signed in to change notification settings - Fork 0
Linode Server Setup
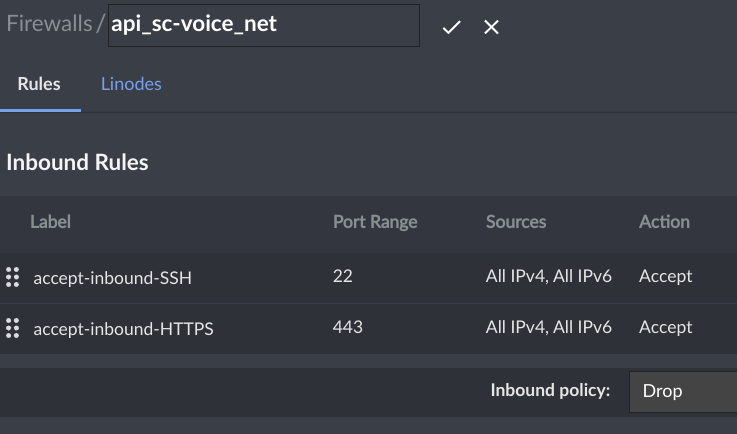
If you haven't already done so, configure a new Linode Firewall for the new Linode server
- name: api_sc-voice_net
- default: DROP
- add: accept-inbound-SSH allow SSH admin access
- add: accept-inbound-HTTP allow certbot renewal
- add: accept-inbound-HTTPS allow normal web traffic
- Edit the accept-inbound-SSH rule to allow IP addresses of Voice admins.
Save firewall. We will use this firewall instead of creating a individual firewall for each Linode server.

Configure new Linode:
- Operating System: Debian 12
- Region: Fremont
- Shared CPU
- Nanode 1GB ($5/month)
- Linode Label: XXX.api.sc-voice.net (where XXX is the language/function for that server)
- Add Tag: api.sc-voice.net
- Root Password: (generate and store in a safe place)
Add SSH Keys: (add at least one)- Firewall: api_sc-voice_net
- VLAN: (ignore)
- Backups: (ignore)
- Private IP: (ignore)
Click Create Linode
Add a DNS A record to the Google Domains control panet for sc-voice.net.
- Set the name of the new record to
XXX.api, where XXX is the language/function for the server. - Set the value of the new record to the public IPV4 address of the new server.
SSH into Linode server as root
Set the hostname to XXX.api.sc-voice.net,
where XXX is the language/function for the server.
hostnamectl set-hostname XX.api.sc-voice.net
hostname
Setting the hostname will help reduce confusion when administering servers.
The unroot user is standard user who can sudo when needed.
SSH into Linode server as root and create user unroot with a strong password:
sudo adduser unroot
sudo usermod -aG sudo unroot
sudo visudo
Append the following line to the end of the sudoers file to not require unroot password for sudo command:
unroot ALL=(ALL) NOPASSWD: ALL
Create a .ssh folder for user unroot:
mkdir ~/.ssh
chmod 700 ~/.ssh
echo > ~/.ssh/authorized_keys
chmod 600 ~/.ssh/authorized_keys
To expedite logging into the server as unroot,
add the public SSH keys for any admins to
/home/unroot/.ssh/authorized_keys.
Test unroot setup
- Add administrator public keys to
/home/unroot/.ssh/authorized_keys. - Logout of server
- Login to server as unroot
- Verify that sudo works
Secure root user
sudo vim /etc/ssh/sshd_config
- Uncomment the
PermitRootLoginline and set the value tono. - Append the line
AllowUsers root unroot - Save and exit vim.
- Restart ssh daemon.
sudo systemctl restart sshd
- Verify that SSH root login is no longer possible.
- Verify that unroot login is still possible and has sudo permissions
SSH to Linode server as unroot.
Install git and load server source.
sudo apt-get update && sudo apt-get upgrade -y
sudo apt install git -y
git clone https://github.com/sc-voice/api_sc-voice_net.git
Install NGinX and UFW firewall
cd ~/api.sc-voice.net/linode/bookworm
./01-install-nginx.sh
./02-configure-nginx.sh
Check NGinX status
systemctl status nginx
It necessary, start it:
systemctl enable --now nginx
Verify that NGinX is running with a browser using the HTTP protocol (e.g., http://XXX.api.sc-voice.net)
sudo systemctl enable --now nginx
You should see "An error occurred. ... Faithfully yours, nginx".
It's best to rely on the firewall provided by the cloud hosting service (See Step 1).
The following script will create a firewall on the actual server. You should only need to do this if the cloud hosting service does not have a firewall for customers.
If you have created a firewall in Step 1, skip this step.
./03-ufw-firewall.sh
SSH to Linode server as unroot.
cd ~/api.sc-voice.net/linode/bookworm
./04-install-docker.sh
Log out and log in again as unroot. Verify that Docker is available.
docker images
Install credentials and launch Docker container. You will be prompted for:
- your admin email
- servername (use the hostname, i.e. XXX.api.sc-voice.net)
- share your email (your choice)
./05-certbot.sh
Verify that SSL is running with a browser using the HTTPS protocol (e.g., https://XXX.api.sc-voice.net)
./06-aws-creds.sh
./07-configure-docker.sh
Test with browser using HTTPS.
./08-cron.sh
That's it!