- You have a participation fundraising event such as 5k Run for the Cure, Holidays of Giving, etc.
- People wish to raise money as a team, group or company such as: "Johnson's Joggers" or "St. Marks Hospital"
- Each team will have a leader that can manage who is on their team
- Each team member will have a separate page but have their efforts contribute to the total fundraising of their team
- Rather than pay high transaction % fees to a SaaS or license fees software company for these features, you wish to provide team fundraising through low-cost open-source CiviCRM without a redundant step to import your data later
- A journey for users to signup for events and then create: their solo fundraising page, team, or join an existing team
- Team admin being able to administer team page and its members, with optional approval process, or enable auto-approval
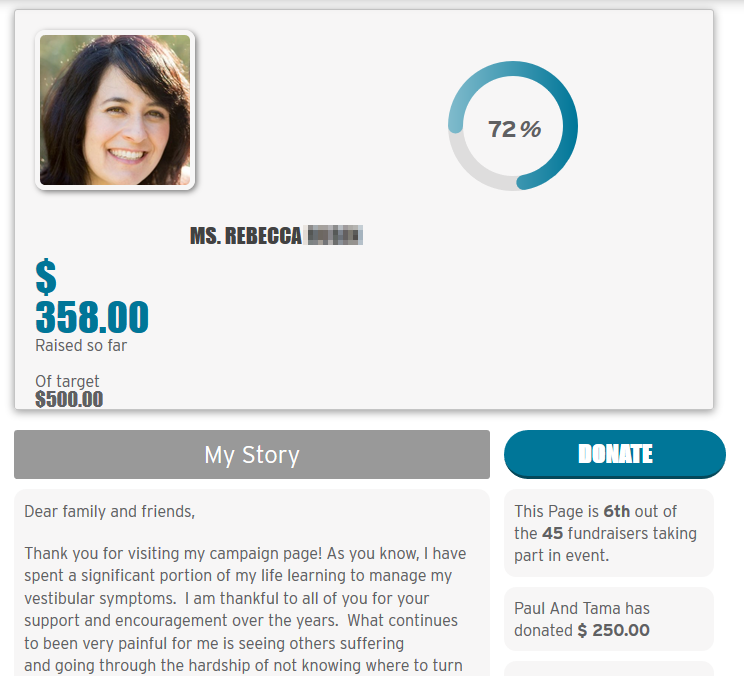
- A redesigned PCP page with widgets, thermometer and inline editing
- A PCP dashboard for admin to manage from backend
- Notifications and activities
- Improved appearance of PCP pages
Download / Clone PCP Teams extension from https://github.com/veda-consulting/uk.co.vedaconsulting.pcpteams into your CiviCRM custom extension directory.
To install, either navigate to:
- UI journey to CiviCRM extension page : Menu > Administer > System Settings > Extensions or
- Direct URL to CiviCRM extension page : http://YOUR_DOMAIN/civicrm/admin/extensions?reset=1
Note: Click 'Refresh' button to display latest extensions from Custom Extension directory if you do not see the extension.
Click "Install" link to install this extension.
Note: On installation process, this extensions creates default custom values,
- Custom Group ('PCP Custom Set', 'PCP Relationship Set' )
- Contact Sub Types ('Team', 'Branch, 'Corporate_Partner, 'In_Memory', 'In_Celebration')
- http://YOUR_DOMAIN/civicrm/pcpteams/setting?reset=1 allows you to turn notification on/off and other settings
- Edit the colors by customizing
css/manage.cssandtemplates/CRM/Pcpteams/Page/Manage.tplwithin the extension itself
- Navigate to Events > New Event.
- Create a new event with the required values and click "Continue".
- Click on the Personal Campaigns tab, and click Enable Personal Campaign Pages for this event.
- For "Supporter Profile", choose "PCP Supporter Profile".
- Fill in the other fields as necessary and click Save.
-
Navigate to Events > Manage Events.
-
Locate an event for which you have configured personal campaign pages.
-
Click Event Links > PCP Register for Events (EPI) from action links.
-
This will take you to a "registration journey" page with two buttons, to make sure you already have place in this event.
- "No, I need to register"
- "Yes I do"
Note: is is a configurable setting to skip this dialogue in your workflow if you want people to register for the event and create their PCP at the same time.
-
If you want to register for this event click No, I need to Register. Then this will take you to the registration page for the event. If you already registered with this event the journey will take you to PCP registration. Once you registered the event, you can see link to promote PCP for this event. Click the Personal Campaign Page link to go to the PCP team setup journey page.
-
If you already registered, the journey jumps to the "PCP Team Setup" journey page.
Are you supporting us as part of a team?
Here we have the following 3 options...
Configure your own PCP page, with 'amount raised', and button to create/join a PCP team later if you choose.
This option would take you to set up your new PCP team page with the following steps:
- Enter PCP Team Name and Click Continue.
- You can invite others to join this team or you can skip this step and do it later.
- After setting up the team, you will arrive at the Team Dashboard where you can see list of team members.
- Click Invite Team Members to invite others to this team. This will send an invitation email to the given email address. (Make sure outbound email is working.)
Note: this option creates a PCP page for the team itself as well as a PCP page for you the individual.
This option would take you to join existing team.
-
Search the team name you wish to join.
- If you wish you can also still click to create your own team at this point.
-
Find right team and click Continue.
- This will send request to team admin who can approve your request (if required) and redirect you to your dashboard.
-
At the dashboard you can see the status of your team request and can click withdraw request to cancel it.
In the dashboard, you can edit various fields with "inline editing".
For instance, click the link below 'of target'. Clicking willing allow you to amend the target (aka 'goal') amount inline. The same is true of the description and title of your page.
To donate from this dashboard, click the Donate button, which turns into an inline edit amount field. Enter an amount, and click OK to donate.
You can use the CiviCRM API or Drupal Views to publish a list of active individual PCPs and team PCPs. Note that all teams have a CiviCRM contact subtype of "Team".
