WPSelenium is a library that allows you to quickly get up and running testing your site with selenium and phpunit.
WPSelenium is a library that quickly gets you up and running when you want to test your site using selenium and phpunit. It does this by installing and configuring phpunit, the selenium server, the php client webdriver (by facebook) and the correct drivers for the browser you want to test on. Once installed all you have to worry about is writing your selenium php tests.
WPSelenium also includes support for testing WordPress plugins and themes. It does this by providing WordPress specific hooks and configuration end points you can use.
Usage
Operand browser is required

Usage: vendor/bin/wpselenium <browser>  [options]
Example: vendor/bin/wpselenium chrome --type wordpress

Operands:
  <browser>  Brower you want to test on. Chrome and Firefox supported by default. See documenation if you want to add
             others.

Options:
  --type <arg>      The type of site you are testing. e.g --type wordpress
  --loglevel <arg>  Console loglevel - info, warn, error, debug.
  -?, --help        Show this help and quit.
In order to run WPSelenium you will need to have the following installed
- Java (and make sure its on your system path. Type java in your terminal or command line window to check)
- Php >= 7.2
- Composer
- Chrome or Firefox or any other browser you want to test on (given you have the drivers)
To get started with WPselenium install it using composer using the following command:-
composer require --dev devchid/wpselenium
Note:- This command assumes that the working directory you are running it from is a composer project. If not, you can easily make it one buy running
composer initor adding acomposer.jsonfile.
Note:- WPSelnenium curently downloads the 76.0.3809.126 chrome drivers and the 0.24 firefox gecko drivers. If your browser needs a newer or older vesion of a driver (you will get error suggesting this if unsure) please specify an updated download url for the driver in the wpselenium.xml config file. Please see the documentation site for more details.
Having installed wpselenium you need to create a wpselenium.xml config file. This file should be in the same location as you composer.json file.
Below if a very basic sample configuration to get you going.
<wpselenium>
    <siteUrl>http://localhost:3000</siteUrl>
    <phpunit bootstrap="vendor/autoload.php">
          <testsuites>
              <testsuite name="WPSelenium Sample Tests">
                  <file>vendor/devchid/wpselenium/src/Sample/SampleTest.php</file>
              </testsuite>
          </testsuites>
    </phpunit>
</wpselenium>
You will need to replace siteUrl, with you own site you are trying to test.
Note:- The WPSelenium.xml can embed the phpunit config, using the phpunit endpoint (like above). This specified config is then loaded when testing your project with phpunit. However if you want to create your own phpunit config file (phpunit.xml) you can also do this (and not include it here). See documentation site for more details.
After this previous step you are in essence done. You can run the following command from the same location as your composer.json file (were browser_driver can either be chrome or firefox)
/vendor/bin/wpselenium [brower_driver]
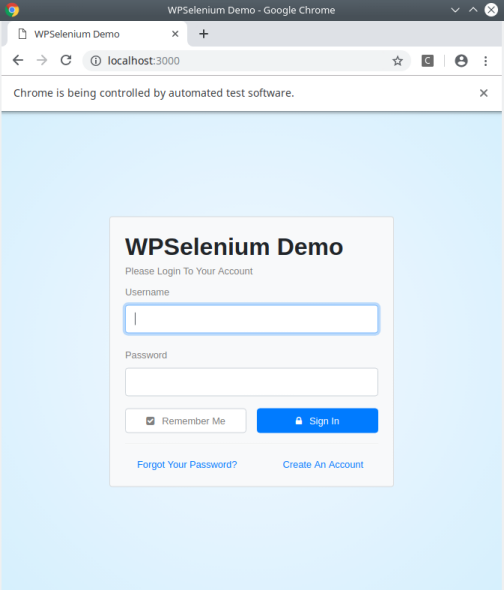
If everything was configured properly you should see a browser window opened up to your site's home page (Example below). This window will close after about 10s .
Note:-
- On first run WPSelenium will download the required files and configure those appropriately. This means your first run will take a little bit long to start testing your site.
- WPSelenium currently comes with only support for chrome and firefox. However if there is another browser you want to test you can specify the link to the browser drivers in you wpselenium config. From there you can rerun the above command using the specified name of your driver (I.e /vendor/bin/wpselenium opera). See Configuration section for more details.
If you managed to see the home page of your site like the above example, everything is set up correct. You can now go ahead and write your tests.
WPSelenium comes with inbuilt support for WordPress sites. This is particularly useful when building custom plugins or themes that might require UI testing. Please see documentation site for more details.
The WPSelenium library is fully documented at https://wpselenium.centridsol.tech/. If you think of anything else that should be documented that's not there, please do give a shout.
WPSelenium is an opensource project and contributions are valued.
If you are contributing a bug fix, please create a pull request with the following details
- The problem/bug you are addressing
- The version of WPSelenium the fix is for
- How you tested the fix
If it's a new feature, please add it as a issue with the label enhancement, detailing the new feature and why you think it's needed. Will discuss it there and once it's agreed upon you can create a pull request with the details highlighted above.
- Chido Warambwa - Initial Work - chidow@centridsol.tech
This project is licensed under the MIT License - see the LICENSE file for details
