RNA-Seq Pipelines live on Yale HPC clusters.
Note about the code blocks in this tutorial:
- Each line is a bash command: program + options + arguments
- Anything after a
#is a comment - For most of the blocks, you can just copy and paste everything to your terminal, then type enter.
- The underlined part or
_partBetweenUnderline_need your action instead of just copy and paste. - You can type ctrl-c to cancel the execution of a command.
To see a demo during a workshop on 10/30/2017 here
- download and install babun, a free cygwin based linux emulator. Extract and run the install.bat file, it will take a few minutes to finish.
- And at last you will be at the terminal! You might want to pin it to the task bar (or search and run babun.bat later).
- Paste the following lines into your terminal (Babun Tip: mouse select text to copy, mouse right click to paste)
babun update
babun shell /bin/bash        #set bash as default shell
ln -s $HOMEPATH/Downloads .  #make a shortcut of your Downloads folder
- Optional: Alternative unix terminals on windows:
- Search and run terminal (you might want to pin it to your dock)
- Optional: Paste the following lines
# install Homebrew, the popular free package manager for OSX. It will take a few minutes.
ruby -e "$(curl -fsSL https://raw.githubusercontent.com/Homebrew/install/master/install)"
brew install #wget will be used later for downloading your RnaSeq data.
- generate the key pair for your terminal:
Then copy the lines from your terminal starting from 'ssh-rsa', an example below:
keyFile=~/.ssh/id_rsa
# generate a key pair if necessary
[[ -e $keyFile ]] || ssh-keygen -f $keyFile -t rsa -N ''
chmod 600 $keyFile  #make your private key safe
cat $keyFile.pub  #print your public key to screen

- Follow the link to register your public key to yale HPC clusters, then
- Paste into the input box, then click <Make changes> Note: your need to prepare/register a key for each computer from which to logon to the cluster.

- Go to account request page of yale center for research computing
- check farnam, also check ruddle if you have sequenced on west campus/YCGA. Note: it might takes a few work days for your accounts to be approved.
- After you got the approvement email from ITS, log into your account from your terminal, example
ssh _yourNetid_@farnam.hpc.yale.edu- After you log onto the cluster, paste the following lines:
You can then exit by type
cmdLine='PATH="/home/zl99/code/ngs/pipelines:$PATH"'
[[ -n $(grep '/home/zl99/code/ngs/pipelines:$PATH' ~/.bashrc) ]] || echo $cmdLine >> ~/.bashrc
exit.
Note for the HPC folders:
- project: 4T for the lab
- scratch60: 10T for the lab, files stored here will be automaticly deleted after 60 days
- In the following examples, most of results are stored under your scratch60 folder. See FAQs to find how to backup/synchronize to your computer using rsync.
- Log onto a specific head node from your local terminal, example:
ssh -X _yourNetid_@farnam2.hpc.yale.edu
- Optional: Run tmux
Note: We are using tmux primarily to keep your working processes running after you disconnect from the cluster. To detach from tmuxa, type ctrl-b then d. For more 'advanced' usage like tabs and panes, see my brief introduction to tmux in FAQs.
tmuxa
- To run one of the pipelines, request an interactive computing node with 8 CPUs, each with 4Gb Memory:
Note: your will be kicked out of the the computing node after the 'walltime', which default to be 24 hours.
srunI
- Then prepare the dependicies of the pipelines, on the computing node
source load_pipelines
Generate a gene x sample read counts matrix for your project.
- Set the parameters: paste the following lines in a computing node
# set up the projectDir and genome
projectDir="/home/zl99/project/Project_Test1M"
genome="hg38"
- Run the pipeline, output to a new folder under scratch60:
It will take a few minutes.
# make a new folder in scratch60, cd there and do the mapping
outDir="$HOME/scratch60/$(basename $projectDir).bowtie2"
mkdir $outDir && cd $outDir && bowtie2localSeBatch $genome $projectDir
- Optional: check the output of the pipeline. Examples:
you can check the pipeline documents below for details.
ls -l
less geneCount.csv #q to quit
ls -l */*.bam
- Follow link provided by the sequencing center, copy the link address of your project. Example:
 , Then type

# extract the projectDir from the link address
projectDir=$(echoProjectDir '_pastehere_')
genome=_genome_ # hg38 or mm10- Then paste the following to run the pipeline. It takes much longer, your might wait overnight.
# make a new folder in scratch60, cd there and do the mapping
outDir="$HOME/scratch60/$(basename $projectDir).bowtie2"
mkdir $outDir && cd $outDir && bowtie2localSeBatch $genome $projectDir
- Tranfer the results to your computer:
- construct the rsync command on the cluster terminal: paster the following lines and copy the output:
.. Tip: to figure out the size of the outDir, type
tmp=$USER@${HOSTNAME%%[0-9].*}.hpc.yale.edu
echo "rsync -azvuP $tmp:$outDir ."
cd $outDir; du -hs. - open your local terminal on your laptop (Babun for windows, terminal for OSX), then type the following
.. Tip: instead of typing, you can drag a folder to your terminal window.
cd "_targetDir_"
_pasteHere_
- construct the rsync command on the cluster terminal: paster the following lines and copy the output:
- Usage:
bowtie2localSeBatch <genome> <projectDir> - Arguments:
- genome: one of {hg38, hg19, mm10, mm9}
- projectDir: the Project folder with all you samples, each as folder with fastq.gz files. Note that only R1 files are used for this single ended (Se) pipeline.
- Output: write to the current directory
- a summary report of the mapping pipeline: summary.report.csv, summary.report.pdf
- a count matrix of [geneId x sampleName]: geneCount.csv, geneInfo.csv
- the normalized gene expression matrices: geneRpkm.csv, geneExpr.vst.csv
- sample output folders, each with:
- BAM file: the alignments.
- bigwig file: the coverage at each base normalized to Counts Per Million Reads mapped (CPM).
TBD. High priority
Reference: STAR.
TBD. Low priority.
Reference: TopHat.
- Set the parameters: paste the following lines to your cluster terminal on a computing node
# cd to mappingDir and set contrasts
cd "~/scratch60/Project_Test1M.bowtie2" #output directory of the mapping pipeline
contrasts="A-B" #example of multiple contrasts: constrasts="A-Ctrl,B-Ctrl"
- Run pipeline, output to a new folder under your mappingFolder
# run pipeline, output to a new folder ./deseq2
mkdir deseq2; cd deseq2
deseq2ContrastBatch ../geneCount.csv ../sampleInfo.csv $contrasts
-
Set your mappingDir and set contrasts:
cd _your/mappingdir_
contrasts="_yourContrasts_"  #example: "A-Ctrl,B-Ctrl"
-
Create/upload your own sampleInfo.csv file to your mappingDir (check the format in the pipeline document below): for example
ls -d Sample* > sampleInfo.csv
nano sampleInfo.csv
See an example file here.
-
Run the pipeline:
mkdir deseq2 && cd deseq2 && deseq2ContrastBatch ../geneCount.csv ../sampleInfo.csv $contrasts
-
Download the results to your computer, as demonstrated in the mapping pipeline.
- Usage:
deseq2ContrastBatch <geneCountFile> <sampleInfoFile> <contrast1>[,<contrast2>[,...]] - Arguments:
- geneCountFile: a csv file with raw read counts of geneID x sampleName
- sampleInfoFile: a csv file with sample info. The first two columns are required, and the first row will be ignored.
- sampleName should match that of geneCountFile
- sampleGroup will be used in a comparision/contrast.
- a contrast: a comparison between two 'sampleGroup's in the format of groupNumerator-groupDenominator
- Output: write to the current directory
- A normalized count matrix
- PCA plot
- Differential expression results as seperate folders, each for a comparison
Reference: DESeq2 package.
TBD. Low priority
Reference: Limma package.
Reference: http://bioinf.wehi.edu.au/RNAseqCaseStudy/
You can use rsync, comes with the terminal on your computer. For example:
- set your remoteDir, localDir to synchronize
remoteDir="yourNetid@farnam.hpc.yale.edu:scratch60"
localDir="~/scratch60"
Tip: you may drag your folder from your file explorer to the terminal to set the localDir. - backup every file and subfolder from your remoteDir (source) to your localDir (target)
rsync -azvuP $remoteDir/ $localDir # with /, transfer everything under the source dir.
- upload a new local folder named 'newFolder' (source) to your remoteDir (target)
#upload a folder named 'newFolder' to your remoteDir
rsync -azvuP $localDir/newFolder $remoteDir   #without /, transfer the source dir.
- For more usage examples of rsync, see a tutorial
- cd to a folder with enough disk space
- Follow the download link provided in their email, copy the link address of your project. Example:
- set the projectLink variable
projectLink='_pasteHere_'- download from Yale Stem Cell Center using wget and verifing what you retrieved by copy&paste the following lines
projectUrl=$(echo "$projectLink" | sed 's%/gen.*fullPath=%%;s%&dirName=.*%%')
tmp=$(echo $projectUrl | tr / \  | wc -w) #count parts by slashes
wget -e robots=off -r -nH -np --cut-dirs=$(bc <<< $tmp-3) "${projectUrl}/"
find -name *.md5sum | xargs md5sum -c
Note:: You might need VPN on your laptop. You might need a computing node by srun --pty -p interactive bash on a cluster.
- download from YCGA using rsync
projectUrl=$(echo $projectLink | sed -E 's/.*fullPath=(.*)&.*/\1/;s%gpfs_illumina%ruddle.hpc.yale.edu:/sequencers/illumina%')
rsync -azvu $projectUrl .
Note:: if you might need to put your_netid@ before $projectUrl on your personal laptop. Alternatively, ask YCGA for an external link, and use wget to download.
Use fastqc
- run the run_fastqc.bat after downloaded and extracted. You might want to add a shortcut to your Desktop.
- Menu : file to open one of a fasta.gz file.
- Menu : file to save report.
- You can find tutorial and examples on the fastqc website.
- Mac tip: you might want to allow the software by [System preferences - security - open anyway].
- You can use IGV, see here
-
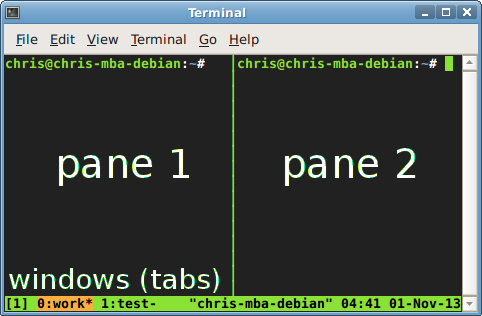
Why whould i use tmux?
- keep programs running after you disconnect (e.g. when working on a remote server via ssh)
- split your terminal into windows(tabs) and panes (multple terminals within a window/tab)
-
Using tabs: once in tmux, type ctrl-b then
type a key to c create a new window (you might call it a tab) n / number select next/specific window x kill the current pane -
More advanced: Using panes
type ctrl-b, then to " / % create a new pane vertically/horizontally o / arrow select next/specific pane ctrl+arrow resize a pane z toggle maximize/unmaximize a pane d detach and leave everthing running in the background ? see a shortcut list
- essential commands
- navigation: ls, cd, mkdir, rmdir, cp, mv, ln, rm
- view/edit: cat, less, echo, nano
- file transfer: rsync, wget
- concepts and operators:
- wildcards: *, ?
- variable: ${}
- redirect: |, >, >>
This might looks overwhelming if your never use linux terminal, but it is rewarding. Set aside one hour to follow the tutorial to see how far you can go, you might find yourself at the end of the tutorial before the hour run off.
- Command-line Bootcamp might be a good start.
- See another tutorial here.
Excercise with the very basic linux commands (program + options + arguments), type each command except the italized part (you should act on it) and the comment (after #), followed by an enter.
- list the folders and files: ls
ls
ls -l #long form: filesize, last modified time
ls -la #see the hidden: ., .., .ssh
ls --help
man ls
Tip of man: / to search; arrows to navigate; q to quit
- navigate in the tree: cd
pwd  #find where you are
cd /  #go to root
ls -l
cd ~  #go to home, or just type cd
cd drag a folder from your file manager #go to a local folder
- moving things around: mkdir, mv, cp
cd
mkdir RnaseqTutorial
cd Rnaclick tab on yourkeyboard for autocompletion
cp ~/.ssh/id_rsa.pub . #. is for current directory
cd .. #.. is for parent directory
mv RnaseqTutorial ~/Downloads
ls ~/Downloads | less  # | is called pipe. less is file viewer
Tip of less: / to search; arrows to navigate; q to quit
- You can use a for loop, for example
# move each sorted.bam.bw in the subfolders to the current folder and rename as the_subfolder.bw for f in */*.bw; do mv $f ${f/\/sorted.bam/}; done${string/pattern/replacement}is a bash string manipulation. The pattern will be deleted without replacement.
You can do this in a spreadsheet. An autofilter following countif function might suffice.