C# Tips And Tricks Part 1
This is part 1 of the C# Tips And Tricks series. These are not tutorials, but rather a collection of notes and tips that can be useful for beginners. They are updated regularly with more info.
When working in the modern IDE, Visual Studio 2022 and with .NET, you do not need to reference .NET dlls manually, they will be available to your project automatically.
If you need to reference a DLL that is not part of the .NET by default, then use the Nuget package manager to add it.
So if you have lines like this in your .csproj file, remove them completely.
<ItemGroup>
   <Reference Include="Security.Cryptography">
       <HintPath>"Path To .DLL file"</HintPath>
   </Reference>
   <Reference Include="System">
       <HintPath>"Path To .DLL file"</HintPath>
   </Reference>
</ItemGroup>
Nuget Package references look like this
<ItemGroup>
    <PackageReference Include="System.Management" Version="9.0.0" />
    <PackageReference Include="System.Management.Automation" Version="7.5." />
</ItemGroup>When working with WPF or Windows Forms, additional assemblies need to be made available to your project.
Use the following line in your .csproj file to enable WPF assemblies
<UseWpf>true</UseWpf>Use the following line in your .csproj file to enable Windows Forms assemblies
<UseWindowsForms>true</UseWindowsForms>They are MSBuild properties, you can read more about them on this page.
If you have non-code files in your solution explorer, such as .XML, .CSV, .JSON files etc. that you want to be available to your code after compilation, maybe because they rely on them and they are important resources for your application, you can configure your project to automatically copy them to the output folder after compilation.
For example, use the following code in your .csproj file to make everything in the Resources folder, which is in the Main folder, copied to the output folder after compilation. The exact folder structure will be preserved.
<ItemGroup>
    <Content Include="Main\Resources\**">
        <CopyToOutputDirectory>PreserveNewest</CopyToOutputDirectory>
    </Content>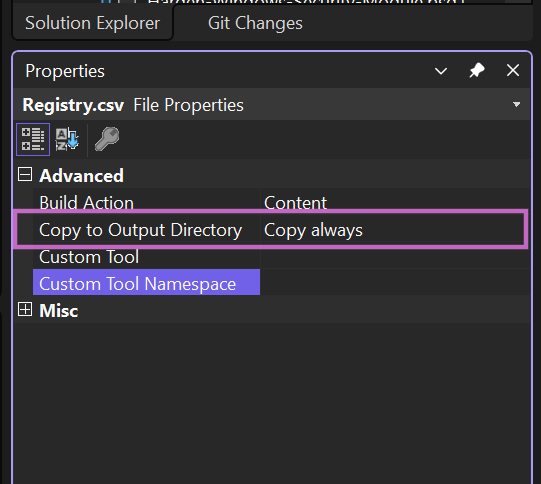
</ItemGroup>You can navigate to an individual file in your solution explorer, right-click on it and select Properties, in the Copy To Output Directory property select Copy always.
You can access the output directory using the following variable
AppDomain.CurrentDomain.BaseDirectorySo in the example above, the files will be in the following directory
Path.Combine(AppDomain.CurrentDomain.BaseDirectory, "Main", "Resources")There are of course other options, such as designating/embedding the file as a resource of your application.
To do that first navigate to the file and right-click on it, select Properties, and in the Build Action property select Embedded Resource.
Then you can access the file using the following code
using System;
using System.IO;
using System.Reflection;

namespace HardenWindowsSecurity
{
    class Program
    {
        static void Main(string[] args)
        {
            // Specify the resource name
            string resourceName = "HardenWindowsSecurity.Main_files.Resources.XAML.Main.xaml";

            // Load the resource from the assembly
            var assembly = Assembly.GetExecutingAssembly();
            using (Stream stream = assembly.GetManifestResourceStream(resourceName))
            using (StreamReader reader = new StreamReader(stream))
            {
                // Read the content of the XAML file as a string
                string xamlContent = reader.ReadToEnd();
                // Print the content to the console
                Console.WriteLine(xamlContent);
            }
        }
    }
}
Or use this code to load the XAML GUI
using System;
using System.IO;
using System.Reflection;
using System.Windows;
using System.Windows.Markup;

namespace HardenWindowsSecurity
{
    class Program
    {
        [STAThread]
        static void Main()
        {
            System.Windows.Application app = new System.Windows.Application();

            // Get the current assembly
            Assembly assembly = Assembly.GetExecutingAssembly();

            // Define the resource path
            string resourcePath = "HardenWindowsSecurity.Main_files.Resources.XAML.Main.xaml";

            // Load the XAML file as a stream
            using (Stream stream = assembly.GetManifestResourceStream(resourcePath))
            {
                if (stream == null)
                {
                    Console.WriteLine("Failed to load XAML resource.");
                    return;
                }

                // Load the XAML from the stream
                Window window = (Window)XamlReader.Load(stream);

                // Show the window as a dialog
                window.ShowDialog();
            }
        }
    }
}
Or use this code to get the name of the embedded resources
using System;
using System.Reflection;

namespace HardenWindowsSecurity
{
    class Program
    {
        [STAThread]
        static void Main()
        {
            // Get the current assembly
            Assembly assembly = Assembly.GetExecutingAssembly();

            // List all resource names
            foreach (string resourceName in assembly.GetManifestResourceNames())
            {
                Console.WriteLine(resourceName);
            }
        }
    }
}-
When you set a file as an Embedded Resource in Visual Studio, it gets compiled into the assembly (i.e., your project's output file, such as .exe or .dll). This means the file becomes a part of the compiled binary and can be accessed programmatically using reflection.
-
The resource name is critical as it follows a specific pattern: Namespace.FolderStructure.Filename.
-
If your project's default namespace is
YourNamespace, and your XAML file is located in"Main files"/Resources/XAML/Main.xaml, the resource name would beYourNamespace.Main_files.Resources.XAML.Main.xaml. -
Assembly.GetExecutingAssembly(): This method returns the assembly that contains the code currently executing. This is important because your embedded resource is part of this assembly. -
GetManifestResourceStream: This method retrieves the resource stream (a sequence of bytes) of the embedded resource based on its name. The method returns a Stream object that you can use to read the content of the resource. -
StreamReader: This class is used to read characters from a stream. SinceGetManifestResourceStreamreturns a stream, we wrap it in aStreamReaderto easily read the text content.
-
Portability: Since the resource is embedded in the assembly, you don't have to worry about distributing external files with your application.
-
Security: The resource is somewhat protected since it’s part of the compiled binary, making it harder (though not impossible) for others to tamper with the file.
-
Ease of Access: Accessing resources via the assembly makes it straightforward, as you don't need to deal with file paths, especially when deploying your application.
-
This method is powerful for scenarios where you want to package files directly within your application and access them as needed.
Static classes have fewer functionalities compared to non-static classes. They are designed to serve specific purposes, such as defining global constants, variables, utility functions, or methods that perform similar operations. Because a static class is meant to be a container for these static members, it cannot be instantiated. This means that you cannot create objects from a static class. Instead, all its members must be accessed using the class name itself.
Non-static classes, on the other hand, are much more versatile. They can do everything a static class can do and offer many additional features. For example, non-static classes can be instantiated, meaning you can create objects from them. These objects can represent custom types, holding state and behavior specific to each instance. This allows you to create multiple objects from the same class, each with its own unique state and/or property.
Non-static classes can contain both static and non-static members. Static members of a non-static class are shared among all instances and are accessed using the class name, just like in a static class. Instance members, however, belong to each specific object and are accessed through that object.
To access static members in both static and non-static classes, you use the same syntax: ClassName.Member. This allows consistent access patterns, regardless of whether the class is static or not.
Microsoft has a troubleshooting documentation for XAML Hot Reload feature but there is one important thing they don't mention, your WPF GUI needs to be using the Application context/object, not Window, for Hot Reload feature to function.
If your WPF GUI only uses the Window object, then the Hot Reload feature will not work.

-
 New-WDACConfig
-
New-SupplementalWDACConfig
-
Remove-WDACConfig
-
Edit-WDACConfig
-
Edit-SignedWDACConfig
-
Deploy-SignedWDACConfig
-
Confirm-WDACConfig
-
New-DenyWDACConfig
-
Set-CommonWDACConfig
-
New-KernelModeWDACConfig
-
Get-CommonWDACConfig
-
Invoke-WDACSimulation
-
Remove-CommonWDACConfig
-
Assert-WDACConfigIntegrity
-
Build-WDACCertificate
-
Test-CiPolicy
-
Get-CiFileHashes

-
ConvertTo-WDACPolicy
-
Get-CIPolicySetting
-
 Introduction
-
App Control for Lightly Managed Devices
-
App Control for Fully managed device - Variant 1
-
App Control for Fully managed device - Variant 2
-
App Control for Fully managed device - Variant 3
-
App Control for Fully managed device - Variant 4
-
App Control Notes
-
How to Create and Deploy a Signed App Control Policy
-
Fast and Automatic Microsoft Recommended Driver Block Rules updates
-
App Control policy for BYOVD Kernel mode only protection
-
EKUs in App Control for Business Policies
-
App Control Rule Levels Comparison and Guide
-
Script Enforcement and PowerShell Constrained Language Mode in App Control Policies
-
How to Use Microsoft Defender for Endpoint Advanced Hunting With App Control
-
App Control Frequently Asked Questions (FAQs)
-
 Create Bootable USB flash drive with no 3rd party tools
-
Event Viewer
-
Group Policy
-
How to compact your OS and free up extra space
-
Hyper V
-
Overrides for Microsoft Security Baseline
-
Git GitHub Desktop and Mandatory ASLR
-
Signed and Verified commits with GitHub desktop
-
About TLS, DNS, Encryption and OPSEC concepts
-
Things to do when clean installing Windows
-
Comparison of security benchmarks
-
BitLocker, TPM and Pluton | What Are They and How Do They Work
-
How to Detect Changes in User and Local Machine Certificate Stores in Real Time Using PowerShell
-
Cloning Personal and Enterprise Repositories Using GitHub Desktop
-
Only a Small Portion of The Windows OS Security Apparatus
-
 Clean Source principle, Azure and Privileged Access Workstations
-
How to Securely Connect to Azure VMs and Use RDP
-
 Basic PowerShell tricks and notes
-
Basic PowerShell tricks and notes Part 2
-
Basic PowerShell tricks and notes Part 3
-
Basic PowerShell tricks and notes Part 4
-
Basic PowerShell tricks and notes Part 5
-
How To Access All Stream Outputs From Thread Jobs In PowerShell In Real Time
-
PowerShell Best Practices To Follow When Coding
-
How To Asynchronously Access All Stream Outputs From Background Jobs In PowerShell
-
Powershell Dynamic Parameters and How to Add Them to the Get‐Help Syntax
-
RunSpaces In PowerShell
-
How To Use Reflection And Prevent Using Internal & Private C# Methods in PowerShell