UniCAVE 2017 Documentation
Ross Tredinnick, Brady Boettcher, Sam Solovy, Simon Smith, Kevin Ponto
Last updated: 3/16/2017
Contents
1. Introduction
2. Installation
3. Modify an Existing Prefab
4. Building and Running the Unity Scene
5. Creating a new Immersive Projection Setup
The UniCAVE Plugin is a solution for running Unity within immersive projection VR display systems. The following document will guide on setup of the Plugin within Unity. The plugin has been tested on Unity version 5.4.03f and Unity version 5.5.03f.
The UniCAVE plugin is an open source project meant to be built upon to increase support for Unity across different forms of immersive projection display setups and to increase support for Unity functionality for clusters of PCs.
Pull or download a zip of the current repository to a desired location.
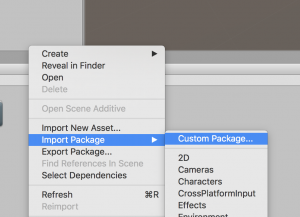
The plugin can be added to a Unity project by clicking the “Assets” menu within the Unity editor, followed by clicking the “Import Package” sub-menu and choosing Custom Package…
Select the UniCavePlugin.unitypackage in the PluginFiles directory of the repository or extracted zip.
Upon importing the package, several assets will appear in a new folder titled “UniCave” in sub folders called Plugins, Prefabs, Scripts, and Materials directories in your project.
The Plugins directory has plugin support for interfacing with 3D tracking systems via a VRPN Unity plugin.
The Scripts directory contains the necessary scripts for tracking and for asymmetric projection matrix calculation.
The Prefabs directory contains several example immersive projection setups. These prefabs can be dragged into your scene to enable support of the associated immersive projection setup. Each prefab consists of a hierarchy of Unity game objects which make up the immersive projection setup. The objects within the hierarchy consist of quads which represent projection surfaces, cameras, and general game objects that contain scripts for performing correct projection. The ordering of objects within the hierarchy matters (particularly camera order where left cameras appear as children before right eye cameras).
First, drag and drop a prefab that matches your physical display setup into your scene.
Click on the root object of the prefab that you just dragged in. There should be a script called Networking Sync on the object. If you are running the UniCAVE plugin across a cluster of machines, keep this script on the object, if not, you can remove the script.
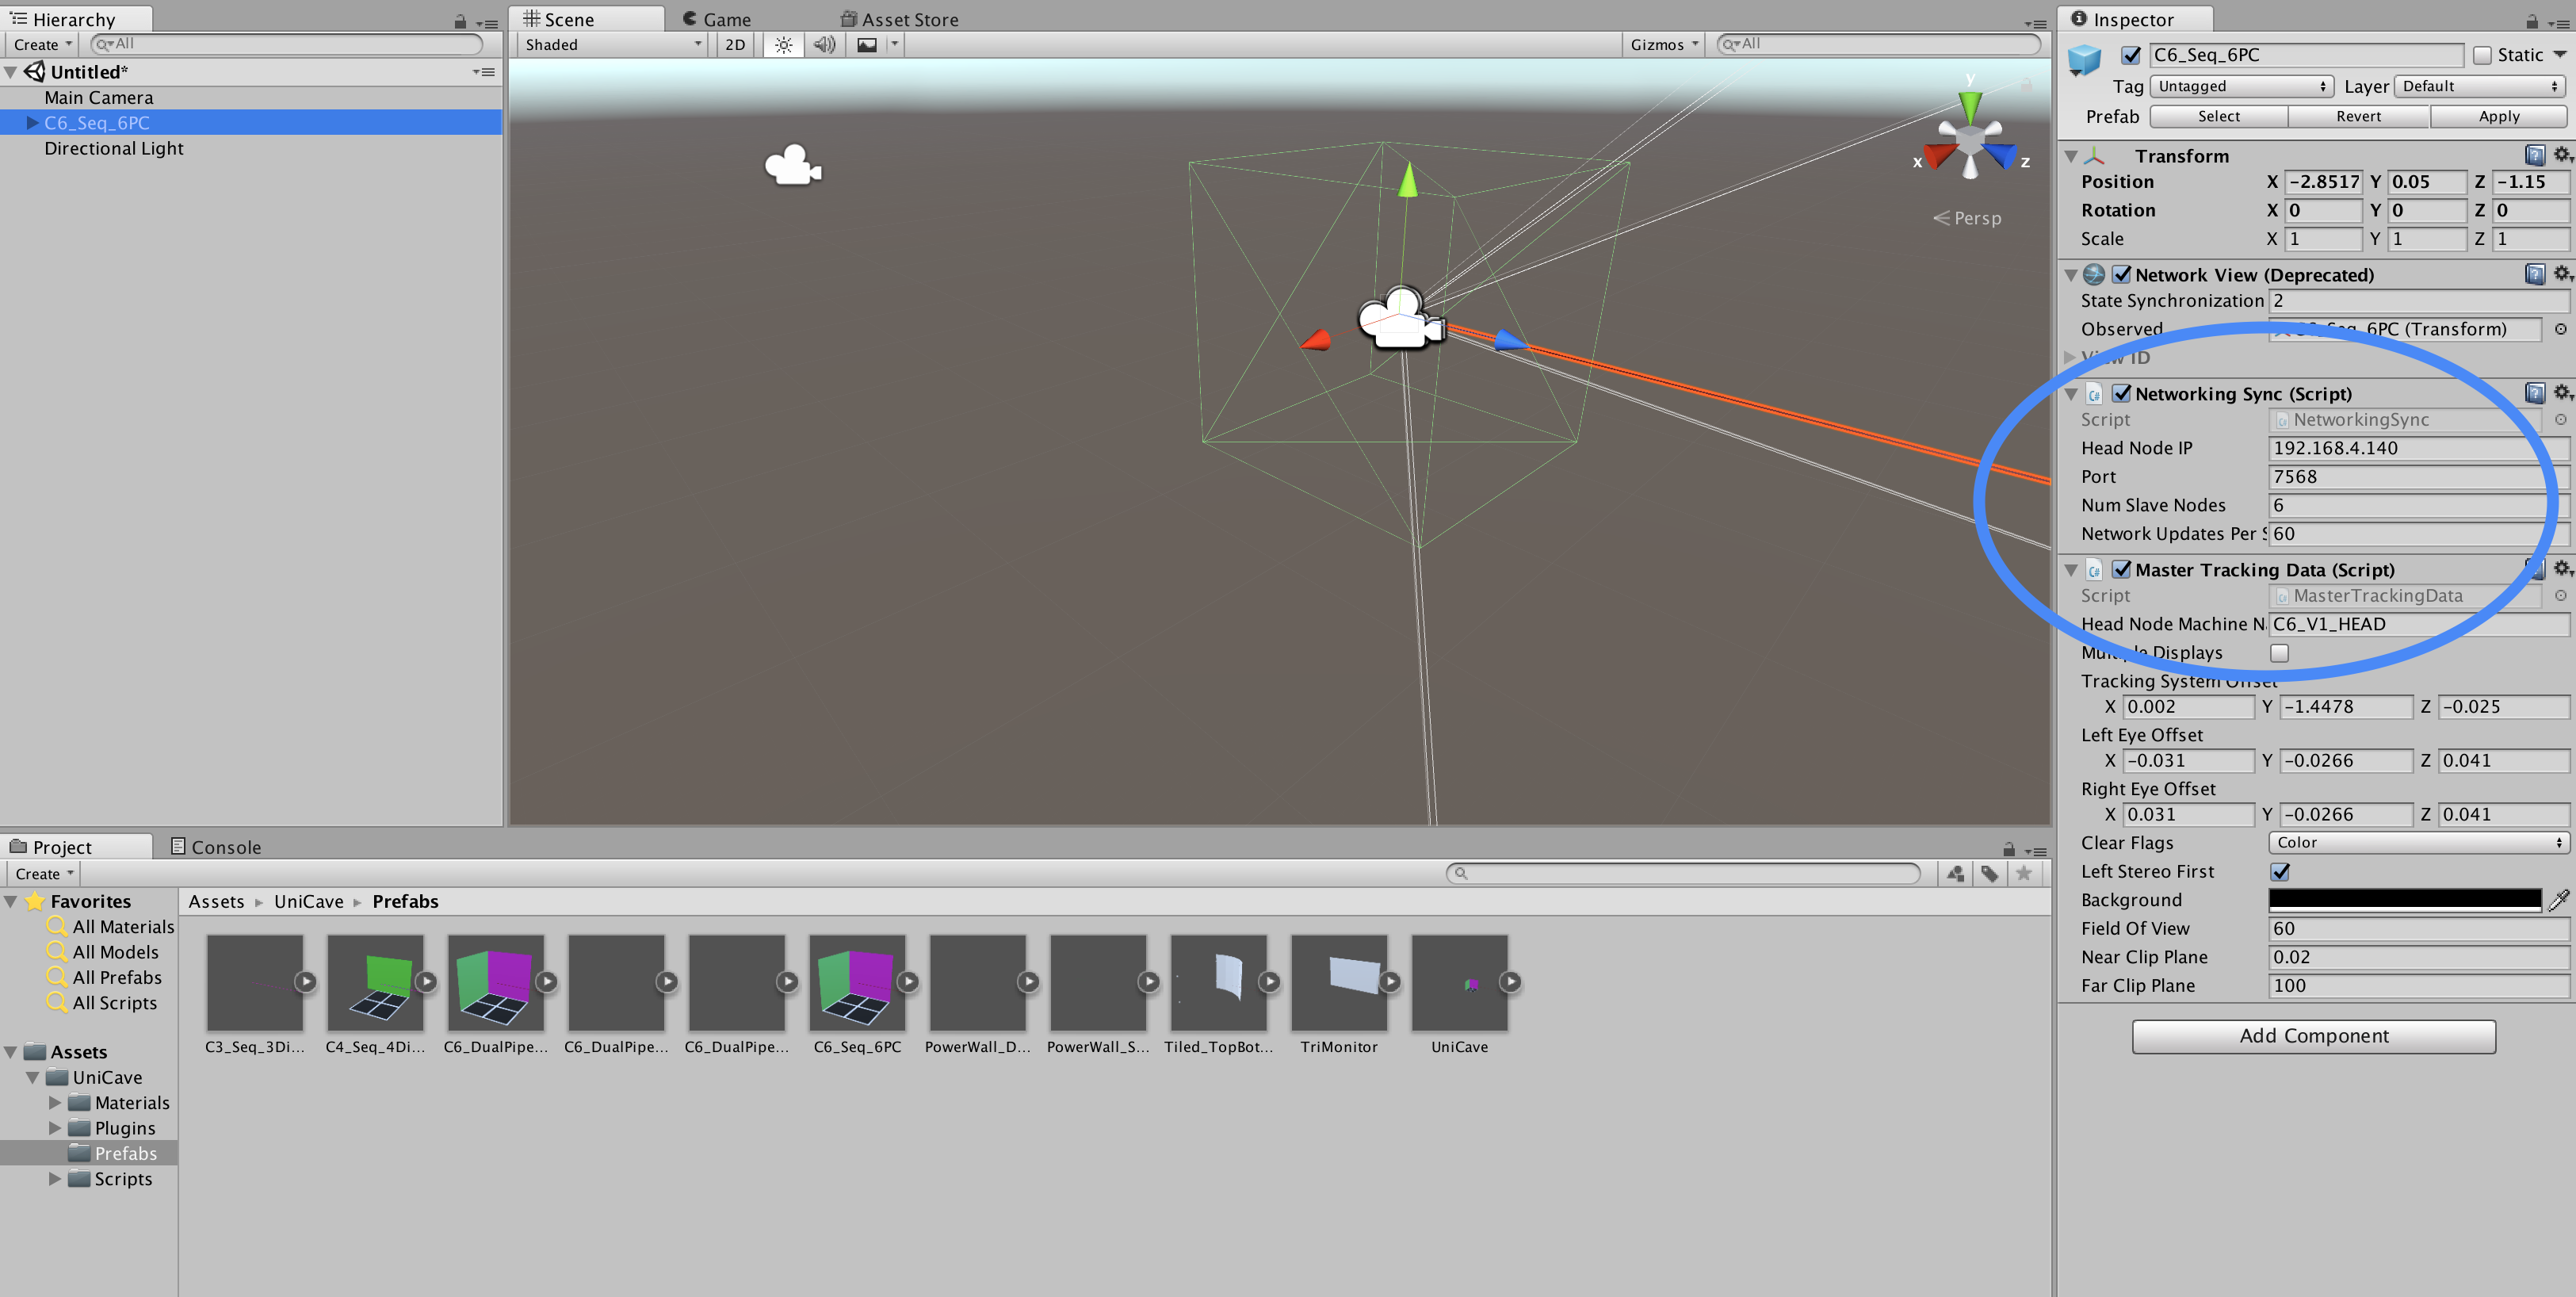
For a cluster setup, three fields exist in this script that should be edited (highlighted above in the blue oval), depending on your immersive projection setup.
- “Head Node IP” should match the head node’s IP address of your cluster.
- “Port” should be set to an open port for opening a network connection between the head and slave nodes.
- “Num Slave Nodes” should be set the number of slave nodes in the cluster.
An optional setting that can be edited is the “Network Updates per Second” which will alter how fast Unity’s networking system updates, which can have an influence on distributed rendering in a cluster.
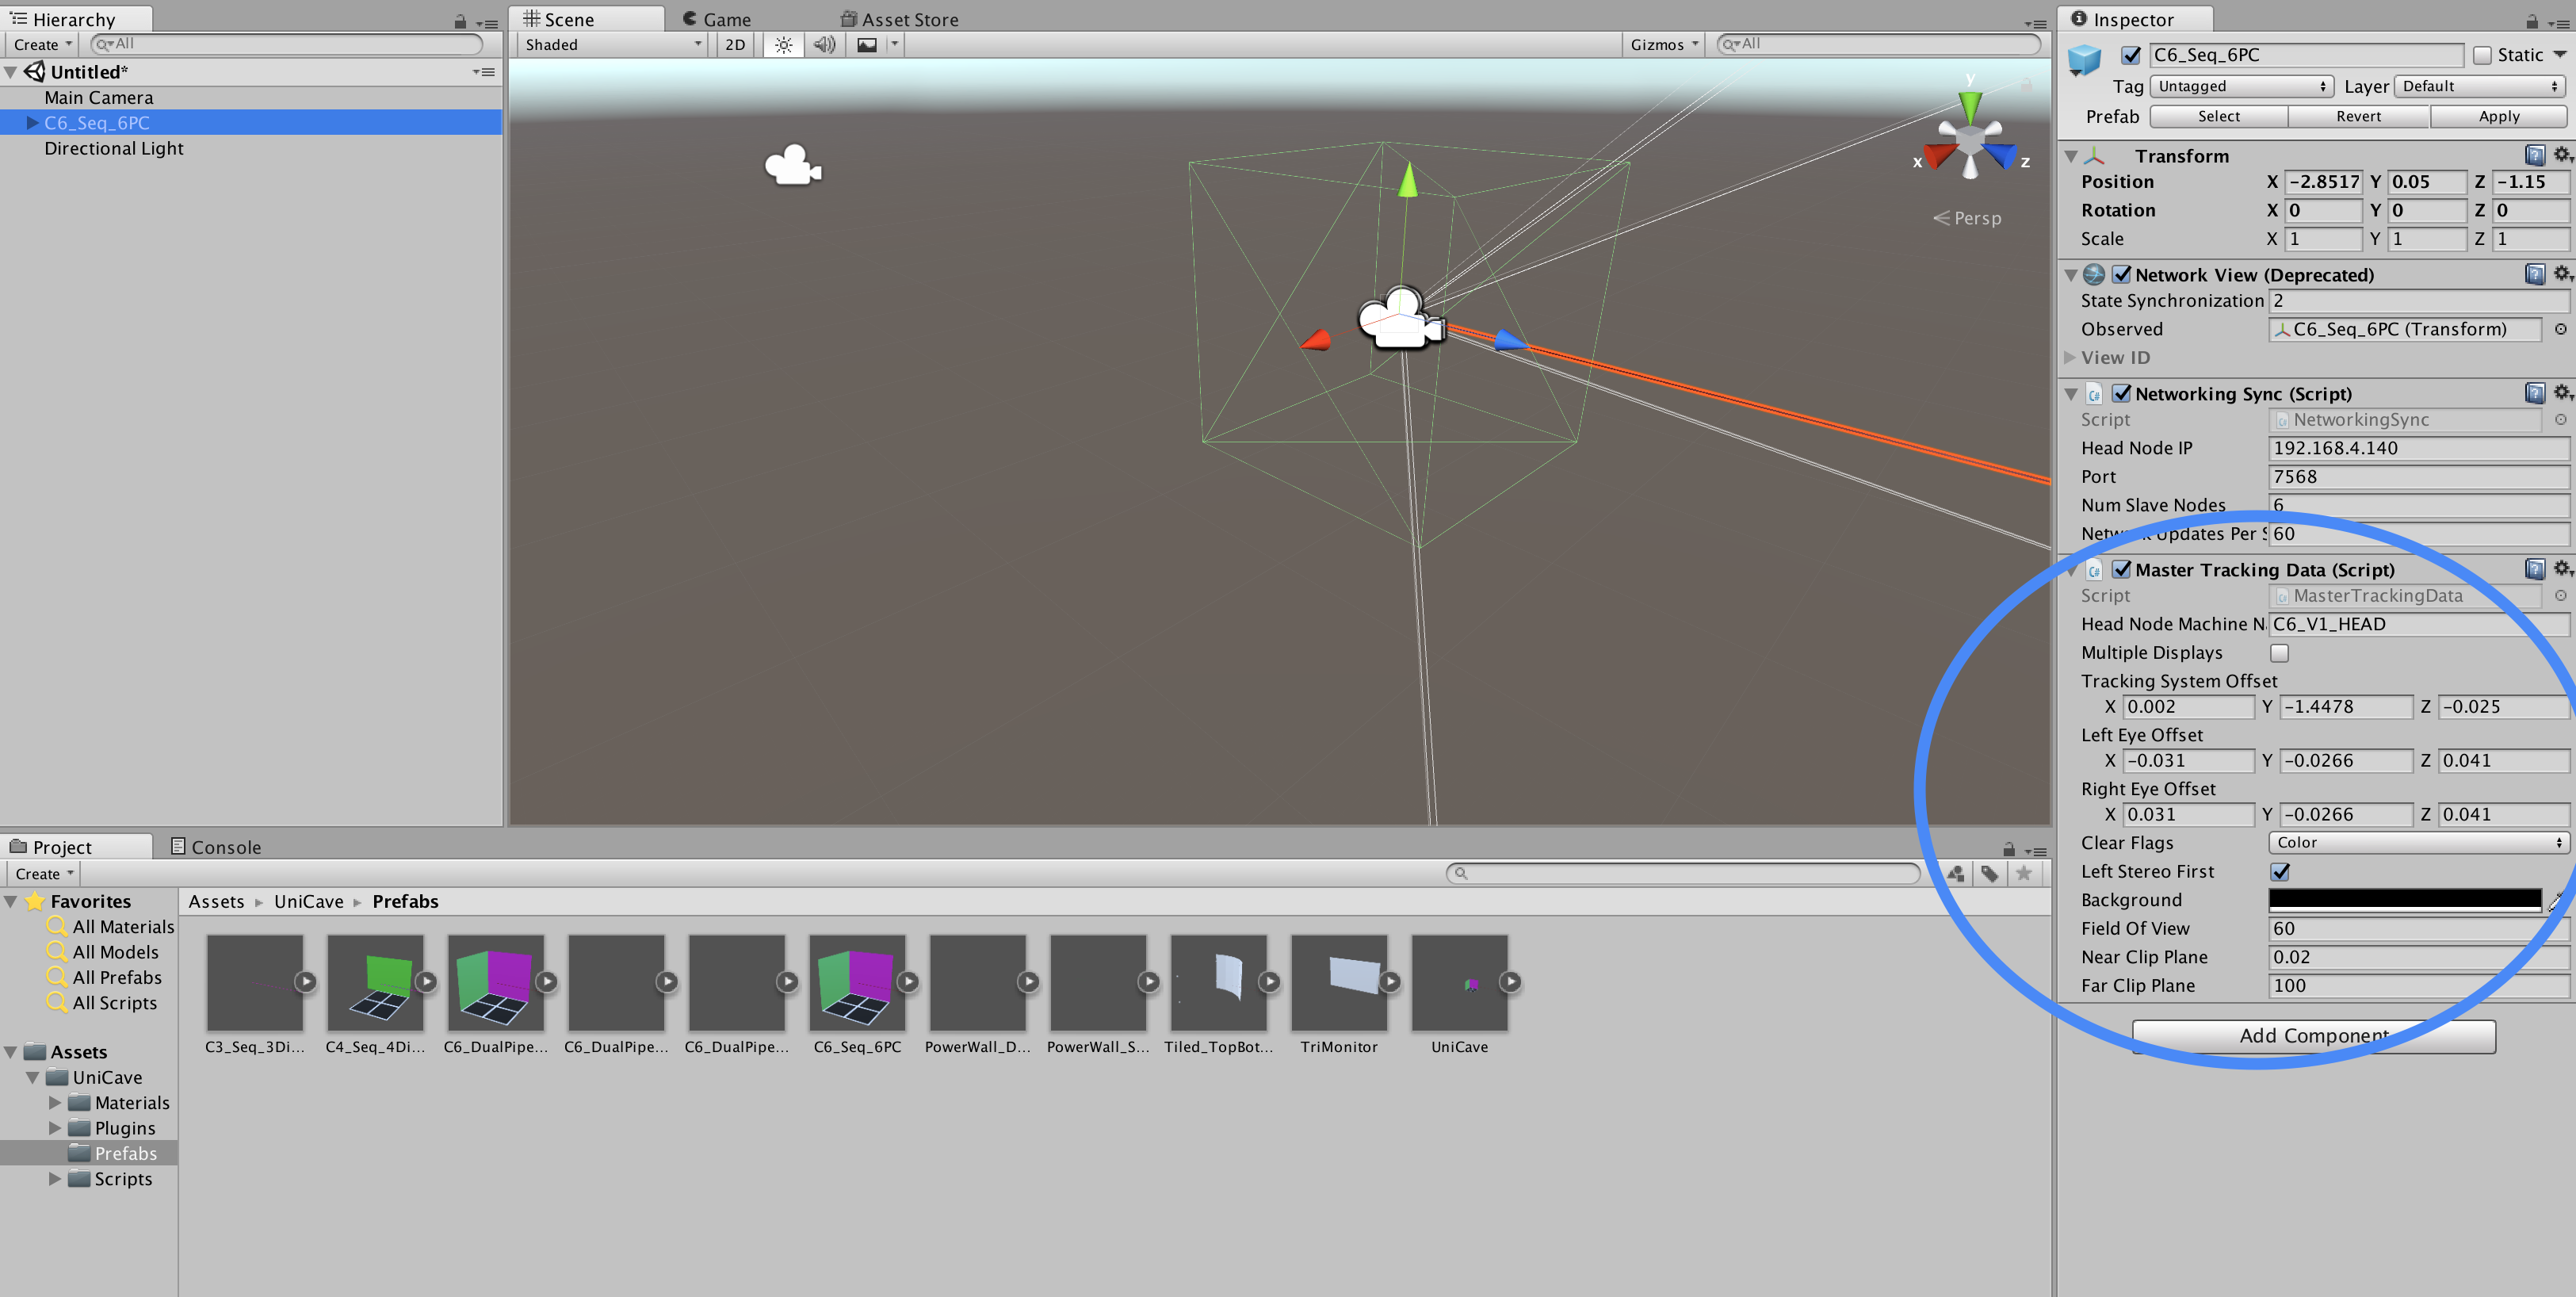
Another script called Master Tracking Data contains several global settings for the immersive projection display setup.
- “Head Node Machine Name” is a string that should be set to the name of the head node in a cluster setup, or the name of the machine running the plugin if no cluster is present.
- “Tracking System Offset” is a vector that can be added onto the tracking system’s per-frame position.
- “Multiple Displays” will activate additional displays within Unity when working with a multiple monitor or projector setup. This should be checked if you have a system setup where one PC may be running multiple monitors or projectors in your immersive setup, without activating additional displays, they will most likely appear black when running the application.
- Left stereo first (default = true) determines which eye Unity will render first, this should be set to match whichever eye is displayed first via the settings on your projectors or 3D monitors.
- The rest of the settings (Eye Offsets, clear flags, near/far clip, background color) all serve as shortcuts for editing properties across all cameras that are within the hierarchy of the immersive display projection prefab. To sync edits made to Master Tracking Data to all of the cameras, right click on the title of the script and choose “Sync Camera Settings”
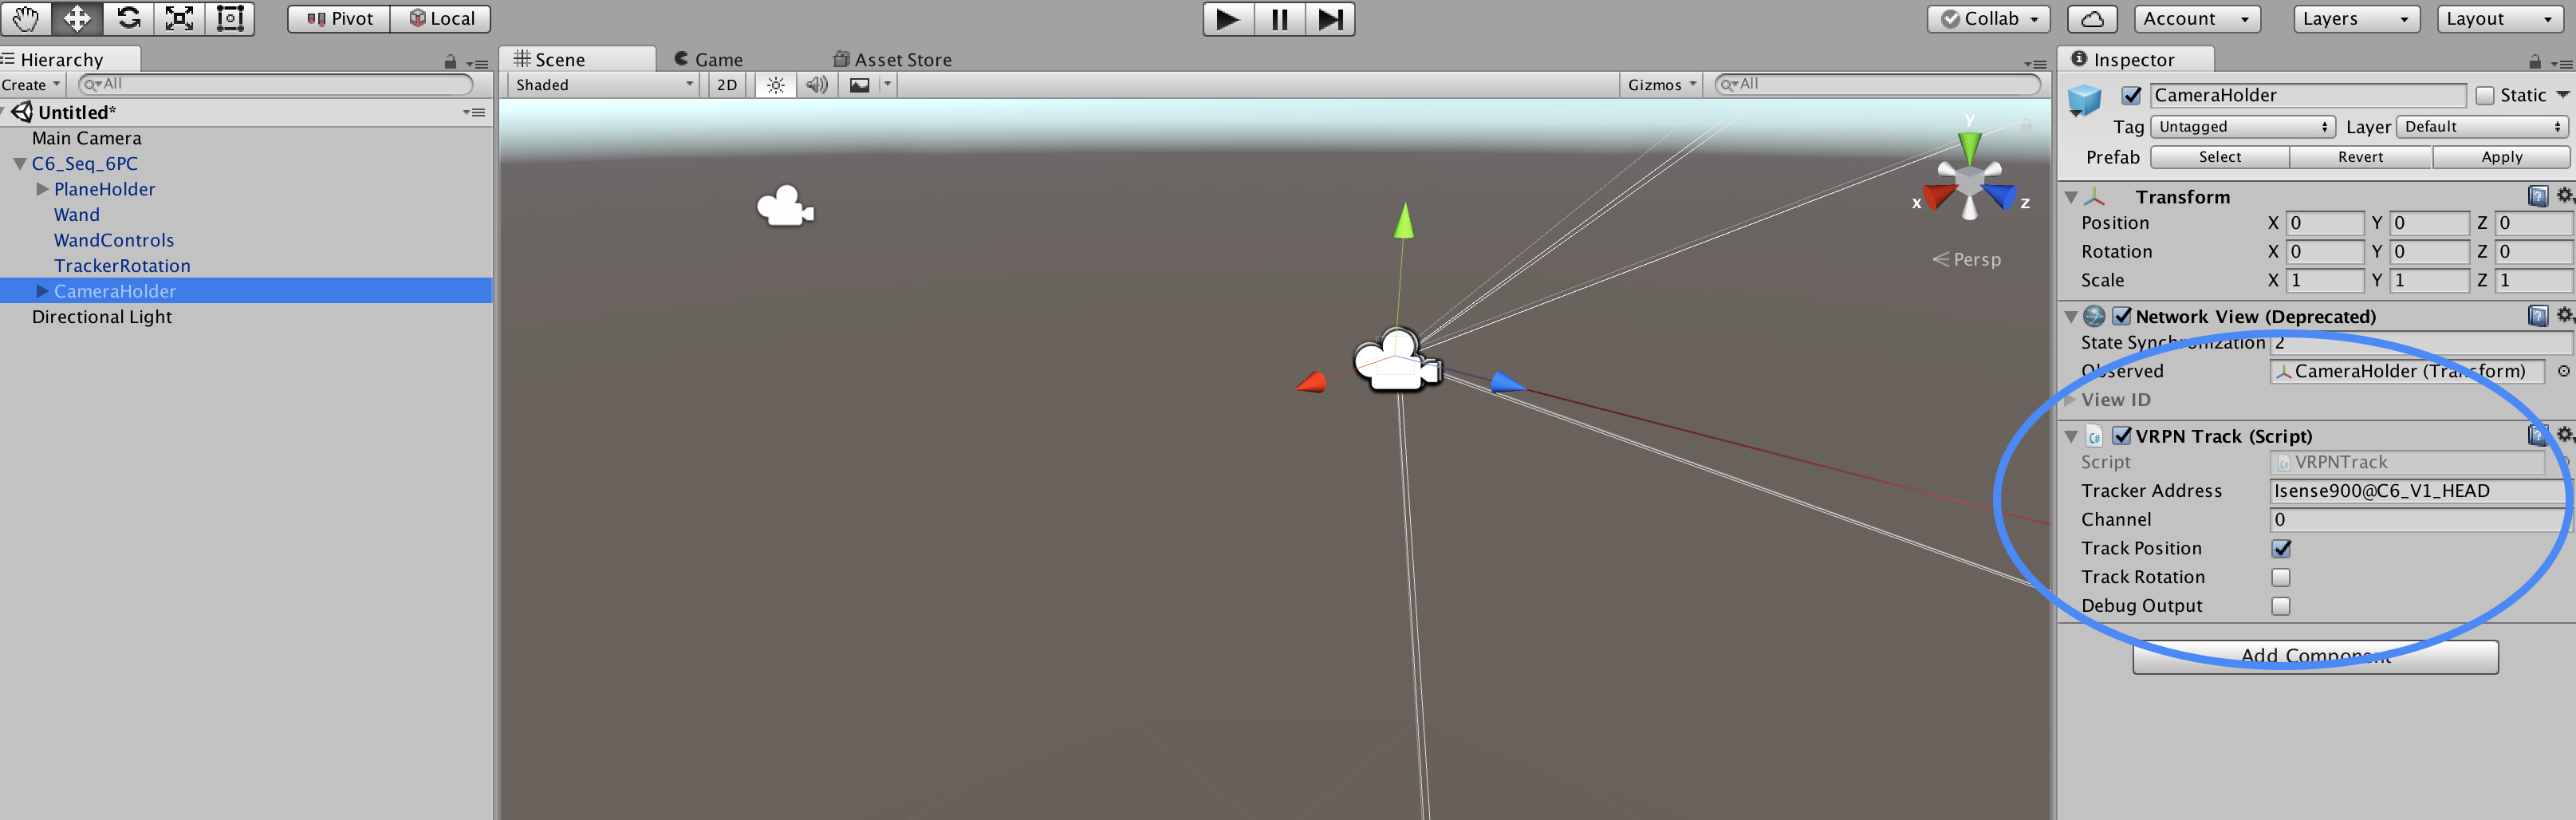
Several VRPNTrack scripts exist on different objects in the hierarchy. This script connects a particular tracked channel to an object in Unity. For example, by default the object “Tracker Rotation” obtains the tracked rotation (check box “Track Rotation” is on) returned by VRPN for channel 0.
- “Tracker Address” should be set to the tracker address name as used by VRPN. For example, for an Intersene900 tracking system, “Isense900@” is used for 6-dof trackers, and “Wand#@” is used for button and analog tracking.
Most of the prefabs are setup to use a CAVE wand-style input device for basic navigation.
- “Holder” should have a reference back to the root object in the prefab hierarchy, this allows the basic navigation – holder only needs to be set for the “WandControls” object.
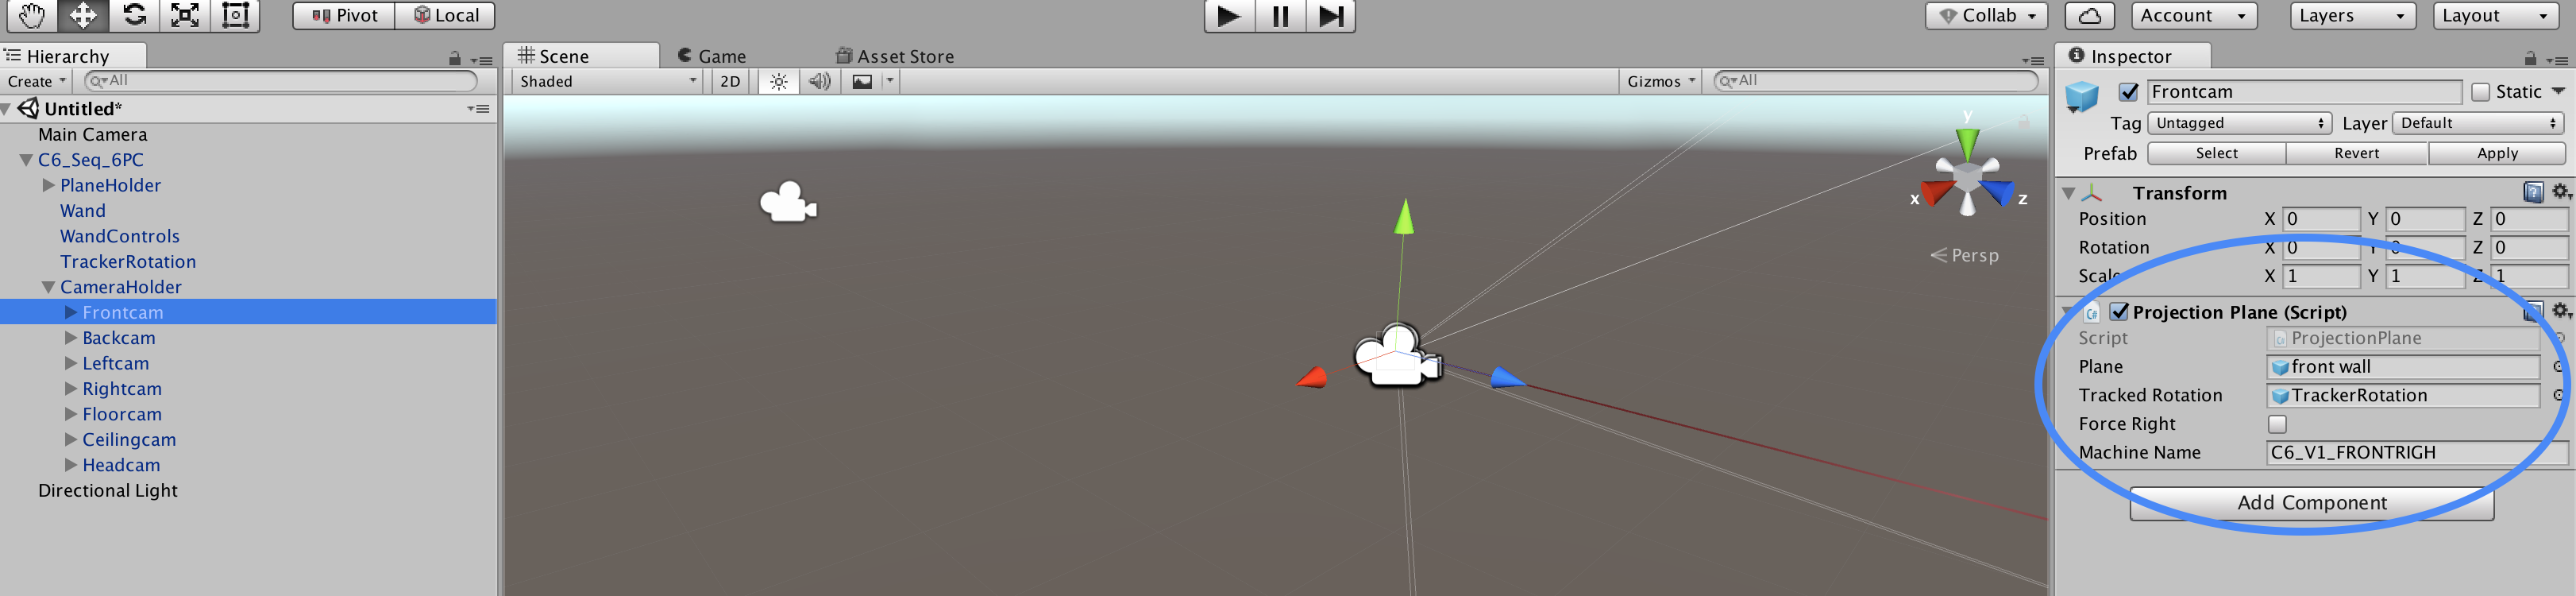
The final script to edit is Projection Plane which exists on each child of the “Camera Holder” object within the hierarchy. In many of the prefabs, each child of “Camera Holder” defines the link between the plane geometry used to setup the physical projection geometry, and the cameras being used to render to that surface. In each script, “Machine Name” should be set to the machine name of the PC that drives the associated display as defined by the geometry of the “Plane” object that this scripts references. For example, if one machine in your setup drives a front wall, the Projection Plane script on the “Frontcam” object’s “Machine Name” variable should be set to that machine’s name. If another machine drives a floor wall, the Projection Plane script on the “FloorCam” object should be set to the floor machine. In situations where a single machine drives several walls, just set each “Machine Name” variable to that same machine name.
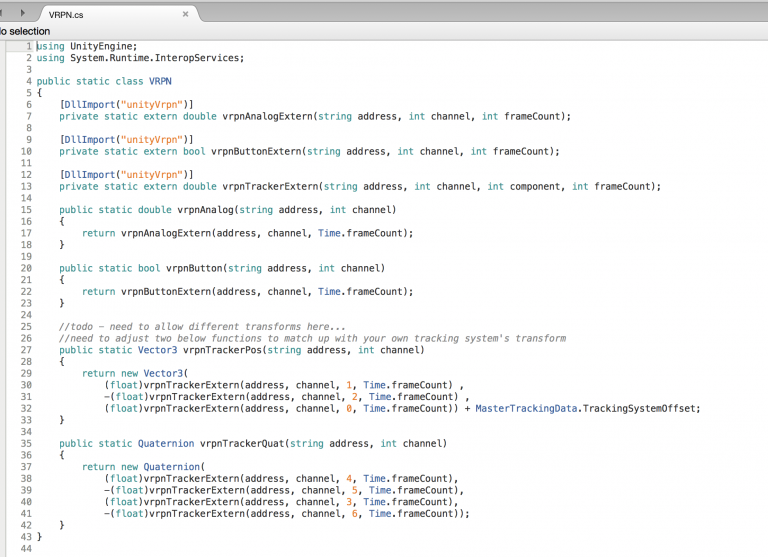
Next some adjustments need to be made within the VRPN.cs script inside of the Scripts folder. The two functions vrpnTrackerPos and vrpnTrackerRot should be adjusted to reflect the transformation from your tracking system to Unity’s world space (z in/out, y up/down, x left/right). Any sort of tracking system offset from your CAVE can be done in the vrpnTrackerPos function while any rotation can be done in vrpnTrackerRot. Our system’s default values may work, but probably not.
After adapting the UniCave Plugin to your scene, you are ready to build the executable. The plugin currently supports Windows and Linux compilation. 32 or 64 bit compilation is supported for either OS. Before building your scene, there are some Player Settings configurations that should be set for correct functionality of the plugin.
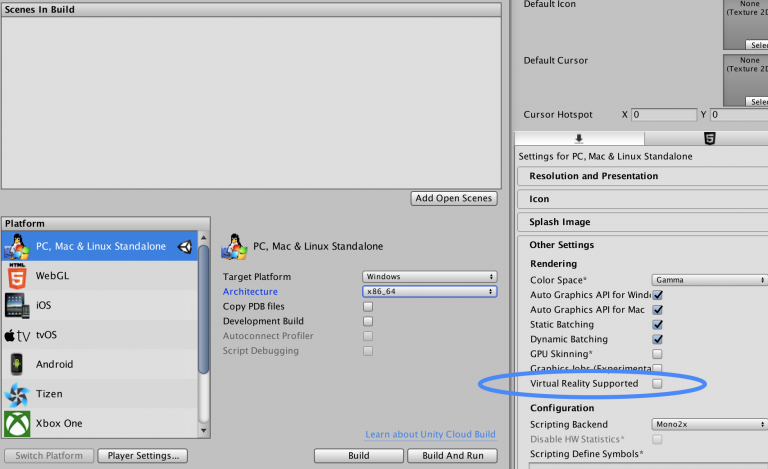
Under “Player Settings”, in the “Other Settings” tab, a check box “Virtual Reality Supported” exists.
If you are compiling the project for a quad-buffered sequential stereo display setup, check “Virtual Reality Supported” and add “Stereo Display (non-head mounted)” as a stereo type.
If you are compiling the project for a Side-by-Side, Top/Bottom stereo, or Dual Pipe setup, uncheck “Virtual Reality Supported” as you wouldn’t need quad-buffered support.
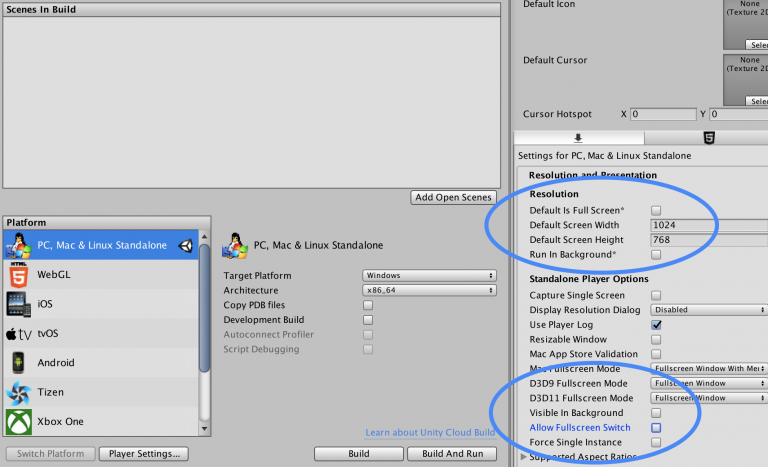
Under “Resolution and Presentation”, uncheck the “Display Resolution Dialog” check box to prevent any popup of the dialog on clustered machines. Uncheck “Default is Full Screen”, as well as “Run in Background”. Under Default Resolution – enter the resolution of one machine of your system. So if you are running one system with multiple displays, enter the total resolution of the system. If you are running a cluster, enter the desktop resolution of one machine in the cluster (if the system has several different resolutions across the machine, this can be taken care of in some run-time flags as described below). Also uncheck “Visible in Background”, “Allow Fullscreen Switch”, and “Force Single Instance”.
When running the exe via your launcher tool for your system, consider adding the “-popupWindow” flag to the command line arguments – this will remove any window title from the application. Also, the “-logFile ” will generate a Unity log file to help with debugging in case something goes wrong. With Unity 5.5 +, it is suggested to supply the “–screen-fullscreen 0” as a command line argument. 4. In Linux, without this run-time flag the system will assume full screen (even when un-checking “Default is Fullscreen” in the Player Settings. In Windows, certain scenes have shown to behave incorrectly without this flag (when running a dual pipe setup with 2 GPUs, certain executions of the particular application were opening minimized)
Supporting OpenGL quad-buffered stereo builds in versions of Unity < 5.4: If you happen to be using a version of Unity prior to 5.4, some of the “Virtual Reality Supported” options may be absent (i.e. no ability to select “Stereo non-head mounted”. It is still possible to obtain quad-buffered stereo via the UniCAVE plugin. Take the packaged “GLQBStereo.dll” and “OpenGL32.dll” files and place them in the same directory as your exe. In addition, open the “config.ini” file and change the “NumViewports” option to match the number of stereo viewports you have in your scene per machine. I.e. if you run 4 stereo walls on a single machine, set this value to 8. Finally in the packaged “gliConfig.ini” file, scroll all the way to the bottom to the “PluginData” section. Change the BaseDir to the directory of your exe. Copy the .ini files plus the “GLFunctions” directory to the location of the exe as well. DirectX quad-buffered stereo is not supported by the UniCave plugin prior to Unity version 5.4.
The easiest method to make your own immersive projection setup is to first see if any of the included prefabs in the unitypackage resemble your system. If so, follow the steps above to modify the system appropriately. If not, please see the guide at https://unicave.discovery.wisc.edu/documentation/creating-a-custom-prefab/ for a step-by-step tutorial on making your own immersive projection display prefab.