Flashing a new bootloader
In general, you should never have to reflash the Bootloader on a Keyboardio Model 01. But, sometimes "should never have to" becomes "absolutely must"
- Keyboardio Model 01 (prototype)
- MicroUSB cable
- Phillips screwdriver
- Arduino Micro
- 6 strands of female-to-female DuPont wire
- A computer running The Arduino IDE 1.6
We're going to use the Arduino Micro as a circuit programmer for the Model 01. To do this, we'll flash a special sketch onto the Micro and then use that to rewrite the bootloader on the Model 01.
Follow the instructions in the Readme.
- Connect your Arduino Micro to your computer with the MicroUSB cable
- Start up the Arduino IDE on your computer
- Open this sketch in the Arduino IDE: https://raw.githubusercontent.com/obra/KeyboardioModel01TestPlan/master/firmware/src/ArduinoISP/ArduinoISP.ino
- Flash the sketch to the Arduino Micro
-
Disconnect your Model 01 from the computer
-
Place a towel on your work surface. The keys on the Model 01 prototypes have somewhat delicate paint and grinding the keycaps into your desk could make some of the paint flake off.
-
Gently place the Model 01 upside down on top of the towel. You don't have to disconnect the two halves of the keyboard from each other or remove the metal center bar.
-
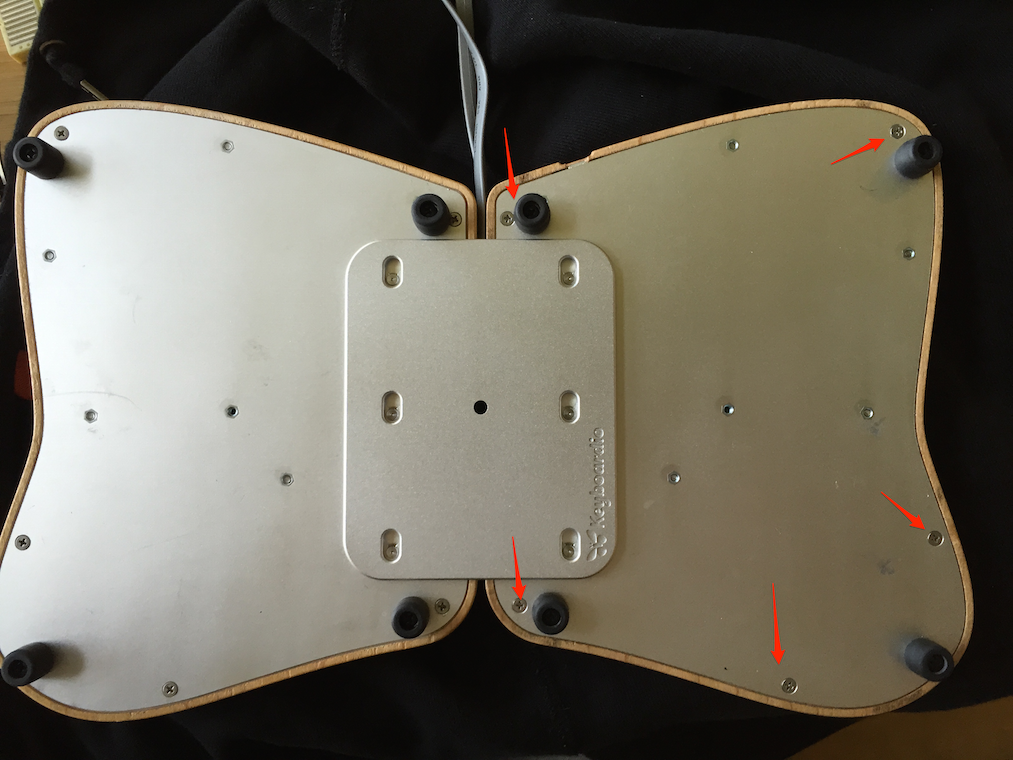
Remove the 5 Phillips screws from the right hand side of the keyboard (as seen from above). If you're not sure you're opening the correct half of the keyboard, make sure you're opening the half with the USB port.
-
Flip the whole keyboard back over, so it's resting on its feet. For now, be careful to hold the wood you just unscrewed in place.
-
Gently grasp the outside edge of the left hand wood enclosure and shake it slightly as you pull up, pushing down on (roughly) the Function and D keys to start to pop the wood top off.
-
As you remove the wood, make sure the interhand-connection RJ12 jack isn't stuck to the wood. If it is, tug down on the black jack. (Never grab that jack by its wires.) If it won't budge, drop email to team@keyboard.io.
-
Set the wood enclosure and screws aside.
On the edge of the Model 01, you'll see a six pin header:
You'll need your six strands of Female-Female DuPont cable. The exact colors don't matter, but here, we'll use Red, Orange, Yellow, Black, Grey and White.
On the Model 01, plug the Yellow, Orange and Red wires into the top row of the two row 6 pin ICSP connector as pictured:

Also, on the Model 01, plug the Black, White and Grey wires into the bottom row of pins on the ICSP connector. The red wire should be next to the black wire, the white wire should be next to the orange wire and the grey wire should be next to the yellow wire.

Next, you'll plug the 6 wires into the Arduino Micro you configured as a programmer in an earlier step.
Five of the wires will be plugged into the 6 pin ICSP connector on the top of the board. The sixth will be plugged into pin 10 on the bottom of the board.
With the 6 pin connector side of the board up and the USB connector facing away from you, slide the grey wire onto the top left pin. Plug the yellow wire onto the top right pin Plug the white wire onto the middle left pin. Plug the Orange wire onto the middle right pin. Plug the Red wire onto the bottom right pin. The bottom left pin should be empty.
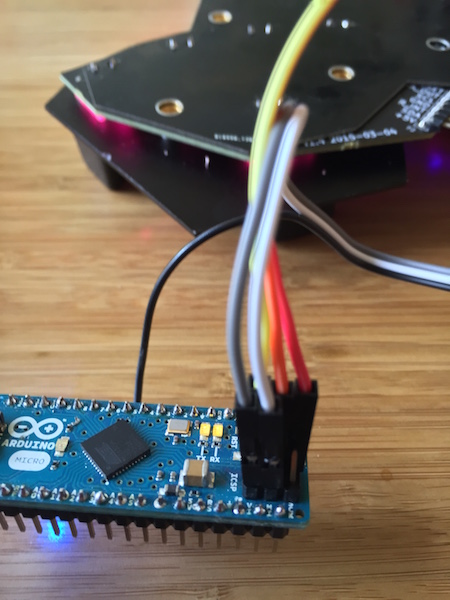
Plug the Black wire onto Pin #10 on the bottom side of the board.

- Connect the Arduino Micro to your computer with the MicroUSB cable.
- If it's not already running, launch the the Arduino IDE
- Select "Keyboardio model 01" from the "Boards" menu in the "tools" menu.
- Select "Arduino as ISP" from the "Programmer" menu in the "tools" menu.
- Select "Burn Bootloader" from the Tools menu.
If, after 3 minutes, the Arduino IDE doesn't report "Done burning bootloader", contact team@keyboard.io for more help.
Your Model 01 should now have the latest bootloader, but no keyboard firmware.
- Disconnect the 6 pin ICSP cable from the left half of your Model 01.
- Connect the MicroUSB cable to your Model 01.
- Follow the 'regular' flashing instructions: [Flashing the firmware]
- Type something. Be sure to hit keys on both hands.
If everything looks good, it's time to reassemble your Model 01.
-
Gently slide the wood enclosure back down on top of the left hand side of your keyboard. Pay particular attention to the black RJ12 connector and the wires feeding into it. Make sure not to crush any of the wires as you slide the enclosure down.
-
Flip your Model 01 over so that the keys are resting on the towel that's still on your work surface.
-
One by one insert the screws you removed from the enclosure during disassembly, tightening each only enough that it grabs hold on the enclosure.
-
Once all screws are started, tighten each of them. They should end up tight, but no so tight that they're hard to remove. Don't use an electric screwdriver.
All done!